Eating a varied, plant-forward diet doesn’t mean sacrificing protein. While legumes and soy remain primary sources, certain fruits and vegetables can meaningfully boost your intake—adding flavor, fiber, and essential nutrients to every meal.
Main Takeaway: While fruits and vegetables are not primary protein sources, certain varieties can meaningfully supplement daily intake when paired with legumes, nuts, or soy products. This guide presents verified protein values and clear recommendations to enhance your plant-forward diet.
Table of Contents
Why Include Protein-Rich Produce?
Fruits and vegetables supply vitamins, minerals, fiber, antioxidants, and water. Incorporating those higher in protein can help meet daily requirements—especially in vegetarian and flexitarian diets—without relying solely on animal products.
Top Protein-Rich Fruits
1. Dried Figs
100 g of dried figs provide 3.3 g of protein. Their concentrated nutrient profile—alongside fiber and minerals—makes them a convenient snack or natural sweetener in yogurts and granola.
2. Coconut (Pulp)
The edible white flesh of coconut delivers 3.0 g of protein per 100 g. Rich in dietary fiber and medium-chain triglycerides, it also exhibits antimicrobial and anti-inflammatory properties.
3. Avocado
At 2.0 g of protein per 100 g, avocado is notable for its monounsaturated fats, which support heart health and may aid in weight management.
4. Passion Fruit
With 2.2 g of protein per 100 g, passion fruit is a tropical option that also provides vitamin C and dietary fiber.
5. Black Currants
Black currants (and similar berries) contribute about 1.4 g of protein per 100 g, plus antioxidants like anthocyanins, supporting eye health and reducing inflammation.
Top Protein-Rich Vegetables
1. Brussels Sprouts
These cruciferous buds offer 3.5 g of protein per 100 g, along with vitamins C and K, folate, and fiber.
2. Spinach
Fresh spinach provides 2.9 g of protein per 100 g, plus lutein and zeaxanthin, which protect eye health.
3. Broccoli
Raw broccoli supplies 2.8 g of protein per 100 g, in addition to vitamin C and sulforaphane, a compound linked to cancer prevention.
4. Asparagus
Asparagus delivers 2.2 g of protein per 100 g, along with folate and antioxidants that may help regulate blood pressure.
How to Use This Information
These fruits and vegetables should complement, not replace, primary protein sources. To ensure complete protein intake, combine them with:
Legumes (chickpeas, lentils)
Soy products (tofu, tempeh)
Whole grains (quinoa)
For detailed nutrient values and serving suggestions, reference the USDA FoodData Central database.
How to Maximize Plant Protein
Combine these fruits and vegetables with complementary sources—such as chickpeas, lentils, tofu, tempeh, and quinoa—to ensure you obtain all essential amino acids.
Thoughtful meal planning can turn any salad, smoothie, or side dish into a protein-powerhouse.
Everyone has attempted the at home fitness ‘program’ at some point and if you are reading this, you probably know what a squat is, you‘ve done a youtube work out at some time in your life, you have been through the third week dip; where the ‘newness’ subsides and the exercises quietly disappear.
This is a step by step, levels based system of designing your home workouts that truly makes progress, whether you haven‘t worked out in a while, are starting from scratch, or are just trying to get over that burning and discouraging plateau that has been holding you back for months.
Table of Contents
Quick-Start Summary
A complete workoutfocuseson all four pillars: strength, cardio, flexibility, and balance.
Find the appropriatestartinglevelthatisindicatedbyyour self, assessment, before you workthrough a plan.
Progressive overload,istraininggettingprogressivelyharder with every training block, keeps the results coming anddoesn‘tgive way to stagnation.
Most people see visible changes around weeks 6–8; earlier improvements are mostly strength, energy, and sleep improvements.
The main reason home workouts fail is lack of progression structure, not lack of willpower.
What a Complete Home Fitness Routine Actually Includes
A complete home fitness routine is a weekly schedule. It consists of a program of strength, cardiovascular, flexibility, and balance exercises (performed in the home, with or without equipment), which will progressively increase in intensity every several weeks to avoid adaptation.
Most routines people abandon only cover one or two of those pillars. That is the first structural reason they stop working.
The 4 Pillars and How Much of Each You Need Per Week
The WHO Physical Activity Guidelines calls for a minimum of 150 minutes of moderate intensity aerobic activity (or 75 minutes of vigorous aerobic activity) each week and muscle strengthening activities involving the major muscle groups on at least two days. While not have official time minimums, flexibility and balance activities are important for everyone, especially over the age of 40 and those who are sedentary at work.
In practical terms, for a five-day routine, this looks like:
Strength training: 2–3 sessions per week targeting different muscle groups.
Cardiovascular training: 2–3 sessions of moderate to vigorous intensity (20–45 minutes).
Flexibility/mobility: 10–15 minutes at the end of each session, or one dedicated session.
Balance work: Integrated into strength sessions or as a standalone 10-minute block.
Why Most Home Routines Fail After Week 3
The answer is usually one of three things: no progressive structure (doing the same workout on repeat), no clear goal alignment (exercising vaguely “to get fit”), or an environment that makes stopping easier than starting. All three of these are solvable — and each is addressed in this guide.
Assess Yourself Before You Start
The single most common mistake in building a home fitness routine is skipping the self-assessment stage and jumping straight to an exercise plan that was designed for someone else.
Beginner, Intermediate, or Ready to Revamp?
You are a beginner if:
You have been inactive for six or more months.
You get breathless climbing two flights of stairs.
You have never followed a structured training plan.
You are intermediate if:
You exercise somewhat regularly but without a structured programme.
You can complete 10 push-ups, 15 bodyweight squats, and a 20-minute brisk walk without stopping.
You have some equipment at home but are not using it consistently.
You are ready to revamp if:
You have been following roughly the same routine for more than eight weeks.
Your weight, measurements, or fitness markers have stopped changing.
You are completing your workouts but they feel noticeably easier than they did initially.
Use the relevant section below as your starting point. You do not need to read all three.
Equipment Inventory — It Changes What You Should Do
Take two minutes to list what you actually have at home. Common options include:
No equipment — bodyweight only.
Resistance bands (loop or tube).
A set of dumbbells (fixed or adjustable).
A yoga mat.
A treadmill, stationary bike, or rowing machine.
A pull-up bar.
Your equipment inventory determines your progression ceiling. Bodyweight training is effective, but it has a natural limit for strength development without added resistance. If you have bands or dumbbells, your programme should use them.
Goal Mapping — Aligning Your Routine to Your Actual Objective
Different goals require different programme emphasis:
Use this quick guide to jump to the right section for you:
Just starting + no equipment → Go to “The Beginner Home Fitness Routine.”
Have equipment, tried routines before → Go to “The Intermediate Home Fitness Routine.”
Was consistent, now plateaued → Go to “How to Revamp a Stale Home Fitness Routine.”
Have treadmill/bands/dumbbells → Go to “Home Fitness Routine With Equipment.”
Who This Routine Is For
This guide suits you if you are an adult (18–65) in general good health who wants to build a sustainable, progressive home training habit — whether you are starting from scratch, returning after time off, or trying to break through a plateau.
Who Should Approach This With Caution
Seek medical advice (from your doctor or a physiotherapist) first if you have a cardiovascular problem, a joint injury or an ongoing health problem which affects the amount you can easily exercise. Pregnant women and women in the first few weeks after giving birth should not follow training programmes but should seek medical advice in relation to this. If you have ever struggled with “disordered eating” or “over, exercising”, access to a clinical exercise physiologist or therapist should be included in the development of your programme.
The Beginner Home Fitness Routine (Weeks 1–4)
Beginner routines focus on simple full-body moves done consistently.
This phase builds the movement foundation. The goal is not to exhaust yourself — it is to establish consistency, correct basic movement patterns, and prepare your joints and connective tissue for higher-intensity work in the next training block.
Weekly Schedule Template
Day
Session Type
Duration
Monday
Full-body strength (bodyweight)
30 min
Tuesday
Low-intensity cardio (walk or cycle)
25–30 min
Wednesday
Rest or gentle mobility
15 min
Thursday
Full-body strength (bodyweight)
30 min
Friday
Moderate cardio (brisk walk / light jog)
30 min
Saturday
Active recovery (stretching, yoga)
20 min
Sunday
Full rest
—
Beginner Exercise List — Sets and Reps
Strength sessions (perform as a circuit, 2–3 rounds):
Bodyweight squats — 3 × 12
Modified push-ups (knees down if needed) — 3 × 8–10
Warm-up (5–7 minutes before every session): leg swings, arm circles, hip circles, marching in place, cat-cow stretch.
Guides from organisations such as the Mayo Clinic also recommend 5–10 minutes of lighter movement and dynamic stretching to prepare your muscles and joints before more intense exercise.
Cool-down (5–10 minutes after every session): standing quad stretch, seated hamstring stretch, pigeon pose, child’s pose, doorway chest stretch.
What Progress Looks Like at Week 4
By the end of this block, you should notice push-ups becoming easier, your resting heart rate a little lower, and post-workout soreness reduced compared to week one. This is the adaptation signal — your body is ready for more stimulus.
The Intermediate Home Fitness Routine (Weeks 5–12)
Adding bands or dumbbells helps you keep progressing beyond the beginner phase.
By this stage, true beginner-level workouts no longer provide enough stimulus for meaningful adaptation. This is when most people plateau — not because they are doing something wrong, but because their programme has not evolved.
The warm-up and cool-down protocol outlined in the beginner section applies at all training levels — do not skip it as intensity increases.
Introducing Progressive Overload at Home
This is the basic idea behind ALL effective training programs: overloading your muscles constantly over time (reps, sets, load, rest, exercise variation etc) so your musculature continues to adjust to the new level.
At home, you apply progressive overload through five mechanisms:
Increasing reps — from 10 to 12 to 15 per set.
Increasing sets — from 2 to 3 to 4 rounds.
Reducing rest time — from 90 seconds to 60 to 45.
Progressing the movement — from modified push-up → standard push-up → decline push-up.
Adding resistance — introducing bands or dumbbells where bodyweight no longer challenges.
Intermediate Weekly Schedule — Introducing Split Training
Day
Session Type
Duration
Monday
Upper body strength (bands/dumbbells)
40 min
Tuesday
Cardio intervals (HIIT or brisk walk/jog)
25–30 min
Wednesday
Lower body and glutes
40 min
Thursday
Active recovery or mobility
20 min
Friday
Full body strength + core
40 min
Saturday
Moderate cardio
35–40 min
Sunday
Full rest
—
Resistance Band and Dumbbell Incorporation
Guidance from major strength and conditioning organisations supports resistance band training as a viable alternative to free weights for building strength at home when effort and volume are matched.
Upper body additions with bands or dumbbells:
Dumbbell shoulder press — 3 × 10
Resistance band pull-apart — 3 × 15
Dumbbell bicep curl — 3 × 12
Tricep overhead extension (dumbbell or band) — 3 × 12
Lower body additions:
Romanian deadlift (dumbbells) — 3 × 10
Banded lateral walk — 3 × 15 each direction
Bulgarian split squat (bodyweight or dumbbells) — 3 × 8 each leg
Banded glute bridge — 3 × 15
Supporting Your Routine With Food (Callout)
Aim for roughly 1.2–1.6 g of protein per kilogram of bodyweight per day to support muscle repair and growth.
Drink water regularly throughout the day, and especially before and after workouts, to support performance and recovery.
Eat a light pre-workout snack (for example, fruit plus some protein) 60–90 minutes before harder sessions to maintain energy.
Base your main meals around lean protein, whole grains, vegetables, and healthy fats to keep energy stable.
How to Revamp a Stale Home Fitness Routine
Revamping a home fitness routine means applying structured changes to volume, intensity, variety, or frequency — rather than starting over — to force new adaptation after a plateau.
This section is for people who have been training consistently but have stopped seeing results. A plateau after a few training blocks is normal — it is your body’s sign of adaptation, not failure.
The warm-up and cool-down protocol outlined in the beginner section applies at all training levels — do not skip it as intensity increases.
Signs Your Routine Has Stopped Working
Workouts feel noticeably easier than they did six to eight weeks ago.
Weight or body measurements have not changed in three or more weeks despite diet consistency.
You feel little or no muscle fatigue after sessions that used to challenge you.
Your motivation has dropped — partly because you are not seeing results.
The 4 Revamp Levers
Apply the same progressive overload principles covered in the intermediate section, using the four levers below.
Lever 1 — Volume: Add one additional set to each exercise, or add one additional training day.
Lever 2 — Intensity: Increase weight, choose a harder exercise variation, or reduce rest periods.
Lever 3 — Variety: Swap one or two exercises per session for different movements that hit the same muscle groups differently (secondary to volume and intensity changes).
Lever 4 — Frequency: Shift from full-body sessions to split training (upper/lower), or add a second session for a lagging area.
Before vs After Revamp — Sample Weekly Schedule
Day
Stale Routine
Revamped Routine
Monday
Full body (same circuit)
Upper body strength — progressive overload applied
Tuesday
30 min walk
HIIT intervals — 20 min
Wednesday
Rest
Lower body — split introduced
Thursday
Full body (same circuit)
Active recovery + mobility
Friday
30 min walk
Full body strength — new exercise variations
Saturday
Rest
Steady-state cardio + core
Sunday
Rest
Rest
Home Fitness Routine With Equipment — Making the Most of What You Have
One of the biggest gaps in most home fitness content is the assumption that everyone is training with zero equipment. If you have a treadmill, stationary bike, resistance bands, or dumbbells at home, your programme should reflect that.
Treadmill-Based Cardio Protocols
Rather than steady-speed walking, you can use interval protocols for greater cardiovascular and metabolic benefit in less time, adjusting all speeds to your fitness level and any medical advice you have.
Beginner interval: 2 minutes walk at an easy pace, 1 minute faster. Repeat 6–8 times.
Day A (Push): Dumbbell press, shoulder press, tricep extension, lateral raise.
Day B (Pull): Bent-over row, bicep curl, single-arm row, rear delt fly.
Day C (Lower): Goblet squat, Romanian deadlift, lunges, calf raise.
No Equipment — Bodyweight Progression System
If you have no equipment, progression still follows the same principles using harder movement variations:
Movement
Beginner
Intermediate
Advanced
Push pattern
Modified push-up
Standard push-up
Decline push-up
Squat pattern
Bodyweight squat
Jump squat
Pistol squat (assisted)
Hip hinge/glutes
Glute bridge
Single-leg bridge
Elevated hip thrust
Core
Plank 20 sec
Plank 45 sec
Plank with shoulder taps
Staying Consistent — The Habit Architecture of Home Workouts
Tracking your sessions helps turn your home workouts into a lasting habit.
Motivation gets you started. Systems keep you going. Research on habit formation, including work led by Dr Phillippa Lally and others, suggests that habit automaticity takes on average around 66 days to develop — not the commonly repeated 21 days, and with substantial variation between people. In her discussion of this work, Dr Pippa Lally from the University of Surrey emphasises that while the average was 66 days, individuals in the original study took anywhere from 18 to 254 days to form a habit, showing how variable the process can be.
Your routine needs to be designed to survive long enough to become a habit.
Why Motivation Fails and What Replaces It
Motivation is emotion-dependent. It rises when you feel good and drops when you are tired, stressed, or busy — which is precisely when you need the routine most. The replacement for motivation is identity anchoring (“I am someone who trains three times per week”) and environmental design.
Environment Design — Making Your Space Work for You
Keep your yoga mat or equipment visible and accessible, not stored away.
Set a fixed workout time and protect it like a meeting.
In behavioural psychology, reducing friction — the small steps between intention and action — is one of the most reliable ways to make habits stick. Designing your environment so that exercise is the easiest option (and skipping requires more effort) supports consistency without relying on constant willpower.
Accountability Systems That Actually Work
Track every session in a simple notebook, spreadsheet, or app — completion creates momentum.
Share your weekly plan with one person who will notice if you skip.
Use implementation intentions: “I will work out on Monday, Wednesday, and Friday at 7 AM in the living room” — this kind of “if–when–where” plan significantly boosts follow-through.
Recovery — Why Rest Days Are Productive Days
Sleep and recovery are where your body actually adapts to the work you do.
Aim for about 7–9 hours of sleep per night to support muscle repair, hormone balance, and performance.
Rest days allow muscle protein synthesis and connective tissues to recover so you can come back stronger.
Watch for signs of overtraining: persistent fatigue, declining performance despite effort, and an elevated resting heart rate over several mornings — all cues to back off and recover.
How to Handle Missed Days Without Losing Momentum
Missing one session is normal. Missing two in a row is the beginning of a broken habit. The rule: never miss twice in a row. When you return after a missed day, do not attempt to compensate by doubling the session — just return to your scheduled workout as normal.
Tracking Progress Beyond the Scale
The scale is a single, easily misread data point. Strength training can increase muscle while you lose fat, so weight may stay the same while body composition improves. Without additional metrics, this can look like failure.
Metrics That Actually Signal Progress
Metric
How to Track
How Often
Body measurements
Tape measure (waist, hips, arms, thighs)
Every 2 weeks
Strength benchmark
Max push-ups, squat reps at bodyweight
Monthly
Resting heart rate
Morning measurement, same time daily
Weekly average
Energy and sleep
Subjective 1–10 rating in a journal
Daily
Scale weight
Morning, post-bathroom, before eating
Weekly average
Results Timeline — What to Expect
Timeframe
What to Expect
Week 1–2
Improved sleep and mood; soreness reduces as your body adjusts.
Week 3–4
Measurable strength gains begin; daily energy often improves.
Week 6–8
Visible body composition changes commonly start with consistent training and nutrition.
Month 3+
Plateau risk rises — this is the time to reassess and apply the revamp levers.
Free fitness tracking apps can simplify this process — any tool that logs your workout date, exercises, and sets or reps is enough.
When to Adjust Your Routine
Reassess and adjust roughly every training cycle. If two or more of these are true, it is time to change something:
Scale and measurements unchanged for three or more consecutive weeks.
Strength benchmarks not improving.
Energy levels declining despite consistent sleep.
Workouts feel too easy to complete.
Common Home Fitness Routine Mistakes to Avoid
Skipping warm-ups — see the beginner section for a simple warm-up that applies at every level.
Doing the same workout indefinitely — the Revamp section shows how to adjust volume, intensity, variety, and frequency.
Measuring success only by the scale — the Progress Tracking section explains better metrics to watch.
Going too hard too early. Excessive soreness and fatigue in week one leads to skipped sessions in week two; build progressively.
Not eating enough protein. Training stimulus without adequate protein means the muscle repair signal has limited raw material; the 1.2–1.6 g/kg/day range suits most active adults.
Neglecting recovery. Treat rest, sleep, and stress management as part of your plan, not an afterthought.
Final Verdict — What Actually Makes a Home Fitness Routine Work
The difference between a home training plan that works and one that quietly disappears is not willpower — it is structure, progression, and environment.
Start at your actual level. Apply progressive overload every training block. Use the equipment you have, not the plan written for someone with none. Track the right metrics. Protect two things above all else: consistency and recovery.
A well-designed home fitness routine built around these principles will usually outperform a gym membership used irregularly.
Frequently Asked Questions
How many days a week should I work out at home?
Three to five days per week is the optimal range for most adults, depending on your schedule and recovery. Beginners should start with three sessions, allowing full recovery between each; intermediate and advanced trainees can extend to four or five, provided at least one full rest day and one active recovery day are included.
Can I build muscle with a home fitness routine?
Yes — training at home builds muscle effectively when progressive overload is applied consistently and protein intake is around 1.2–1.6 g per kilogram of bodyweight per day. Bodyweight training builds muscle effectively up to an intermediate level; beyond that, added resistance through bands or dumbbells significantly extends your development ceiling.
How long before I see results from a home fitness routine?
Most people notice improved energy and sleep quality within two to three weeks. Visible body composition changes typically begin around weeks six to eight of consistent training, depending on nutrition and starting point, while measurable strength gains often appear within about four weeks.
Is a 30-minute home workout enough to see results?
Yes, for most fitness goals at beginner and intermediate levels. Thirty minutes of structured, progressive training three to four times per week consistently outperforms longer, irregular sessions; session quality and programme design matter more than duration.
What is the minimum equipment needed for an effective home fitness routine?
A yoga mat and a resistance band set are the minimum needed for a complete, progressive training plan at home. Dumbbells or an adjustable dumbbell set extend your strength progression ceiling further, and a treadmill or stationary bike can add structured cardio capacity — but bodyweight cardio and outdoor walking can serve the same function.
How do I know when to change my home fitness routine?
Change your routine — or apply the revamp levers (volume, intensity, variety, frequency) — when two or more of these apply: workouts feel noticeably easier than they did several weeks ago, measurements or weight have not shifted in three consecutive weeks, strength benchmarks have plateaued, or motivation has dropped significantly without an external cause. These are signs of adaptation, not failure.
Citation and Methodology
This guide is based on current recommendations from major health organisations and peer‑reviewed research, including global physical activity guidelines and evidence-informed advice on warm-ups, recovery, and habit formation. Exercise principles such as progressive overload, result timelines, and progression strategies are aligned with widely accepted strength and conditioning practice and cross-checked against reputable medical and fitness resources.
About Health4fitnessblog.com
Health4fitnessblog.com content is written to be practical and easy to understand across topics like health, technology, business, marketing, and lifestyle. Articles are based mainly on reputable, publicly available information, with AI tools used only to help research, organise, and explain topics more clearly so the focus stays on real‑world usefulness rather than jargon or unnecessary complexity.
Disclaimer
The information in this article is for general educational purposes only and is not a substitute for professional medical advice, diagnosis, or treatment. Always consult a qualified healthcare provider before starting, changing, or intensifying any exercise or nutrition programme, especially if you have any medical condition, are pregnant, or are taking medication.
Active Kids Indoor Activities: 40+ Energy-Burning Ideas for Every Age (2026 Guide)
It’s raining. Your kids have been inside since 9 a.m. The couch is a trampoline, the hallway is a racetrack, and you’ve already heard “I’m bored” eleven times. Sound familiar?
Finding active kids indoor activities that actually burn energy — without destroying the house or requiring a trip to the craft store — is one of the genuinely hard parts of parenting. Most lists hand you 50 ideas and leave you to figure out which ones work in a 700-square-foot apartment with a noise-sensitive downstairs neighbour.
This guide is different. Every activity here is sorted by age group, space requirement, and cleanup difficulty — so you can find the right one in under two minutes. We’ve also included the developmental reason each activity matters, because “fun” is great, but knowing why it works makes you a more confident parent.
Table of Contents
Quick Answers
How much activity do kids need? → The CDC recommends 60 minutes of moderate-to-vigorous activity daily for children aged 6–17.
Best for small spaces? → Simon Says, Freeze Dance, Tape Hopscotch — zero footprint, high energy output.
Best for toddlers (2–4)? → Pillow obstacle courses and animal walks.
Best for school-age (5–10)? → Scavenger hunts, balloon volleyball, yoga challenge cards.
Best for tweens (11+)? → Dance cardio, resistance band workouts, DIY obstacle course.
No equipment needed? → Yes — at least 20 activities here require nothing beyond what’s already in your home.
Why Active Kids Indoor Activities Actually Matter
Active kids indoor activities are structured or unstructured physical play designed to develop gross motor skills, burn excess energy, and support cognitive function — all within the home. They work by engaging large muscle groups (legs, core, arms) through movement patterns like jumping, crawling, balancing, and throwing.
But here’s what most activity lists skip entirely: movement isn’t just about burning energy. It’s about brain development.
According to the CDC’s research on physical activity benefits for children, regular physical activity in kids is directly linked to improved academic performance, better sleep quality, reduced anxiety, and stronger concentration. The brain and body aren’t separate systems — especially in children under 12.
And the stakes are higher than most parents realise. Data from a CDC review found that approximately 50.4% of teens now report 4 or more hours of daily screen time, with high screen-time users significantly more likely to have low physical activity levels. Indoor movement breaks aren’t a luxury. They’re a counterbalance.
The Science Behind “Gross Motor” Play
Gross motor skills are large-scale movements using the body’s major muscle groups: running, jumping, climbing, throwing, balancing. These skills develop rapidly between ages 2 and 10, forming the physical foundation for everything from handwriting to sports to self-regulation.
Pediatric therapists also emphasise proprioceptive input — the sensory feedback muscles and joints send to the brain during heavy physical work. Activities like wheelbarrow walks, bear crawls, and carrying weighted items provide deep proprioceptive input. Research in occupational therapy consistently links this to calmer, more focused behaviour in children.
In plain language: a child who has had a good bout of physical activity is neurologically better prepared to sit still and concentrate. That’s the real payoff.
High-, Medium-, and Low-Energy Indoor Play Framework
When you’re stuck inside all day, it helps to think in terms of energy levels instead of random ideas. Matching an activity to your child’s current energy level makes it far more likely to work — and last.
High-energy (bounce-off-the-walls mode):
Obstacle courses
Dance parties and freeze dance
Relay races and pillowcase races
Indoor “snowball” fights with rolled-up socks or paper
Medium-energy (active but controlled):
Balloon volleyball / balloon keep-it-up
Indoor bowling and target toss
Scavenger hunts
Animal walk races
Calm-but-active (wind-down movement):
Kids yoga and stretching
Balance/tightrope walk on tape
Fort building and crawling
Use this: start with one high-energy activity to burn off steam, follow it with a medium-energy game, then finish with a calm-but-active option to ease into the next part of the day.
Active Kids Indoor Activities by Age Group
Toddlers (Ages 2–4): Big Movement, Small Risk
Safe indoor movement activities for toddlers
Toddlers need movement that is safe, repetitive, and sensory-rich. They don’t need rules — they need space to explore. Focus on activities that build balance and coordination without injury risk.
Top picks for toddlers:
Pillow Obstacle Course — Stack couch cushions and pillows into tunnels and towers. Crawl through, climb over, roll off. Zero cleanup, maximum engagement.
Animal Walks — Bear crawl, crab walk, frog jump, snake slither. Call out an animal and let them move across the room. Great proprioceptive input, no equipment required.
Balloon Keep-Up — Blow up a single balloon and keep it off the floor. Toddlers can play solo or with a parent. No sharp edges, soft landing.
Dance Freeze — Play music, pause it randomly. Freeze when it stops, dance when it starts. Develops body awareness and auditory attention.
Indoor Bubble Chase — Blow bubbles and have the toddler pop them. Combines movement, visual tracking, and fine motor coordination.
Space needed: Any room with cleared floor space. Cleanup rating: ★☆☆ (minimal to none)
Early School Age (Ages 5–8): Rules, Roles, and Repetition
Children in this age group are ready for simple structured games with clear rules. They want to win, they want fairness, and they want to do it again. Repetition is learning at this stage.
Top picks for ages 5–8:
Indoor Scavenger Hunt — Write clues on index cards and hide them around the house. Each clue leads to the next. Running, reading, and problem-solving, all in one.
Balloon Volleyball — Tie a piece of string between two chairs. Hit the balloon over the “net.” Teaches hand-eye coordination and turn-taking.
Hopscotch with Painter’s Tape — Create a grid on the floor. Peel it off cleanly when done — no residue, no damage.
Simon Says (Movement Edition) — Classic game, but focus purely on physical commands: “Simon says do 10 jumping jacks,” “Simon says balance on one foot for 5 seconds.”
Yoga Challenge Cards — Draw or print simple pose cards. Kids take turns drawing a card and holding the pose for 10 seconds. Balance, flexibility, laughter.
Indoor Bowling — Line up empty plastic bottles or toilet paper rolls. Use a soft ball. Score it like real bowling.
Space needed: Living room or hallway. Cleanup rating: ★★☆ (minor — tape, scattered items)
Older Kids (Ages 9–12): Challenge, Competition, and Creative Play
Challenging indoor activities for older kids
Kids in this range want challenge and autonomy. They’re motivated by personal bests, friendly competition, and creative control. Give them structure with room to improvise.
Top picks for ages 9–12:
DIY Obstacle Course — Use furniture, tape-marked zones, cushion tunnels, and hallway markers. Time each attempt. Kids will run it 15 times trying to beat their record.
Just Dance / Dance Cardio — Free YouTube dance cardio routines exist for every level. 20 minutes equals a real workout at this age.
Resistance Band Exercises — Basic sets cost under $15 and are safe for pre-teens. Squats, rows, and shoulder press can all be done in a bedroom.
Stair Exercises — Step-ups, timed circuits up and down. Turns any multi-level home into a free gym. Monitor form to avoid trips.
Floor is Lava — Define lava zones, assign safe islands (cushions, rugs). Plays longer than you’d expect and requires real physical problem-solving.
Plank and Push-Up Challenge — Set a daily target and track it on a wall chart. Kids this age respond well to visible progress.
Space needed: Varies — most work in a living room or hallway; stair exercises need a staircase. Cleanup rating: ★★☆ (moderate — cushions, rearranged furniture)
Don’t Forget Older Kids and Tweens
Older kids and tweens want activities that feel more grown-up, not babyish. Alongside obstacle courses and fitness challenges, try simple kitchen projects, strategy-heavy board games, or creative hobbies like jewellery or candle making that let them express independence while still spending time with you.
Quick-Reference Activity Table: Space, Age & Cleanup
Some of the best indoor movement ideas are the classics — but with a slightly more active twist.
The Floor is Lava — Scatter pillows, cushions, or towels across the floor. Shout “the floor is lava!” and kids must jump between safe spots without touching the ground. Simple, effective, endlessly entertaining.
Simon Says Fitness — Play the classic Simon Says game, but use exercises as commands: “Simon says do five jumping jacks,” “Simon says hold a plank,” “Simon says crab walk to the door.”
Hide-and-Seek (Active Variations) — Make it more active: when someone is found, they run to a home base instead of just being “out.” Or add a fitness penalty — found players do 10 squats or 5 star jumps before rejoining.
Apartment-Friendly and Small-Space Activities
This is the gap most guides miss completely. Urban parents face real constraints: low ceilings, thin floors, shared walls, limited square footage. The activities below are designed for high energy output with a zero-to-minimal footprint.
Engage Their Brains with Games and Creative Projects
On lower-energy days, mix active play with sit-down options like board games, card games, puzzles, and open-ended building toys such as blocks or Lego. Foster carers can even use part of their allowance from agencies like Fostering People to stock up on simple indoor activities that keep kids engaged without relying on screens.
Use this framework and you’re no longer guessing. That’s the difference between 5 minutes of chaos and 30 minutes of genuinely engaged play.
Common Mistakes Parents Make With Indoor Activities
These aren’t catastrophic errors. But they consistently cut short how long an activity lasts — and how much energy it actually burns.
Setting it all up for them. Kids who help build the obstacle course play it longer. Ownership drives engagement.
Stopping too soon. The first 5 minutes are always the noisiest. Most activities hit their stride at the 10-minute mark once kids understand the rules. Hold the line.
Defaulting to screens too quickly. The first 3 minutes of any screen-free activity feel like resistance. Push through it — kids almost always engage once momentum builds.
Skipping cleanup as a game. “Who can clean up fastest?” is itself a movement challenge. Don’t miss it.
Treating it as age-locked. A 6-year-old and a 10-year-old can play balloon volleyball together with minor rule adjustments. Mixed-age play is developmentally valuable — don’t separate them unnecessarily.
Who These Activities Are For — and Who Should Pause
Well suited for:
Parents and caregivers of children aged 2–12 looking for screen-free, energy-burning options on rainy days, holidays, or winter months
Families in apartments or small homes needing low-impact, low-noise solutions
Parents of high-energy or sensory-seeking children who struggle to settle
Teachers and childcare providers looking for structured indoor movement breaks
Proceed with caution if:
Your child has a recent physical injury — check with your paediatrician before resuming high-impact activities like jumping or stair sprints
Your child has a diagnosed sensory processing disorder — some proprioceptive activities can dysregulate rather than calm without guidance from an occupational therapist
You’re in a space with fragile furniture or hard floors only — clear the activity zone before starting
Not designed for:
Children under 18 months — supervised tummy time and sensory play are more appropriate
Structured athletic training — these are play-based, not programme-based
Final Verdict: The Best Active Indoor Activities for Kids in 2026
No single activity works for every child, every day, in every space. But that’s exactly the problem with most guides — they give you 50 ideas and no framework for choosing.
The best active kids indoor activities match your child’s current state, fit your actual space, and require the least setup. Because the faster you start, the faster they’re moving.
Top 5 for most families:
Pillow Obstacle Course — Toddler to age 8, any space, minimal cleanup
Simon Says (Movement Edition) — Any age, any space, zero equipment
Start with one. Use the developmental framework to choose the right one. And when your child asks to do it again tomorrow — that’s the real measure of success.
Take Learning Outside the Box Indoors
Indoor time is also a chance to follow your child’s curiosity. Let them pick a topic they love and explore it together online, then watch age-appropriate documentaries about nature, science, or history to keep their minds as active as their bodies.
Frequently Asked Questions
Q1: How can I keep my child active indoors when it’s raining all day?
A: Rotate through 3–4 different activity types across the day: start with high-energy (obstacle course or dance cardio), shift to structured (scavenger hunt or bowling), and wind down with calming movement (yoga or slow animal walks). This mirrors the natural rhythm of a school day and prevents overstimulation from a single activity type.
Q2: What are the best gross motor activities for kids at home?
A: The most effective gross motor activities involve whole-body movement: bear crawls, obstacle courses, jumping games, and balance challenges. These develop coordination, strength, and spatial awareness. According to the CDC’s physical activity guidelines, children aged 6–17 need at least 60 minutes of this type of movement daily.
Q3: Are there indoor activities suitable for high-energy kids in a small apartment?
A: Yes. Bear crawl races, crab walks, wall sits, plank holds, and slow-motion challenges are all effective — and produce minimal noise and vibration. Tape a hopscotch grid in the hallway with painter’s tape for a quick, removable option that works in under 10 square feet.
Q4: How much physical activity does my child actually need each day?
A: According to the CDC’s physical activity guidelines for children, children aged 6–17 need at least 60 minutes of moderate-to-vigorous physical activity every day. For children under 6, the guideline is active play throughout the day. Indoor activity breaks count toward this total.
Q5: Do indoor physical activities really help with focus and behaviour?
A: Yes, and the evidence is clear. The CDC’s research on physical activity benefits directly links regular movement to improved academic performance, reduced anxiety, better sleep, and stronger concentration. A 10–15 minute movement break mid-morning or mid-afternoon measurably improves a child’s ability to focus on what comes next.
Q6: What can a 10-year-old do when bored inside without screen time?
A: At 10, kids respond best to challenge and autonomy. Set them up with a timed DIY obstacle course they design themselves, a resistance band workout they can track, a dance cardio session, or an indoor bowling tournament with brackets they score. The key is a tangible goal — a time to beat or a score to chase.
Some people can see objects closer, but far away, objects are a distant blur. This condition is called short-sightedness or myopia. It is a problem that occurs mainly among young adults and children. Myopia occurs in people with incorrect eye shapes. The refracted light of the objects focuses before the retina instead of at the retina.
Table of Contents
See a Doctor
If you have myopia, you might be having difficulty performing tasks correctly, or your vision quality is detracting you from your daily activities. See an eye doctor immediately who can determine the level of your nearsightedness. Most probably, the doctor may prescribe eyeglasses and you can get new eyeglasses tomorrow as it’s so easy and fast when you order online.
Spend Time Outside
Increase the number of your outdoor activities as much as possible. Spending time outdoors during your early adult life and adolescence can decrease the risk of myopia. The ultraviolet ray of the sun changes the structure of the cornea and sclera to maintain a standard eye shape.
Protect Your Eyes
Wear sunglasses while out in the sun because they can shield your eyes from ultraviolet rays and halt the progression of myopia. Make sure you invest in high-quality as some cheap sunglasses can be detrimental to the eye muscles in the long run if worn for too long.
Eat healthy Food
Try to consume plenty of vegetables, fruits, and leafy greens. Your eyes can tremendously benefit if you include fish items, especially salmon, that are high in fatty acids and omega-3 fats. Including these in your daily diet can work wonders for the health of your vision.
Get proper Rest
Try to reduce your eye strain as much as possible. Taking breaks between your computer work by looking far away from screens for 20 seconds is a good strategy. This practice would give your eyes proper rest and can slow the development of short-sightedness.
Get surgery treatment
Sometimes doctors advise you to get laser or lens surgery to improve your eyes. The good thing about such surgeries is that they are permanent solutions that can see you through your lifetime. Laser surgery reshapes the eye, and lens surgery replaces the lenses with artificial lenses. Furthermore, short-sightedness can be a hindrance to professional and personal endeavors, but the Best Laser Eye Surgery in London offers a transformative experience, freeing individuals from the limitations of visual impairment.
Wearing special lens
Depending on your conditions, some opticians may advise orthokeratology, a lens worn overnight. This treatment can help improve your vision without contact lenses or glasses. If this is a suitable option, talk to your optician and see whether it would fit your situation.
Implantable Collamer lens
An implantable Collamer lens, popularly known as ICL, is a soft contact lens implanted in the eyes. It is made of polymeric materials. The lens is embedded in your eyes with a microscopic incision between your iris and your natural lens. It corrects the light refraction so that it falls right on the retina as opposed to before the retina.
The topical medication
Atropine drops are used as topical medication as a treatment for short-sightedness. It’s a prescribed eye drop, and the doses vary from person to person. When you drop them in your eyes, your pupil will dilate. This treatment can be a good treatment for some people.
Wear correct lenses
If worn correctly for the prescribed time frame, the right lenses can optimize and bring your vision to your natural sight. Regular exams are the best way to know whether you use the correct prescription lens. Wearing too weak a prescription can increase the progression of nearsightedness.
Maintain your health
If you have diabetic retinopathy, maintaining your weight and exercising can help not just your weight but also your vision. This condition can hurt the eye’s blood vessels due to the excess sugar circulating in the bloodstream. Check your sugar levels regularly and stay fit to lower the odds of developing short-sightedness.
Smoking is bad
Smoking raises the likelihood of developing short-sightedness. Avoid smoking for as long as you can, or smoke in moderation. The less you smoke, the more you will benefit by easing off the inflammation throughout your eyes, which can prevent age-related eye disorders.
Signs of short-sightedness
If you are experiencing the following, you may be having short-sightedness:
You cannot see distant objects as clearly as you see nearby objects, which affects your normal daily functioning
The vision beyond a certain peripheral point seems blurry but gets more apparent as you come close to those objects
You often partially shut your eyes or squint to see things, especially if they are far away
You get migraines and headaches often due to eyestrain caused by a hard day’s work
It is difficult for you to see things clearly while driving or have trouble reading signs at night
An ophthalmologist or an optometrist can quickly diagnose any of the above symptoms. Your eye professional will also consider your other health aspects and advise you on the right way forward. You may have to get surgery, a pair of contact lenses or eyeglasses to correct your short-sightedness.
If you’re noticing any of these symptoms or are unsure whether your vision has changed, it might be time to consult a professional. Thankfully, there are local opticians who do home visits, making it easier than ever to get your eyes checked without needing to travel.
You know the drill. You climb into bed exhausted, close your eyes — and your brain decides now is the perfect time to replay every conversation from the last decade. Hours pass. The alarm looms.
If this sounds familiar, you’re not alone. According to CDC’s sleep guidelines for adults, more than a third of U.S. adults regularly sleep less than seven hours a night. The consequences go far beyond grogginess. Poor sleep raises your risk for obesity, heart disease, diabetes, and depression.
But here’s what most sleep advice gets wrong: better sleep isn’t just about what you do at bedtime. It’s shaped by decisions you make all day long — from your morning light exposure to your afternoon coffee, your evening meal, and the temperature of your bedroom.
This guide breaks down 15 evidence-based strategies for better sleep, organized into a practical timeline you can follow from morning to night. No gimmicks. No expensive gadgets. Just science-backed habits that work.
Table of Contents
Better Sleep in 5 Quick Answers:
What makes sleep “better”? → Falling asleep within 15–20 minutes, staying asleep through the night, and waking refreshed after 7–9 hours.
What’s the #1 fix? → A consistent sleep-wake schedule — even on weekends.
Do supplements help? → Melatonin and magnesium may help short-term, but habits matter more.
When should I worry? → If poor sleep persists 3+ nights per week for over three months, consult a healthcare provider.
What’s the 10-3-2-1-0 rule? → A simple framework: 10 hrs before bed = no caffeine, 3 hrs = no food/alcohol, 2 hrs = no work, 1 hr = no screens, 0 = times you hit snooze.
What Is Better Sleep (and Why Does It Matter)?
Better sleep is the consistent ability to fall asleep within a reasonable time, cycle through all sleep stages without disruption, and wake feeling restored. It is not simply about logging more hours — it is about the quality, consistency, and timing of your rest.
Sleep quality matters because your body uses deep and REM sleep to consolidate memory, repair tissue, regulate hormones, and strengthen immune function. When these processes are interrupted, the effects ripple into every part of your health.
The Science Behind Sleep Quality
Your sleep is governed by two systems working together:
Circadian rhythm — your internal 24-hour clock, primarily set by light exposure. It tells your brain when to produce melatonin (the sleep hormone) and when to ramp up cortisol (the wake-up hormone).
Sleep pressure (adenosine) — a chemical that accumulates in your brain throughout the day. The longer you’re awake, the more adenosine builds up, making you progressively sleepier. Caffeine works by blocking adenosine receptors, which is why a late coffee can sabotage your sleep.
When these two systems are aligned — high sleep pressure meeting a well-timed circadian dip — you fall asleep quickly and sleep deeply.
Sleep Stages Explained in 60 Seconds
Each night, your body cycles through four stages roughly every 90 minutes:
Deep sleep dominates early in the night. REM sleep increases toward morning. Both are essential.
Your Daily Better Sleep Timeline — Morning to Night
Most sleep guides hand you a random list of tips. That approach misses the point — better sleep is a daylong process. Here’s when each action matters most.
Morning (6–10 AM): Set Your Circadian Clock
Morning light exposure helps reset your internal body clock
Your morning routine has more impact on tonight’s sleep than your bedtime routine does. Exposure to bright natural light within the first hour of waking signals your suprachiasmatic nucleus (the brain’s master clock) to suppress melatonin and start your 24-hour countdown to sleepiness.
Step outside for 10–20 minutes of direct sunlight, even on cloudy days.
Wake at the same time daily — including weekends. Consistency matters more than total hours.
Avoid sunglasses for the first 15 minutes outdoors (the light exposure needs to reach your retina).
Afternoon (12–4 PM): Protect Your Sleep Pressure
Adenosine has been building in your brain since you woke up. This is the “pressure” that will eventually make you feel sleepy. Two things can interfere with it:
Caffeine — blocks adenosine receptors. According to research published in the Journal of Clinical Sleep Medicine, caffeine consumed even six hours before bedtime reduced total sleep by about 40 minutes. Set a hard caffeine cutoff by 2 PM (or earlier if you’re caffeine-sensitive).
Long naps — discharge too much sleep pressure too early. If you must nap, keep it under 20 minutes and before 3 PM.
Evening (6–9 PM): Wind Down the Right Way
Eat dinner 2–3 hours before bed. A full stomach triggers digestion processes that can interfere with sleep onset.
Avoid alcohol within 3 hours of bedtime. Alcohol sedates you initially but fragments sleep during the second half of the night, reducing REM.
Dim artificial lights. Bright overhead lighting after sunset suppresses melatonin. Switch to warm, low lamps.
Bedtime (9 PM–Midnight): Optimize Your Environment
Stop screens 60 minutes before bed. Blue light from phones and laptops delays melatonin release. If you must use a device, enable night mode and reduce brightness.
Block all light and noise. Use blackout curtains or a sleep mask. Consider earplugs or a white noise machine.
Reserve your bed for sleep only. Working, scrolling, or watching TV in bed weakens the mental association between your bed and sleep.
15 Proven Tips for Better Sleep
Here’s every evidence-based tip from the timeline above, plus a few more:
Get bright light first thing in the morning — anchors your circadian rhythm.
Keep a consistent sleep-wake schedule — even on weekends.
Cut caffeine by early afternoon — it has a half-life of 5–6 hours.
Exercise regularly — but time it right — morning or afternoon workouts improve deep sleep. Avoid vigorous exercise within 3 hours of bedtime.
Limit naps to 20 minutes before 3 PM — preserves nighttime sleep pressure.
Eat your last big meal 2–3 hours before bed — digestion and sleep don’t mix well.
Avoid alcohol within 3 hours of bedtime — it disrupts REM sleep.
Dim the lights after sunset — supports natural melatonin production.
Stop screens 60 minutes before bed — blue light delays sleepiness.
Try the 10-3-2-1-0 sleep rule — a simple checklist for daily habits (details below).
Keep your bedroom cool (60–67°F / 15–19°C) — your core temperature needs to drop to initiate sleep.
Block light and noise completely — blackout curtains, sleep masks, and white noise machines.
Use relaxation techniques — deep breathing (4-7-8 method), progressive muscle relaxation, or a body scan meditation.
Don’t stay in bed if you can’t sleep — after 20 minutes, get up and do a quiet activity in dim light until you feel drowsy.
Consider melatonin or magnesium (with caution) — low-dose melatonin (around 0.5–3 mg) can help reset timing; magnesium glycinate may promote relaxation. Consult a healthcare provider first.
Consider melatonin or magnesium (with caution) — low-dose melatonin (around 0.5–3 mg) can help reset timing; magnesium glycinate may promote relaxation. For a deeper look at how sleep intersects with cellular aging and longevity research, NMN research and aging science offers a useful resource. Consult a healthcare provider first.
The 10-3-2-1-0 Sleep Rule
A simple daily routine to improve sleep quality and consistency
This simple framework turns better sleep into a daily checklist:
Hours Before Bed
Action
10 hours
No more caffeine
3 hours
No more food or alcohol
2 hours
No more work
1 hour
No more screens
0
Times you hit the snooze button
Better Sleep Comparison — Habits vs. Supplements vs. Products
Category
Examples
Effectiveness
Cost
Best For
Habits
Consistent schedule, light exposure, exercise
High — strongest evidence
Free
Everyone
Supplements
Melatonin, magnesium, L-theanine
Moderate — works for some
$10–$30/month
Those with mild difficulty falling asleep
Products
Sleep masks, white noise machines, weighted blankets
Moderate — comfort-based
$20–$200
Environment-related sleep issues
Apps
BetterSleep, Calm, Headspace
Low to moderate
$0–$70/year
Stress or anxiety-related sleep struggles
Key takeaway: Habit changes deliver the most consistent, long-lasting results. Supplements and products work best as complements, not replacements.
Common Mistakes That Ruin Your Sleep
Even well-intentioned people sabotage their sleep without realizing it. Watch out for these:
“Catching up” on weekends. Sleeping in two extra hours on Saturday shifts your circadian rhythm — the equivalent of jet lag. Keep your wake time within 30 minutes of your norm.
Relying on alcohol to relax. It might help you fall asleep, but it fragments the second half of the night and suppresses REM.
Exercising right before bed. Vigorous activity raises core temperature and adrenaline, the opposite of what your body needs to sleep.
Staying in bed when you can’t sleep. This trains your brain to associate the bed with wakefulness and frustration. Get up after 20 minutes.
Obsessing over sleep tracker data. A growing concern called orthosomnia — anxiety about achieving “perfect” sleep tracker scores — can actually make sleep worse.
Scrolling “just for five minutes.” Blue light aside, engaging content raises dopamine and alertness, pushing back sleep onset.
Who This Guide Is For — and Who Should See a Doctor
This guide is best for:
Healthy adults who want to improve sleep quality and consistency
People new to sleep hygiene who need a structured starting point
Anyone tired of generic tip lists and wanting to understand why these strategies work
This guide is NOT a replacement for professional help if you have:
Chronic insomnia — difficulty sleeping 3+ nights per week for 3+ months. Ask your doctor about Cognitive Behavioral Therapy for Insomnia (CBT-I), widely considered the gold-standard treatment.
Sleep apnea — snoring, gasping, or pauses in breathing during sleep. Requires a sleep study and potentially a CPAP device.
Restless legs syndrome, narcolepsy, or parasomnias — these require diagnosis and specialist care.
If your sleep problems persist despite consistent lifestyle changes, consult a healthcare provider. Better sleep starts with the right habits, but some conditions need more than habits alone.
Final Verdict — Your Better Sleep Action Plan
Better sleep isn’t a mystery. It’s the result of deliberate choices made throughout the day — from morning sunlight to a cool, dark bedroom at night.
If you remember just three things:
Set your circadian clock with morning light and a consistent wake time.
Protect your sleep pressure by cutting caffeine early and limiting naps.
Prepare your body by dimming lights, cooling your room, and stepping away from screens before bed.
Start with the 10-3-2-1-0 rule tomorrow. You don’t need to change everything at once — just pick two or three tips from this guide and build from there. Better sleep compounds. One good night leads to another.
Frequently Asked Questions About Better Sleep
Q: How much sleep do I actually need?
A: Most adults need 7–9 hours per night, though individual needs vary slightly. Consistently waking without an alarm and feeling refreshed is a better indicator than a specific number.
Q: What is the 10-3-2-1-0 rule for sleep?
A: It’s a framework for daily habits: no caffeine 10 hours before bed, no food or alcohol 3 hours before, no work 2 hours before, no screens 1 hour before, and zero snooze-button hits in the morning.
Q: Does melatonin actually help with sleep?
A: Melatonin can help with timing — such as adjusting to a new schedule or time zone — but it’s not a sedative. Low doses (0.5–3 mg) are most effective. Consult a healthcare provider before using it regularly.
Q: How can I fall asleep faster?
A: Keep a consistent bedtime, avoid screens for 60 minutes before bed, and try a breathing technique like the 4-7-8 method (inhale 4 seconds, hold 7, exhale 8). If you’re not asleep in 20 minutes, get up and do something calming.
Q: Is it bad to sleep with my phone next to the bed?
A: Yes. Even if you don’t use it, the temptation to check notifications disrupts your wind-down. Notifications can also wake you during lighter sleep stages. Charge it in another room or use airplane mode.
Here are some reasons why you should consider getting an electric bike for yourself!
With the continuous advancement of technology and the rise of portable electronic devices, most people just sit in front of their screens and lie on the couch all day. This lifestyle has been prevalent since the pandemic has started. Although some parts of the world are still on lockdown, having a little physical exercise around the block should not hurt. Cycling, for example, is an effective way to reduce your health risks, and what better way to do cycling than with electric bikes!
Although it may sound counterintuitive, having a bike with an electric motor is not really a form of cheating. Even though an electric bike, or ‘e-bike’, does give you the extra power you need to conquer those hills and inclines, it still does give you the pump that you get when pedaling a normal bike. In fact, the assistance that these e-bikes give you in navigating challenging terrain gives you more benefits in the long run.
Best electric bikes level up the fun and excitement you enjoy with a traditional bicycle. Powered by electric motors and portable batteries, e-bikes are not just made for improving the daily commute because they also make a good companion for leisure and outdoor activities. But most importantly, electric bikes offer countless advantages and benefits to our physical and mental health, so here are some:
Table of Contents
Health Benefits of Using Electric Bikes
1. Improves Heart Health
Like any other cardiovascular exercise, cycling using an electric bike does keep your heart strong! With the regular use of an e-bike, it is proven that the low-impact exercise it offers helps build stamina more consistently. It is mainly because it is not as taxing on the joints, unlike the intense muscle workouts that regular bicycles provide. Moreover, it is found that people who frequently go cycling have about 15 percent fewer heart attacks than non-cyclists.
A research conducted in 2008 associated the change of transport (from non-cycling to cycling) with the change in cardio-respiratory fitness. The study resulted in a significantly higher cardiorespiratory fitness associated with cycling as a mode of transport; hence by cycling, especially with the help of electric bikes, you can have a healthier and stronger heart.
2. Effectively Burns Calories
Although an electric bike makes use of pedal-assisted technology, cycling using it is considered as a form of exercise after all. An e-bike lets you pedal more conveniently therefore reducing the intensity of workout you have to go through.
The cardio exercise that e-bikes provide you does not only improve your heart health but can also help you effectively lose weight. By using electric bikes, extra calories are burned through those longer distances that you can cover compared to when using conventional bikes. As a matter of fact, it is found out that an hour of cycling using an ebike can help you burn as much as 500 calories.
An article from Healthline shows how many calories you can burn in biking based on how long and much you travel by time and distance.
3. Helps maintain a habit of cycling
Maintaining a good workout routine is hard, especially when you are the type that easily gets bored. It only gets worse when other workouts leave you so exhausted that you do not look forward to doing them again— beats the purpose of an ‘actual routine,’ right?
That is the good thing about e-bikes. It may not give you the rigorous exercise of traditional cycling, but it does help you build a healthy habit. With assisted pedaling, you can take longer rides that would take you to see more views and explore more places which will definitely build up your excitement and help you continue what you have started.
4. Better Sleeping Pattern
The habit of cycling using electric bikes leads to sustainable exercise. And experts say that with regular exercise comes better sleep. Studies have found that people who get regular exercise fall asleep more quickly compared to control subjects and are less likely to wake up in the middle of the night.
In a study conducted by the Sleep Foundation in 2013, where they correlated exercise to sleep, it was found that over 75% of respondents who exercise get good to very good quality of sleep. And as a form of exercise, cycling with the aid of electric bikes can actually help you get better sleep at night.
5. Relieves Stress
Regularly exercising, in general, boosts your mood. Happy hormones are at their peak after a good workout, and frequently doing so leads to better mental health. Of course, what better way to maintain an active lifestyle and a healthy mind than riding e-bikes! With the encouragement to be consistent with strolling through the great outdoors, one can avoid getting stressed out and enjoying long rides.
While it improves your physical health, e-cycling also helps reduce tendencies for anxieties or depression to occur. As we all know, stress is not entirely a good feeling as it denotes emotional or physical tension. A recent study published in the International Journal of Workplace Health Management found that people who cycle are less stressed. Especially for workers who spend a whole day at the office, cycling to and from work can significantly reduce stress.
Why you Should Get Yours Now?
Truth be told, there are innumerable reasons why you should get an electric bike. Aside from being an efficient and eco-friendly mode of transport, an electric bike serves as a fun way to exercise and stay fit with its pedal sensor and assistance features. Ebikes are not plainly for commuting purposes; there are many different types of e bikes used in extreme sports like hunting and mountain biking. There are electric bikes made specifically for casual rides and there are some made for outdoor adventures. We can go on with more reasons why you should buy an electric bike but ultimately, having an ebike by your side makes a really huge difference to your life.
Summary
All-in-all, e-bikes are sure to be enjoyed by all ages, from little kids to the elderly. With the lessened intensity that electrically assisted pedaling offers, e-bikes are sure to encourage more people to get into cycling and make a healthy lifestyle out of it.
By Trevor James
About the author:
Trevor James is the founder of Electric Bike Paradise, the #1 online seller of electric bikes, electric scooters, electric skateboards, mobility scooters, electric wheelchairs, and electric golf caddies. Trevor has been selling bicycles, electric bikes, and electric scooters online as 2010 and finally established Electric Bike Paradise in late 2013 when he happen to meet a car enthusiast that introduced him to electric bikes. And also, Trevor spent time penetrating for electric bikes online but couldn’t find a website that obtainable a wide selection of electric bikes, scooters, and informational articles. That is why he determined to start a website where everyone can shop expediently, browse buying guides, and read educational posts. The website is called Electric Bike Paradise.
If you’ve been researching ways to address fine lines, chronic migraines, or jaw clenching in Calgary, you’ve likely come across Botox. But with dozens of clinics competing for your attention — and wide variation in pricing, qualifications, and techniques — it’s hard to know where to start.
The benefits of Botox treatment in Calgary go far beyond aesthetics. From Health Canada-approved cosmetic results to medically recognized therapeutic applications, Botox has become one of the most clinically documented injectable treatments in Canada. This guide covers what it does, how it works, what it costs in Calgary, and how to avoid the most common mistakes.
Whether you’re a first-timer or exploring a new treatment area, here’s what you need to know before booking.
Table of Contents
Quick Answers
What is Botox? → A purified neuromodulator (onabotulinumtoxinA) that temporarily relaxes targeted muscles.
Is it only cosmetic? → No. Health Canada approves it for migraines, hyperhidrosis, TMJ, and more.
What does it cost in Calgary? → Typically 8–8–8–16 per unit; most cosmetic treatments run 300–300–300–600 CAD.
How long do results last? → 3–4 months on average; medical applications may vary.
Who should get it? → Adults with realistic expectations, treated by a CPSA- or CRNA-licensed provider.
What Is Botox — and How Does It Actually Work?
Botox (onabotulinumtoxinA) is a purified protein derived from Clostridium botulinum that temporarily blocks acetylcholine release at the neuromuscular junction. When injected in precise, low doses, it prevents the targeted muscle from contracting, softening expression lines and relieving muscle-driven conditions. According to Health Canada’s Summary Basis of Decision for Botox Cosmetic, the treatment is approved for glabellar lines, lateral canthal lines (crow’s feet), and forehead lines. Effects typically appear within 3–7 days and last 3–4 months.
This mechanism is why Botox works for both cosmetic and medical conditions. The same principle that smooths a forehead line also prevents the muscle contractions that trigger chronic migraines or cause jaw grinding.
Botox vs. Dysport vs. Nuceiva: What’s Available in Alberta?
Not all neuromodulators are identical. Three are currently available at Calgary clinics:
Product
Active Ingredient
Onset
Spread
Best For
Botox (Allergan)
OnabotulinumtoxinA
3–7 days
Moderate
All-purpose; most studied
Dysport (Galderma)
AbobotulinumtoxinA
2–5 days
Wider spread
Large areas (forehead)
Nuceiva (Evolus)
PrabotulinumtoxinA
2–5 days
Similar to Botox
Cost-competitive option
All three are Health Canada-approved. The right choice depends on the treatment area, your provider’s preference, and your aesthetic goals. Ask your injector which product they stock and why they prefer it.
The Top Cosmetic Benefits of Botox Treatment in Calgary
Botox helps reduce visible expression lines
If you are considering your first Botox treatment in Calgary, it helps to understand what cosmetic results are realistically achievable before you walk into any clinic. Placing your care with a dermatologist-led team at a reputable dermatologist clinic in Calgary also ensures that your treatment plan is tailored to your skin type, facial anatomy, and long-term goals.
The cosmetic benefits of Botox treatment in Calgary are well-established and Health Canada-approved for several facial areas. Here’s what the evidence actually supports:
1. Smoothing Expression Lines
Botox is most recognized for reducing:
Horizontal forehead lines — caused by frontalis muscle movement
Glabellar lines (“11s”) — vertical lines between the brows
Lateral canthal lines (“crow’s feet”) — around the outer corners of the eyes
These three areas represent Health Canada’s approved cosmetic indications. Results for these areas are predictable, well-studied, and typically last 3–4 months.
2. The Lip Flip
A lip flip uses 4–6 units of Botox injected into the orbicularis oris muscle above the upper lip. It causes the lip edge to roll slightly outward, creating the appearance of fuller lips — without filler.
This is a lower-cost option (roughly 50–50–50–80 CAD) and suits patients who want subtle volume enhancement. It’s not a replacement for dermal fillers if significant volume is the goal.
3. Masseter Slimming (Jawline Narrowing)
One of Calgary’s fastest-growing Botox applications is masseter reduction — injecting the large chewing muscle to slim a square jaw. It typically requires 20–30 units per side and results appear gradually over 4–6 weeks as the muscle atrophies with disuse.
This is an off-label use in Canada, so results and longevity vary. Most patients see 4–6 months of effect before retreatment.
4. Preventative Botox for Calgary’s High-UV Environment
Here’s an angle most Calgary clinics don’t discuss openly: the city sits at 1,048 metres above sea level, which means UV radiation is measurably stronger than at sea level. Combined with the dry chinook climate, skin ages faster in Calgary than in coastal Canadian cities.
Preventative Botox — micro-dosing in younger adults (typically late 20s to mid-30s) — aims to slow the formation of dynamic wrinkles before they become static lines. The evidence for long-term prevention is still emerging, but the logic is sound: muscles that don’t contract repeatedly cause less collagen degradation over time.
5. Brow Lift and Eye-Opening Effects
Strategic placement of Botox above the lateral brow can create a subtle lift without surgery. By relaxing the depressor muscles that pull the brow down, the frontalis muscle’s natural upward pull goes unopposed — raising the tail of the brow 1–3 mm.
This is a nuanced technique. In the wrong hands, it can cause a “Spock brow” appearance. Always confirm your injector has specific training in brow anatomy.
The Medical Benefits of Botox in Calgary: Beyond Cosmetics
Botox is used for both cosmetic and medical conditions
This is where many guides fall short. The medical benefits of Botox are clinically significant and, in some cases, covered by Alberta Health Services. As confirmed in the official Botox Product Monograph approved by Health Canada, Botox holds therapeutic indications for chronic migraine, upper and lower limb spasticity, cervical dystonia, and hyperhidrosis — making it one of the most broadly approved injectable neuromodulators in Canada.
Chronic Migraine Prevention
For patients experiencing 15 or more headache days per month (with at least 8 being migraines), Botox is an approved preventative treatment. It involves 31 injections across 7 head and neck muscle areas, administered every 12 weeks.
Alberta Health Services may cover this under the Drug Benefit Program if patients have failed at least two first-line preventive medications. Patients should speak with a neurologist or headache specialist for formal assessment.
Hyperhidrosis (Excessive Sweating)
Botox injected into the axillary (underarm) region is one of the most effective treatments for primary hyperhidrosis. It blocks the acetylcholine signal to eccrine sweat glands — the same neuromuscular blocking mechanism used in cosmetic applications. According to clinical data cited by the International Hyperhidrosis Society, sweat production decreases by 82% to 87% following Botox treatment for primary axillary hyperhidrosis.
Results last 6–12 months, longer than cosmetic applications, because sweat glands don’t regenerate nerve connections the way facial muscles do.
Results last 6–12 months, longer than cosmetic applications, because sweat glands don’t regenerate the way muscle-nerve connections do.
TMJ Relief and Bruxism Management
Calgary has a notable number of dental clinics and oral health specialists offering Botox for temporomandibular joint (TMJ) disorder and bruxism (teeth grinding). Injecting the masseter and temporalis muscles reduces their force of contraction — easing jaw pain, reducing headache frequency, and slowing tooth wear.
This is an off-label use for Botox but is widely practiced by dentists registered with the Alberta Dental Association and College. Results typically last 3–5 months.
Muscle Spasticity and Other Neurological Applications
Botox holds additional Health Canada approvals for upper and lower limb spasticity, cervical dystonia, and blepharospasm. These are specialist-administered treatments outside the scope of most aesthetic clinics but are worth knowing — they reinforce that Botox is a serious, well-studied medical tool, not just a cosmetic shortcut.
What Does Botox Cost in Calgary? (2026 Pricing Breakdown)
Estimated Botox cost varies by treatment area
Pricing transparency is one of the biggest gaps in the Calgary Botox market. Most clinics list ranges without context. Here’s a clearer breakdown:
Treatment Area
Units Needed (Approx.)
Estimated Cost (CAD)
Forehead lines
10–20 units
120–120–120–280
Glabellar lines (“11s”)
20–25 units
240–240–240–350
Crow’s feet (both sides)
10–15 units
120–120–120–210
Full upper face (all 3 areas)
40–60 units
400–400–400–750
Lip flip
4–6 units
50–50–50–90
Masseter slimming (both sides)
40–60 units
400–400–400–700
Hyperhidrosis (underarms)
50–100 units
600–600–600–1,200
Chronic migraine (therapeutic)
155–195 units
800–800–800–1,500+
Per-unit pricing in Calgary:8–8–8–16 per unit. The lower end is common at med spas; the higher end reflects dermatologist or plastic surgeon clinics with higher overhead and specialist credentials.
A note on cost vs. value: Choosing a provider based on the lowest price-per-unit is the most common mistake Calgary patients make. A poorly placed 40-unit treatment can cause ptosis (drooping eyelid) or asymmetry. The injector’s skill matters more than the price-per-unit.
How to Choose a Botox Provider in Calgary: A Checklist
License check — Is the injector a physician, RN, or NP licensed in Alberta? Confirm at cpsa.ca or nurses.ab.ca.
Medical director on file — Med spas must have a supervising physician. Ask who it is.
Consultation included — Reputable providers always do a pre-treatment assessment.
Product authenticity — Ask if they use Health Canada-approved products (Botox, Dysport, or Nuceiva).
Before/after portfolio — Review actual patient results, not stock images.
Adverse event protocol — Ask how they handle complications such as ptosis or asymmetry.
Clinic location — Is it a registered medical facility? Botox in non-medical settings (e.g., salons) is a regulatory red flag in Alberta.
Calgary’s aesthetic clinic density is highest in the Beltline (SW), Marda Loop, and Mission districts, where competition keeps pricing competitive and clinic standards generally high.
What to Expect: The Botox Treatment Process Step by Step
Preparation for a Botox procedure in clinic
Here’s how a standard cosmetic Botox appointment unfolds at a Calgary clinic:
Consultation (10–15 min) — Discuss goals, review medical history, and assess facial anatomy. A good injector maps your treatment before picking up a needle.
Photographs — Baseline photos document your starting point. This is standard practice at quality clinics.
Topical numbing (optional) — Most patients don’t need it; forehead injections are brief and low-pain.
Injection (5–10 min) — A series of small, targeted injections using a fine-gauge needle. Most sessions involve 10–30 injection points depending on the areas treated.
Post-treatment care — Stay upright for 4 hours. Avoid rubbing the injection site, strenuous exercise for 24 hours, and extreme heat for 48 hours.
Results onset — Visible softening begins at day 3–5. Full results appear at day 10–14.
Follow-up — A 2-week check allows your provider to assess results and touch up if needed. Always confirm whether the follow-up is included in the fee.
Post-Botox Care for Calgary’s Climate
Calgary’s environment creates unique aftercare considerations that most generic guides ignore.
UV exposure: At 1,048m elevation, UV index in Calgary peaks higher than in most Canadian cities. Post-treatment, apply SPF 50+ daily — especially around treated areas. Sun damage accelerates skin aging regardless of Botox results.
Dry climate: Alberta’s low-humidity air — especially during chinook conditions — can dehydrate skin. Use a fragrance-free, ceramide-based moisturizer twice daily to support skin barrier recovery post-injection.
Cold weather: Extreme cold in Calgary winters doesn’t directly affect Botox longevity, but patients who exercise heavily outdoors may notice results fading slightly faster due to increased facial muscle activity.
Altitude: There is no clinical evidence that Calgary’s altitude directly shortens Botox duration. Metabolic rate and injection technique are far more significant factors.
Common Mistakes to Avoid With Botox in Calgary
These are the mistakes that lead to disappointing results or unnecessary risk:
Choosing price over credentials. A $7/unit price from an unlicensed injector is not a deal — it’s a liability.
Expecting permanent results. Botox is temporary by design. Plan for retreatment every 3–4 months to maintain results.
Ignoring the consultation. If a clinic skips a consultation and goes straight to injecting, walk out. Proper assessment is non-negotiable.
Overfreezing the forehead. Too many units in the frontalis muscle creates the “frozen” look patients want to avoid. A skilled injector uses the minimum effective dose.
Mixing providers between sessions. Switching injectors mid-cycle makes it harder to track results and adjust technique over time.
Not disclosing medications. Blood thinners (aspirin, NSAIDs, fish oil) increase bruising risk. Always disclose your full medication list.
Who Should (and Shouldn’t) Get Botox in Calgary
Botox is well-suited for:
Adults (18+) with dynamic expression lines they’d like to soften
Patients with clinically diagnosed hyperhidrosis, chronic migraines, or TMJ disorder
Individuals seeking preventative treatment in their late 20s to 30s
Those with realistic expectations and willingness to maintain results over time
Botox is NOT recommended for:
Pregnant or breastfeeding individuals (out of precaution; systemic risk is low but unstudied)
Patients with neuromuscular conditions such as myasthenia gravis or Lambert-Eaton syndrome
Individuals with a known allergy to any botulinum toxin product or its components
Anyone seeking a permanent solution — Botox does not stop the aging process
Proceed with caution if:
You’re on blood thinners or have a bleeding disorder — bruising risk increases significantly
You’ve had a severe allergic reaction to a previous Botox treatment
You’re under active care for a neurological condition — consult your specialist first
Conclusion: Are the Benefits of Botox Treatment in Calgary Worth It?
The benefits of Botox treatment in Calgary are real, well-documented, and broader than most people assume. For cosmetic goals, it remains the most effective non-surgical option for dynamic expression lines. For medical applications — migraines, hyperhidrosis, TMJ — it offers clinically meaningful relief backed by Health Canada approval.
The key is choosing the right provider and having realistic expectations. Botox won’t restructure your face, stop aging, or last forever. But for the right patient, treated by a licensed and experienced injector, it consistently delivers results worth the investment.
If you’re in Calgary, start with a consultation at a clinic with a verified medical director, transparent pricing, and a portfolio of real results. That single step eliminates most of the risk.
Frequently Asked Questions
Q1: What is the average cost of Botox per unit in Calgary?
A: The average cost of Botox in Calgary ranges from 8to8 to 8to16 per unit in 2026. Med spas typically charge 8–8–8–11/unit, while specialist dermatology or plastic surgery clinics charge 12–12–12–16/unit. A full cosmetic treatment (forehead, 11s, crow’s feet) commonly costs 400–400–400–700 CAD total.
Q2: How long do Botox results last in Calgary?
A: Cosmetic Botox typically lasts 3–4 months for most patients. Medical applications like hyperhidrosis can last 6–12 months. Factors affecting longevity include your metabolism, muscle strength, injection technique, and how physically active you are.
Q3: Can dentists in Calgary provide Botox for TMJ?
A: Yes. Dentists licensed with the Alberta Dental Association and College who have completed recognized Botox training may administer it for TMJ and bruxism. It’s an off-label use but widely practiced. Confirm your dentist has specific injection training before proceeding.
Q4: Is Botox for chronic migraines covered by Alberta Health Services?
A: Potentially. Alberta Health Services may cover therapeutic Botox for chronic migraine (15+ headache days/month) under the Drug Benefit Program if you have failed at least two preventive medications. A referral to a neurologist is required. Coverage is not automatic — prior authorization is needed.
Q5: What is “Baby Botox” and is it available in Calgary?
A: “Baby Botox” (also called micro-dosing or skin-tox) uses smaller-than-standard doses — typically 30–50% less — to soften movement without eliminating expression. It’s popular among first-timers and younger patients pursuing preventative treatment. Most Calgary aesthetic clinics offer it; expect to pay a similar per-unit rate with a lower total unit count.
Q6: What is the difference between Botox and Dysport available in Alberta?
A: Both are Health Canada-approved neuromodulators that block muscle contractions. Dysport has a slightly faster onset (2–5 days vs. 3–7 for Botox) and spreads more widely — making it better suited for larger areas like the forehead. Botox offers more precise placement for targeted areas. Neither is universally superior; the right choice depends on your anatomy and treatment goals.
Every year, thousands of people across the UK wonder whether they can get gastric sleeve surgery on the NHS — and most don’t know where to start. The eligibility criteria feel confusing, the referral pathway is multi-layered, and waiting times vary wildly depending on where you live.
Here’s the good news. Gastric sleeve surgery is available completely free on the NHS for patients who meet specific criteria. But getting approved isn’t as simple as walking into your GP’s office and asking. It requires documented evidence, patience, and a willingness to commit to lifelong changes.
This guide walks you through every step — from checking your eligibility to understanding the full NHS referral pathway, realistic waiting times, and what to do if you’re turned down. Whether you’re just starting to research your options or already partway through the process, this is designed to give you clear, actionable answers.
Table of Contents
Quick Takeaways: NHS Gastric Sleeve
Who qualifies? BMI 40+, or BMI 35–40 with obesity‑related conditions like type 2 diabetes or sleep apnoea.
What’s the process? GP referral → Tier 3 programme (typically 6–12 months) → multidisciplinary assessment → Tier 4 surgery.
How long is the wait? Typically 18 months to 3+ years overall, depending on your NHS region.
Is it free? Yes, fully funded on the NHS for eligible patients.
If you don’t qualify? Private gastric sleeve in the UK usually costs around £8,000–£12,000.
What Is Gastric Sleeve Surgery?
Bariatric consultation explaining how gastric sleeve surgery works.
A gastric sleeve — formally known as a sleeve gastrectomy — is a surgical weight loss procedure where approximately 75–80% of the stomach is permanently removed. The remaining stomach is shaped into a narrow, banana-sized tube or “sleeve.”
The operation is performed laparoscopically (through small incisions using a camera), typically takes 1–3 hours, and usually requires a 2–3 night hospital stay.
How it works: By dramatically reducing the stomach’s capacity, the procedure limits how much food you can eat in a single sitting. It also reduces the production of ghrelin — the hormone responsible for hunger signals — which helps reduce appetite beyond just physical restriction.
Most patients lose **50–70% of their excess body weight** within 12–24 months of surgery.
Gastric Sleeve vs Gastric Bypass — Which Does the NHS Prefer?
This is a question many patients don’t think to ask until their surgical consultation. Both procedures are available on the NHS, but they work differently.
Feature
Gastric Sleeve
Gastric Bypass
How it works
Removes ~80% of stomach
Creates small stomach pouch + reroutes intestine
Reversible?
No
Technically, but very rarely reversed
Surgery time
1–2 hours
2–3 hours
Weight loss (12–24 months)
50–70% of excess weight
60–80% of excess weight
Diabetes remission rate
High
Higher
Nutritional deficiency
Moderate
Higher (due to malabsorption)
Reflux risk
Higher (can worsen GORD)
Lower (often improves reflux)
Recent research supported by the National Institute for Health and Care Research suggests that gastric bypass may be more clinically and cost-effective than sleeve gastrectomy for many patients. Your bariatric surgeon will discuss which procedure is most appropriate based on your individual health profile.
The key takeaway? Don’t set your heart on one specific procedure before your surgical consultation. Your surgeon may recommend an alternative — and that recommendation is usually based on evidence.
Who Is Eligible for Gastric Sleeve on the NHS?
NHS eligibility for gastric sleeve surgery is determined by NICE clinical guideline CG189, which sets out the criteria bariatric teams follow when assessing patients.
BMI Criteria and NICE Guidelines
You may be eligible for NHS-funded gastric sleeve surgery if you meet one of these BMI thresholds:
BMI of 40 or above (classified as severely obese) — even without additional health conditions
BMI between 35 and 40 — with at least one significant obesity-related health condition that could improve with weight loss
BMI between 30 and 35 — bariatric surgery may be considered in exceptional cases, particularly if you have **recent-onset type 2 diabetes**, following specialist assessment.
!IMPORTANT: BMI alone doesn’t guarantee eligibility. You must also demonstrate that non-surgical weight management methods haven’t worked for you over at least 12 months.
Qualifying Health Conditions (Co-Morbidities)
If your BMI falls between 35 and 40, you’ll need at least one of these conditions to meet the criteria:
Type 2 diabetes (especially recent-onset)
High blood pressure** (hypertension)
Obstructive sleep apnoea
Non-alcoholic fatty liver disease (NAFLD)
Severe osteoarthritis** significantly affecting mobility
Heart disease
Ethnicity-Adjusted BMI Thresholds — Do You Qualify at a Lower BMI?
This is one of the most under-discussed aspects of NHS bariatric eligibility. According to NICE guidance, the standard BMI thresholds should be **reduced by 2.5 kg/m²** for people of:
South Asian family background
Chinese or other Asian background
Middle Eastern background
Black African or African-Caribbean background
This means a BMI threshold of **37.5** (instead of 40) or **32.5** (instead of 35) may apply. These adjusted thresholds exist because people from these ethnic groups tend to carry fat centrally and face higher cardiometabolic risk at lower BMI levels.
If you fall into one of these groups, make sure your GP and bariatric team apply the correct thresholds during your assessment.
The NHS Referral Pathway — Step by Step
Patients move through GP referral, Tier 3 programmes, and specialist assessment.
Getting a gastric sleeve on the NHS isn’t a single appointment. It’s a structured pathway that typically takes **18 months to 3+ years** from start to finish. Here’s how it works:
Step 1 — GP Consultation and Initial Referral
Everything starts with your GP. Book an appointment specifically to discuss bariatric surgery. Your GP will:
Check your BMI and assess whether you meet the initial criteria
Review your medical history and any obesity-related conditions
Refer you to a Tier 3 specialist weight management service
Practical tip: Bring documentation of any previous weight loss attempts — diet programmes, gym memberships, dietitian appointments, or medication records. This evidence strengthens your case.
Before you can be considered for surgery, you must complete a structured Tier 3 programme. These are NHS-funded, multidisciplinary programmes that typically include:
Dietitian consultations — personalised meal planning and nutritional guidance
Behavioural support — understanding eating habits, triggers, and emotional eating
Physical activity guidance — structured exercise plans appropriate for your mobility level
Psychological assessment** — evaluating your mental readiness for surgery and long-term changes
Most programmes run for **6–12 months**, and many areas ask you to demonstrate around **5–10% weight loss** or clear behavioural changes during this period.
!NOTE: Dropping out of the Tier 3 programme — even briefly — can reset your timeline. Attend every appointment, even when progress feels slow.
Step 3 — Multidisciplinary Assessment and Surgical Referral (Tier 4)
After completing Tier 3, your weight management team will conduct a comprehensive assessment. This involves:
A surgeon reviewing your suitability for the procedure
A specialist nurse coordinating your care pathway
A psychologist confirming you understand the commitment required
A dietitian confirming you can follow post-surgery dietary requirements
If the team agrees you’re a suitable candidate, you’ll be referred to a **Tier 4 bariatric surgical service** and placed on the surgical waiting list.
Step 4 — Pre-Surgery Preparation and the Operation
Before your surgery date, you’ll typically need to:
Follow a liver-shrinking diet (2–4 weeks of a very low-calorie diet)
Stop smoking (if applicable — strongly advised)
Have final blood tests and pre-operative checks
Attend a pre-admission clinic
The operation itself is performed laparoscopically under general anaesthetic. Most patients stay in hospital for **2–3 nights** and return to normal activities within **3–6 weeks**.
How Long Is the NHS Waiting List for Gastric Sleeve?
The NHS bariatric pathway can take 18 months to over 3 years.
This is where honest expectations matter. NHS waiting times for bariatric surgery are **substantial** — and they vary significantly by region.
Stage
Typical Wait
GP consultation → Tier 3 referral
2–4 months
Tier 3 programme duration
6–12 months
Tier 3 completion → surgical approval
2–6 months
Surgical waiting list → operation
6–18+ months
Total estimated timeline
18 months – 3+ years
The Postcode Lottery Problem
Not all NHS regions offer the same level of bariatric access. Investigations by national newspapers have reported that budget pressures have significantly affected obesity services in many parts of England, with bariatric surgery access restricted in a large number of local areas.
What does this mean in practice? Two patients with identical BMIs and health conditions can have dramatically different experiences depending on which NHS Integrated Care Board (ICB) area they live in. Some regions have active bariatric programmes with steady throughput. Others have effectively frozen referrals.
You can check your local area’s waiting times by using the My Planned Care NHS website, and you have the legal right to ask to be referred to a different provider if waiting times are excessive.
What Happens After Surgery — Recovery and Long-Term Care
Recovery includes diet changes, follow-up care, and long-term monitoring.
Surgery is just the beginning. Long-term success depends entirely on what happens next.
Diet and Nutrition After Gastric Sleeve
Your diet will go through several stages in the weeks following surgery:
Week 1–2: Clear liquids only (water, broth, sugar-free jelly)
Week 2–4: Puréed foods
Week 4–6: Soft foods
Week 6+: Gradual return to solid foods
Long-term, aim for **three small meals per day** rich in protein. Eat slowly, chew thoroughly, and avoid drinking during meals. Carbonated drinks and high-sugar foods are best avoided permanently.
Vitamin Supplementation and Blood Monitoring
Because your stomach is significantly smaller, your ability to absorb certain nutrients is reduced. **Lifelong vitamin supplementation is mandatory**, typically including:
Multivitamin with iron
Vitamin B12
Calcium and Vitamin D
Folic acid
You’ll also need **annual blood tests** to monitor for deficiencies. Your bariatric team will follow up for the first two years, after which your GP takes over long-term monitoring, as outlined on the NHS weight loss surgery page.
Expected Weight Loss Results
Most patients can expect to lose **50–70% of their excess body weight** within 12–24 months of surgery. However, outcomes depend heavily on:
Adherence to dietary guidelines
Regular physical activity
Attendance at follow-up appointments
Psychological wellbeing and support
Some patients experience weight regain after 2–5 years if dietary habits slip. That’s why the commitment to lifestyle change is non-negotiable.
NHS vs Private Gastric Sleeve — A Comparison
If NHS waiting times are too long or you don’t meet the eligibility criteria, private surgery is an option — but it comes at a cost.
Factor
NHS Gastric Sleeve
Private Gastric Sleeve (UK)
Cost
Free
£8,000 – £12,000+
Waiting time
18 months – 3+ years
2–6 weeks
Eligibility
Strict BMI + co-morbidity criteria
Generally BMI 30+
Tier 3 programme required?
Yes (6–12 months)
No (but assessment still required)
Aftercare
NHS follow-up for 2 years + GP long-term
Varies by provider (often 1–2 years)
Choice of surgeon
Limited
You choose your surgeon
Pros
Completely free; structured pathway
Fast; more flexible eligibility
Cons
Very long waits; regional variation
Expensive; aftercare quality varies
In the UK, gastric sleeve surgery prices in private clinics are often out of reach for many patients, with typical package costs ranging from around £8,000 to £13,000 depending on provider and location.
Common Mistakes and Pitfalls to Avoid
Many patients unintentionally slow down their own journey. Here are the most common errors:
Not documenting weight loss attempts. Your GP needs evidence that you’ve tried non-surgical methods for at least 12 months. Keep records of every programme, diet, and appointment.
Assuming your GP will automatically refer you. Some GPs are less familiar with bariatric referral pathways. Come prepared with knowledge of the NICE criteria and your BMI/health data.
Ignoring the psychological assessment. This isn’t a box-ticking exercise. Bariatric teams need to see that you understand the lifelong commitment. Engage genuinely with the process.
Dropping out of the Tier 3 programme. Even missing a few sessions can result in being discharged from the programme and having to start again.
Expecting surgery alone to solve everything. Surgery is a powerful tool, but without dietary and lifestyle changes, weight regain is common.
Who Should Consider NHS Gastric Sleeve — and Who Should Look Elsewhere
Best for:
Adults with BMI 35+ and at least one obesity-related health condition
UK residents willing to engage with a structured 6–12 month weight management programme
Those who cannot afford private surgery and are prepared for a long wait
Patients committed to lifelong dietary changes and follow-up
Not for:
People with BMI below 35 without qualifying conditions (unless ethnicity-adjusted thresholds apply)
Those seeking surgery within weeks — NHS timelines are measured in years
Anyone unwilling to commit to lifelong vitamin supplementation and dietary changes
Patients with active untreated eating disorders, severe psychiatric conditions, or substance abuse issues
Final Verdict
Getting a gastric sleeve on the NHS is absolutely possible — but it requires preparation, patience, and persistence. The process involves multiple stages, from your initial GP conversation through a Tier 3 weight management programme to a full multidisciplinary assessment before surgery is even scheduled.
The most important step? **Start now.** The sooner you book that GP appointment and begin documenting your weight loss journey, the sooner the clock starts ticking on a pathway that could take 18 months to 3+ years.
If NHS waiting times or eligibility criteria rule out this route, private surgery is an alternative — but do your research, check the provider’s aftercare programme, and understand the full cost before committing.
Your weight doesn’t define your worth, but if surgery is the right medical decision for your health, you deserve to understand exactly how to access it.
Frequently Asked Questions
Q: Can I get a gastric sleeve on the NHS for free?
A: Yes. If you meet the eligibility criteria set by NICE guidelines, gastric sleeve surgery is fully funded by the NHS. This includes the surgery itself, hospital stay, and follow-up care.
Q: What BMI do I need for gastric sleeve surgery on the NHS?
A: You typically need a BMI of 40 or above, or a BMI between 35 and 40 with a significant obesity-related condition such as type 2 diabetes or obstructive sleep apnoea. In exceptional cases, a BMI of 30–35 may qualify if recent-onset type 2 diabetes is present.
Q: How long is the NHS waiting list for bariatric surgery?
A: Total wait times range from 18 months to over 3 years, depending on your NHS region. This includes the Tier 3 programme (6–12 months) and the surgical waiting list itself.
Q: Is gastric sleeve or gastric bypass better on the NHS?
A: Both are effective. Research suggests gastric bypass may offer slightly better long-term weight loss and diabetes remission for some patients. Your surgeon will recommend the procedure best suited to your individual health profile.
Q: What happens if the NHS rejects my bariatric surgery application?
A: You can ask for a formal explanation, request a review, or seek a second opinion. If you still don’t qualify, private surgery in the UK (£8,000–£12,000) or overseas options are available.
Q: Do I need to lose weight before NHS gastric sleeve surgery?
A: Yes. You’ll need to complete a Tier 3 weight management programme (6–12 months), and many programmes require a 5–10% weight loss. You’ll also follow a liver-shrinking diet 2–4 weeks before surgery.


")


")

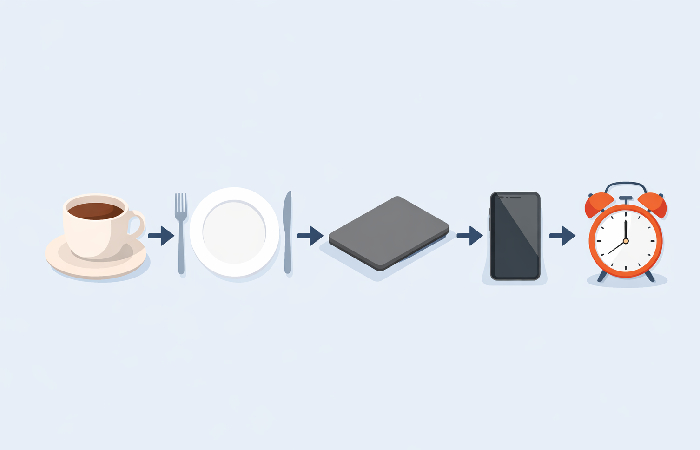

")


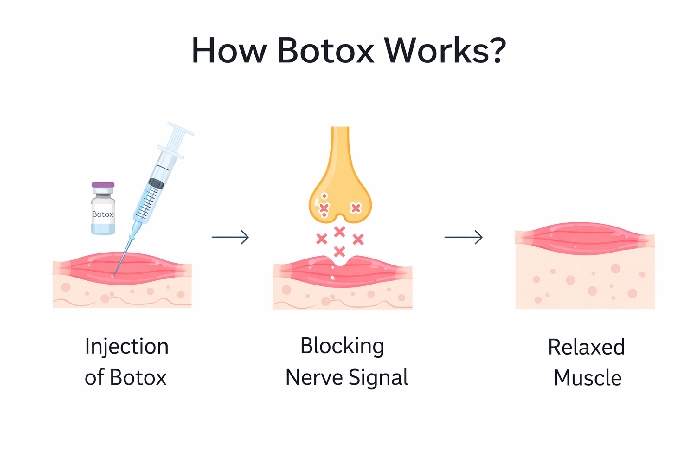

")