
You are in the Target skincare aisle, between classes, and one of the bottles is 10 dollars. The other is 25 dollars. Both say they work to eliminate acne. And you‘ll have about 45 seconds before class to decide which is a better buy.
Here’s the short version — neither brand is universally “better.” La Roche-Posay wins in some categories, Neutrogena wins in others, and the smartest move for most students is often mixing products from both. This guide breaks down every head-to-head matchup by product category, gives you realistic retail price examples (checked April 2026), and hands you three copy‑paste dorm routines at different budget levels. No fluff, no affiliate‑driven hype — just ingredient science translated into decisions you can make today.
This article is for informational purposes only and not intended to provide personal treatment advice. Consult your dermatologist or campus health care provider for treatment options.
Table of Contents
Key Takeaways
- Tight budget + easy acne–> solid, cheap initial options: Neutrogena salicylic acid cleanser, adapalene gel.
- Acne + sensitive/ reactive skin – La Roche-Posay‘s Effaclar range is designed for exactly this combination, with more gentle preparatio…
You are trained to rephrase in formal academic English. The passage should sound natural and human. - Best single product to begin with – > OTC adapalene 0.1% (both products contain same active ingredient, and Neutrogena will usually be cheaper)
- Hybrid routine = the budgetsmart play blend a Neutrogena cleanser to be used as treatment with an LRP treatment or vice versa.
- Not using moisturizer worsens acne Skin that is too dry may react by producing more oil to compensate, potentially blocking pores again.
Why College Skin Breaks Out (It’s Not Just Hormones)
Ever notice how your skin looks worse during finals week? That’s not a coincidence.
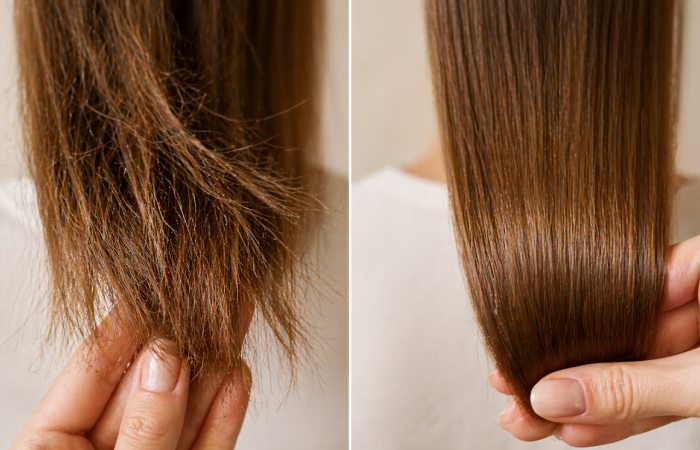
Acne is experienced by a huge chunk of the population between the ages of 12 and 24, with dermatology data suggesting that around 80–85% of people in this age group are affected at some point (see this overview on acne epidemiology and prevalence). If you’re suffering in college, be assured that you’re most definitely not unlucky — you’re very normal. A college campus just forces a bunch of acne triggers onto you (stress, sleep disruption, diet changes, rushed routines) in ways that make it easy to struggle now that the game has changed.
Stress, Sleep, and Sebum — The Campus Acne Triangle
When you have anxiety and midterms, part time jobs, and 8 a.m. Classes cause anxiety your body releases more cortisol. Cortisol tells the glands in your skin to release more oil. The more oil, the more zits.
Sleep deprivation compounds the problem. Your skin repairs itself overnight, and chronic short sleep (common in dorms) slows that cycle down. Toss in dining‑hall food that’s often heavier on refined carbs and dairy than your home cooking, plus shared‑bathroom environments where you rush through your routine — and you’ve got a recipe for persistent, frustrating acne.
None of this means you need a 10‑step skincare routine. The opposite, actually. A consistent 3‑step system with the right active ingredients does more than a complicated routine you’ll abandon after two weeks.
Am I Acne-Prone, Oily, Sensitive — or All Three?
This question matters more than brand loyalty. And yes, you can be all three at once.
- Acne-prone means that you are prone to unblocked pores and you keep getting normal breakouts – whiteheads, blackheads, or red, inflamed pimples.
- Oily – shine appears by noon, particularly across forehead, nose & chin (the Tzone)
- Sensitive means products sting, your skin becomes red easily, or you are sensitive to fragrances and harsher ingredients.
If you‘ve got oily, acne-prone, not especially sensitive skin, Neutrogena‘s simple formulas tend to work out well as inexpensive essentials. If you‘re sensitive and prone to breakouts skin that reacts to a strong product by breaking out, or to a strong product by becoming irritated La Roche-Posay‘s Effaclar line was made for that hybrid.
A simple check from Article 1 you can borrow in your internal links: wash with a gentle cleanser, wait 30 minutes, and see if your skin is shiny, tight, or both. That quick test helps you decide which side of “oily vs sensitive” you’re really on.
La Roche-Posay vs Neutrogena — Brand Positioning in 60 Seconds
Two very different companies. Two very different price points.
- La Roche-Posay is a French brand that falls under the L‘Oreal umbrella. La Roche-Posay has a clear base with their products beginning with the thermal spring water from the town of La Roche-Posay itself, as well as relating back to their dermatological research . Their acne line (Effaclar) caters for oily, potentially spot-prone skin that is sensitive these include ingredients such as niacinamide, zinc, lipo hydroxy acid and salicylic acid, in products tested under dermatological supervision. You’ll usually pay more. Products commonly run about 15 to 35 dollars each.
- Neutrogena, an American brand (started in 1930, taken over by Jhonson & Johnson) for straightforward, no-nonsense, affordable skincare, has a strong portfolio of OTC acne products using proven ingredients (salicylic acid, benzoyl peroxide and adapalene) at real student-priced levels for the majority of products 8 to 20 dollars.
Quick framing that’s useful:
- Neutrogena competes on affordability and potency of basic actives.
- La Roche-Posay competes on formulation sophistication — gentler delivery systems, fewer potential irritants, and a focus on skin that’s both breakout‑prone and reactive.
Which matters more depends entirely on your skin and your bank account.
The Ingredients That Actually Fight Acne
Prior to looking at particular products, you must understand them. Four active ingredients do the work in OTC acne treatment. Everything else is supporting cast.
Salicylic Acid (BHA) — Pore Unclogger
Salicylic acid is a beta hydroxy acid that’s oil‑soluble — meaning it can penetrate into the pore lining and help dissolve the mix of dead skin cells and sebum that causes clogs. It’s the go‑to active for blackheads, whiteheads, and general “clogged pore” acne. You’ll find it in cleansers and leave‑on treatments from both brands, typically at 0.5% to 2% concentration.
- Good starting point for mild acne.
- Relatively gentle compared with some other actives.
- Works best when used consistently rather than as a random spot‑on‑pimple treatment.
Benzoyl Peroxide — Bacteria Killer
Benzoyl peroxide (BPO) takes a different approach. It generates oxygen inside the pore, which kills Cutibacterium acnes — one of the key bacteria associated with inflamed, red pimples. It also helps clear dead skin cells and reduce excess oil.
- Levels vary from roughly 2.5% to 10%, although lower strengths (e.g. 2.5%) may be almost as effective as higher strengths but cause less irritation.
- Within the active ingredients, Effaclar Duo from LRP contains benzoyl peroxide as the active and the “Stubborn Acne” product from Neutrogena also contains benzoyl peroxide as the active.
One real drawback — BPO can bleach towels, pillowcases, and clothing. Use white pillowcases if you’re applying it at night. That’s not a brand issue; it’s chemistry.
Adapalene — The Retinoid That Changed OTC Acne Treatment
Adapalene 0.1% used to require a prescription. It went OTC in 2016 and became one of the most effective acne treatments you can buy without seeing a doctor. Professional acne guidelines, including the American Academy of Dermatology’s acne treatment guidelines, consider topical retinoids a cornerstone of acne therapy.
How it works: adapalene regulates skin cell turnover, discouraging the layering up of cells that can clog pores. Best for black-and-white-headging acne and targeted at preventing symptoms in the long run.
Here‘s a little secret that most comparison blogs will try hard to hide from you: Neutrogena and La Roche-Posay sell you exact the same thing with the same concentration that has been proven effective against acne: 0.1%. Both contain the same active ingredient. The difference is in the inactive ingredients (the vehicle) and the price. Neutrogena’s version usually costs substantially less.
Adapalene may trigger a purge in the first 2 to 4 weeks. Your skin may seem worse before it‘s better. That‘s usually temporary. Use 2 times a week to start, then increase to every other night after 4 to 6 weeks if you tolerate it.
Supporting Cast: Niacinamide, Zinc, Ceramides, Hyaluronic Acid
None of these are actual acne fighters by themselves. They‘re simply the elements which turn your regimen into an attainable one.
- Niacinamide- (Vit. B3) calms irritation and redness and helps fade postacne marks. Present in all LRP Effaclar & Toleriane products.
- Zinc PCA — helps manage excess oil and support skin healing. A signature ingredient in the Effaclar range.
- Ceramides- Lipids that reinforce your skin barrier. Present in LRP Toleriane Double Repair moisturizer- if your barrier has been compromised due to a repetitive use of overwashing or aggressive products.
- Hyaluronic acidthat attracts water to hydrate the skin without making it greasy. The principal element in Neutrogena‘s Hydro Boost collection that is light, noncomedogenic, and inexpensive.
Head-to-Head — Best Products by Category
This is where brand comparisons actually matter. Not “which brand is better overall” — but which specific product tends to win in each category for acne‑prone college skin.
Best Cleanser for Acne-Prone Skin
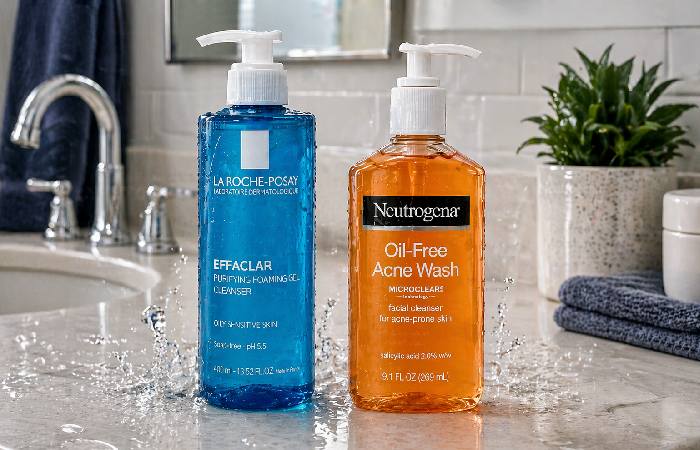
La Roche-Posay Effaclar Purifying Foaming Gel vs. Neutrogena Oil-Free Acne Wash
- Led to Effaclar Purifying Foaming Gel is designed with zinc pidolate and a soap free formulation, to balance excess oil production without to aggressively stripping the skin barrier. Fragrance free and suitable for oily , sensitive and acne prone skin. Many tolerate twice daily application without being too tight or dry.
- Neutrogena Oil-Free Acne Wash has 2% salicylic acid–meaning that it‘s treating your acne just while washing, as opposed to just neutralizing oil and dirt. It works well, can be found easily, and has a low price tag. The packaging itself actually cautions that irritation and dryness are more likely when used in conjunction with other topical treatments.
Several students felt that Neutrogena was a bit drying with daily use on the other hand, the winter-time heat in dorms really leeches out moisture from the air. In which case, reduce usage to once daily or use a moisturizer if that occurs.
- Winner for budget: Neutrogena (about 9–10 dollars for 9.1 oz at major US retailers).
- Winner for acne + sensitive combo: LRP Effaclar (about 15 16 dollars for 6.76 oz).
Best Acne Treatment (Leave-On)
La Roche-Posay Effaclar Duo vs. Neutrogena Stubborn Acne AM Treatment
- LRP Effaclar Duo contains approximately 5.5% benzoyl peroxide in a lightweight, non-occlusive, quickly absorbing formulation that layers well over moisturizers and sunscreens. The product is marketed as being effective for inflamed pimples; however, it does contain LHA and niacinamide to counterbalance its irritancy. Overall, the product has been well received for improving skin texture and preventing new blemishes; however results will inevitably vary by person.
- And Neutrogena Stubborn Acne AM Treatment contains 2.5% of micronized benzoyl peroxide (a lower percentage that rides along on the surface to kill acneassociated bacteria but maybe gentler on skin for newbies).
From a college‑student perspective:
- Winner for stronger “pimple‑control” potential: LRP Effaclar Duo (around 24–25 dollars for 1.35 oz).
- Winner for sensitive skin or firsttime BPO users: Neutrogena Stubborn Acne (about 10 11 dollars for 1 oz).
Best Moisturizer That Won’t Break You Out
La Roche-Posay Toleriane Double Repair vs. Neutrogena Hydro Boost Water Gel
- Neutrogena Hydro Boost Water Gel is popular for a reason. It’s oil‑free, non‑comedogenic, and centered around hyaluronic acid for lightweight hydration. It feels like a gel‑cream and sinks in quickly. At about 19–20 dollars for 1.7 oz on Neutrogena’s site, it’s the more accessible option up front, although the per‑ounce cost is relatively high.
- LRP Toleriane Double Repair does the job differently. Ceramides plus niacinamide help to repair and restore the skin barrier while repairing and providing deep hydration. This moisturizer targets skin irritated by acne ingredients — red, flaky, tight — and if needs repairing. Cost around 22–23 dollars for a 3.38 oz, this moisturizer is actually cheaper per ounce than Hydro Boost.
- Winner for lightweight daily hydration feel: Neutrogena Hydro Boost.
- Winner for barrier repair alongside acne treatment: LRP Toleriane Double Repair.
If you are breaking out and peeling or stinging you need to focus on barrier repair that‘s what allows you to keep using your acne actives for long enough to see an effect.
Best Retinoid (Adapalene) — The Budget Truth
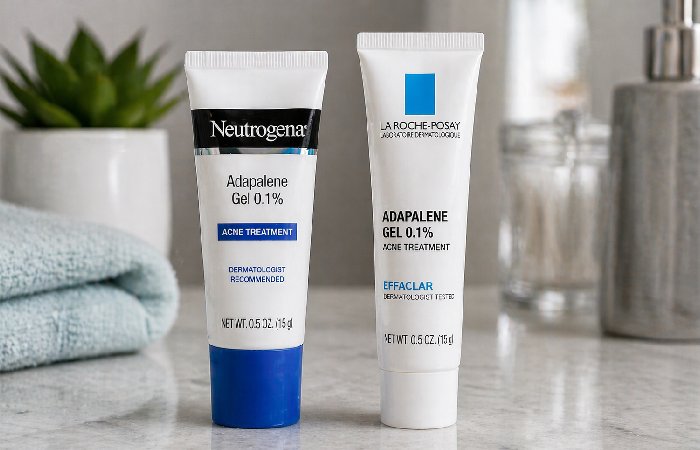
La Roche-Posay Effaclar Adapalene Gel 0.1% vs. Neutrogena Stubborn Marks PM Treatment (Adapalene 0.1%)
Same active. Same concentration. Different price tags.
Neutrogena’s adapalene gel is typically available around 14–15 dollars for 0.5 oz at big‑box US retailers. LRP’s version commonly runs closer to 29–30 dollars for a comparable size. Both are fragrance‑free and oil‑free. Both work the same way — normalizing cell turnover to prevent clogged pores and reduce existing comedones.
You might notice that the feel isn‘t quite the same and that one is a tad less drying to you than the other. Nevertheless, for most frugal students, the Neutrogena does the same job with the same retinoid at about half the price. And if price is the barrier between using adapalene consistently and not using it at all, cheaper wins every time.
-
Winner: Neutrogena — for most students, the savings make this an easy call.
Best Sunscreen for Acne-Prone Students
Don’t skip this. Adapalene and BPO both increase sun sensitivity. Post‑acne marks darken faster without UV protection. “I forgot” is not a sunscreen strategy.
- Yes. La Roche-Posay‘s Anthelios range is one of the most popular in terms of recommended sun protection for sensitive, blemish prone skin – light, noncomedogenic formulations offering excellent UVA/UVB coverage. Many dermatologists like its textures for reactive skin. You’ll generally pay about 25–36 dollars depending on the formula and size.
- Neutrogena makes several lightweight, oil‑free SPF options that work well for oily skin. Their Clear Face and Ultra Sheer lines are very inexpensive (around 10-16 dollars) and readily available in US drugstores. Some very sensitive students find some Neutrogena formulations irritating or reacting to pilling with certain moisturizers so patch test if you have reactive skin.
- Winner for protection + sensitive‑skin tolerance: LRP Anthelios.
- Winner for budget and accessibility: Neutrogena Clear Face or Ultra Sheer.
The best sunscreen is the one you’ll actually reapply on busy days.
Price Reality Check — What a College Student Actually Pays
Real‑world price examples, checked April 2026 at US retailers (prices vary by store, sales, and region).
A full LRP routine (cleanser + treatment + moisturizer) runs roughly 64 dollars at these example prices. The Neutrogena equivalent runs roughly 40 dollars. That 24‑dollar gap matters on a student budget — that’s textbook money or a week of coffee.
But per ounce, LRP’s Toleriane moisturizer is actually cheaper than Hydro Boost (about 6.80 vs 11.70 dollars per ounce). Price math isn’t always straightforward. Always read the sizes on the bottles before assuming the “cheaper” brand is actually the better deal per use.
The Verdict — Which Brand Should You Choose?
Use this as a quick decision map:
There’s no scenario where one brand is objectively superior across every category. That’s the honest answer. The “best” brand is whichever one matches your specific skin type and the amount you can spend each month.
3-Step Dorm Routines at Three Budget Tiers
Three products. Morning or night. Taped to your bathroom mirror if you have to. Consistency beats complexity for acne.
Under 25 dollars — The Starter Kit
Goal: Clean + treat + not wreck your barrier.
- Cleanse: Neutrogena Oil-Free Acne Wash (2% salicylic acid) — ~9.99 dollars.
- Treat (PM, 2–3x/week): Neutrogena Adapalene Gel 0.1% — ~14.99 dollars.
- Total: ~24.98 dollars.
If you really can‘t find an acceptable moisturizer yet, apply a very thin layer of an inexpensive basic unsensitizing moisturizer that you already know you can tolerate. When you‘re ready, a nourishing noncomedogenic moisture source should be the very first product you add to your regimen and after that, skipping it longs is an open invitation for irritation and rebound oil.
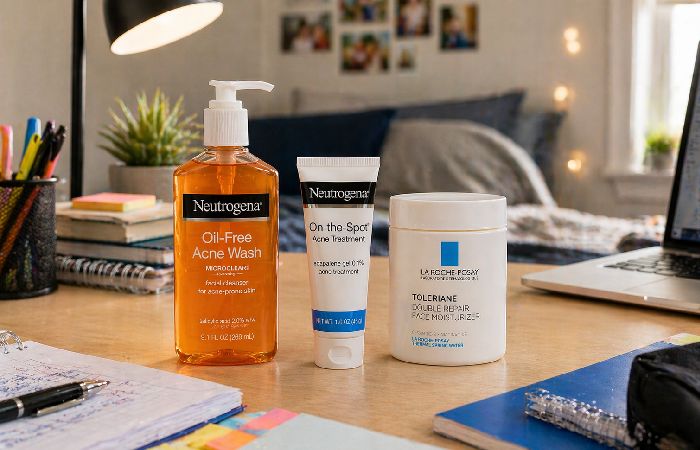
Under 45–55 dollars — The Balanced Build
Goal: Add one higher‑quality product where it matters most.
- Cleanse: Neutrogena Oil-Free Acne Washwas at about 9.99 dollars.
- Treat (PM): LRPEffaclarDuo (50.5=, B oint 5.9 to dollars.
- Moisten (AM or both): Neutrogena Hydro Boost Water Gel ~19.99 dollars.
- Total: about 54.97 dollars at list price, usually less with sales or coupons.
This the hybrid – budget cleanser, premium leave-on treatment (formulation quality is more important here) and cheap, easy-to-use moisturizer. Only has one active step and one barrier supporting step which is easier to persevere with over exams.
Under 70–80 dollars — Splurge Where It Counts
Goal: Combine BPO and adapalene without overloading your skin.
- Cleanse: LRP Effaclar Purifying Foaming Gel — ~15.99 dollars.
- Treat (PM):
-
-
LRP Effaclar Duo (BPO) on one night.
-
Neutrogena Adapalene 0.1% on the alternate night (no BPO that night).
-
- Moisturize: LRP Toleriane Double Repair — ~22.99 dollars.
- Total: around 78.96 dollars, but products typically last 2–3 months, so the monthly cost often lands near 26–39 dollars.
Alternating nights for BPO and adapalene is a common dermatologist strategy to avoid over‑irritating your barrier. Don’t use both on the same night unless a clinician specifically tells you to.
Next upgrade after 4–6 weeks: Add a daily sunscreen you’ll actually wear.
Freshman Skincare Mistakes That Make Acne Worse
You’d be surprised how many breakouts are self‑inflicted. Five things to stop doing immediately.
- Over‑washing your face. Twice a day is enough. Three or more times won’t make acne heal faster — it will strip your barrier, trigger rebound oil production, and often make breakouts worse.
- Stacking multiple actives on the same night. Salicylic acid cleanser, then benzoyl peroxide, then adapalene, then an exfoliating toner — your skin can’t handle that all at once. Pick one or two actives max and give them room to work.
- Forgetting to moisturize because “my skin is oily.“Oily skin requires moisture just like every other skin type. Telling your skin to stop producing oil by stripping away moisture will encourage your sebaceous glands to pump out even more oil. A light, noncomedogenic moisturizer won‘t clog pores; avoiding it will only make flare-ups more aggravating and difficult to manage.
- Physical scrubs on inflamed acne. The use of physical scrubs on pimples introduces even more bacteria into the skin causing the skin to become damaged resulting in marks and scars. Chemical exfoliants (salicylic acid/ adapelene) tend to be much gentler.
- Expecting overnight results. Most acne treatments need at least 6–8 weeks to show noticeable improvement. If you quit after 10 days because “it’s not working,” you never gave it a fair chance.
A Note on Product Safety — Benzoyl Peroxide and Storage
You might‘ve heard about benzene in products with benzoyl peroxide. This is the story of what really happened and (in the end) what‘s important to you.
In March 2025, the US FDA released results from testing 95 benzoyl peroxide acne products (see the full summary in the FDA’s benzoyl peroxide and benzene investigation). More than 90% had undetectable or extremely low levels of benzene. A limited number showed higher levels and were voluntarily recalled at the retail level (stores pulled them from shelves). Regulators described the estimated cancer risk from typical daily use, even over decades, as very low.
So should you panic? No. But storage and replacement habits matter:
- Benzoyl peroxide can decompose to benzene at higher temperatures.
- This is a huge concern to college students who would be able to leave things in a boiling car, on a bright sunlit sill or near a heater.
Practical steps, in line with current dermatology‑society advice:
- Store BPO products at room temperature or cooler, away from direct heat and sunlight.
- Replace them every 10–12 weeks if you’re using them regularly.
- Toss anything past its expiration date.
- Don‘t keep products in areas where the temperature will get very hot often (e.g. in the back of a car during summer).
If you are still concerned, discuss with a dermatologist options such as adapaleneonly polices or ones with other actives.
When to See a Dermatologist
OTC products can work very well for mild to moderate acne. But they have limits.
Consider seeing a dermatologist (or campus health clinic) if:
- Nothing has cleared your acne after 8-12 weeks of using OTC.
- You are developing cystic or nodular acne, painful cystic or nodular acne.
- There are there are persistent scars or dark patches that are not fading due to acne.
- Breakouts are making you feel worse, less confident or getting in the way of your daily life.
Prescription-strength retinoids, oral medications, and hormonal treatments minimize some breakouts that salicylic acid and benzoyl peroxide are unable to affect.
Frequently Asked Questions
Is La Roche-Posay worth the extra money vs. Neutrogena for acne?
It really depends on your skin. If you‘re a sensitive, breakout-prone mess, the more gentle formulations in the Effaclar range with their niacinamide and zinc amounts to good value, in my opinion. If your skin is untroubled by harsh ingredients and money (or lack thereof) is your issue, the cheaper Neutrogena contains the same basic actives salicylic acid, BPO and adapalene. There is no overall ‘this is worth it’ just what you need to buy each month.
Can I use both La Roche-Posay and Neutrogena in the same routine?
Yes that‘s easy. The brands don‘t clash. I like Neutrogena facial cleanser, if I‘m using an LRP treatment, and the other brand‘s spf or moisturizer. Logos don‘t matter to my skin‘s chemistry.
Which is better for hormonal acne in college students?
Neither of the two brands’ OTC products can do anything about your hormones. Topicals such as adapalene (from either line) can help control the breakouts resulting from your hormonal changes, along your chin and jawline. If your breakouts are visibly cyclical or have excessive stress and haven‘t responded to an 8-week regular course of over-the-counter treatments then your dermatologist may go over prescription options including retinoids, oral medications and/or hormone therapy.
How long until I see results from OTC acne treatment?
Expect at least 6-8 weeks. You will have what is called a “purging” phase with adapalene during weeks 2-4 where breakouts will temporarily increase; just give it time to work. If you notice no changes at all by weeks 10-12, then switch up your regimen, or seek a dermatologist.
Is Neutrogena adapalene the same as La Roche-Posay adapalene?
They contain the same active ingredient – adapalene 0.1%, just in a different inactive base. Some people prefer one over the other in terms of side effects or comfort, but you are essentially getting the same strength of retinoid from either one. The Neutrogena product is generally around half the price, which makes daily use more feasible for most students.
Does benzoyl peroxide cause cancer?
There is no current evidence or official guidance to indicate that users should cease using all BPO products. It‘s the benzene – which is a different thing – that is the concern, as it forms in some products under certain circumstances. Testing revealed that 90.73% of BPO products contained undetectable or little benzene; recalls have been initiated for specific products that listed higher amounts. What regulators say: “it is extremely unlikely that significant levels would be produced during typical use, so the overall risk from normal use is very low”. Easy solution: use BPO products correctly, replace frequently and consult your dermatologist if you have concerns or want alternatives.
Disclaimer
This publication is for general information purposes only and should not be considered medical advice. Always consult a dermatologist or healthcare professional with expertise on your skin and acne before commencing, changing or discontinuing treatment or any product.
About the Author:
Abdul Rahman, has more than 4 years experience writing about consumer electronics, laptops and IT support solutions in Ireland and the UK. He simplifies complicated repair terms into easy, useful advice so you can be sure of your buying decisions.
Published by: www.health4fitnessblog.com a convenient source of content on business, health, technology and lifestyle that strives for relevance and use rather than sophisticated implementations and complex concepts.