Curry leaves (Murraya koenigii) are aromatic green leaves widely used in South Asian cooking and traditional medicine for centuries. Known for their unique citrusy and slightly nutty flavor, they add depth and aroma to many dishes, especially curries and rice preparations. Apart from their rich taste, curry leaves are valued for a range of health benefits supported by modern research.
One of the great advantages of curry leaves is their versatility and ease of use. They can be easily added fresh, dried, or as powdered supplements to enhance both flavor and nutrition in everyday meals. Whether sautéed in oil at the start of cooking or infused into soups and sauces, incorporating curry leaves into the diet is simple and practical, making them accessible for culinary and health purposes alike.
Definition Of Curry Leaves
Curry leaves, scientifically known as Murraya koenigii, are aromatic leaves native to South Asia, particularly India, Sri Lanka, and Bangladesh. Although they share the name with curry powder, curry leaves are the actual leaves of the curry tree and differ significantly from the spice mixture. These fresh, glossy green leaves possess a unique citrus-like aroma and have been used for centuries in both culinary applications and traditional Ayurvedic medicine.
The curry tree belongs to the Rutaceae family and is widely cultivated across the Indian subcontinent, except at higher Himalayan elevations. Fresh curry leaves are predominantly used in South and Southeast Asian cooking, where they are typically fried with oil, mustard seeds, and onions as a base flavoring agent.
Properties Of Curry Leaves
Phytochemical Composition
Curry leaves contain an impressive array of bioactive compounds that contribute to their therapeutic properties. Research has identified numerous beneficial substances including alkaloids, glycosides, and phenolic compounds. The leaves are rich in specific compounds such as linalool, alpha-terpinene, myrcene, mahanimbine, caryophyllene, murrayanol, and alpha-pinene.
The primary alkaloids found in curry leaves include girinimbine, mahanine, mahanimbine, isomahanimbine, murrayazolidine, and murrayazoline. These carbazole alkaloids are responsible for many of the plant’s pharmacological activities, particularly its anti-inflammatory and antioxidant effects.
Multiple studies have demonstrated curry leaves’ potent antioxidant capacity. The benzene fraction of curry leaves showed maximum antioxidant activity (3510.4 μmol) at 100 μg/mL, followed by ethyl acetate and petroleum ether fractions. These antioxidant effects help neutralize free radicals and reduce oxidative stress, which is associated with chronic disease development.
The antioxidant activity is attributed to various phenolic compounds, monoterpenes, and carbazole alkaloids present in the leaves. Research indicates that curry leaf extracts provide significant protection against oxidative damage in multiple organ systems including the nervous system, heart, brain, and kidneys.
Benefits of Curry Leaves
Blood Sugar Management
Clinical studies have demonstrated curry leaves’ effectiveness in managing diabetes. Research published in multiple peer-reviewed journals shows that curry leaf extracts significantly reduce blood glucose levels in diabetic animal models.
In one study, treatment with Murraya koenigii extract at 500 mg/kg showed significant restoration of blood glucose and HbA1C levels compared to control groups. The maximum reduction in fasting blood glucose levels reached 57.76% in rats treated with aqueous extract. These effects are attributed to the leaves’ ability to influence insulin activity and protect pancreatic beta cells.
Cardiovascular Health Benefits
Curry leaves demonstrate significant cardiovascular protective effects. Research indicates they can help reduce major risk factors for heart disease, including high cholesterol and triglyceride levels.
A clinical study involving menopausal women with hyperlipidemia found that daily consumption of 5g curry leaf powder for 45 days significantly reduced total cholesterol, LDL cholesterol, and triglycerides while increasing beneficial HDL cholesterol by 12%. Animal studies have shown that curry leaf extract containing mahanimbine prevented diet-induced complications such as high blood lipids, fat accumulation, inflammation, and oxidative stress.
The leaves contain compounds like alkaloids and flavonoids that assist the liver in metabolizing fats and preventing fat accumulation in the bloodstream. Additionally, their high antioxidant content helps reduce oxidative stress and inflammation, two key contributors to cardiovascular disease.
Iron Content and Anemia Prevention
Curry leaves are an excellent source of iron, making them particularly valuable for preventing iron deficiency anemia. Fresh curry leaves contain 0.93 mg/100g of iron, while dehydrated leaves contain significantly higher concentrations at 10.44-12 mg/100g.
This high iron content makes curry leaves especially beneficial for vegetarians and vegans who may have limited access to heme iron from animal sources. The iron in curry leaves is in a bioavailable form that can be effectively absorbed by the body, supporting hemoglobin production and oxygen transport.
Digestive Health Support
Traditional Ayurvedic medicine has long recognized curry leaves for their digestive benefits. The leaves possess mild laxative properties that help regulate the digestive tract and can be effective in treating both diarrhea and constipation.
Research indicates that curry leaves stimulate digestive enzymes, reduce indigestion, and support overall gastrointestinal health. Their anti-inflammatory and antimicrobial properties also contribute to maintaining a healthy digestive system.
Anti-inflammatory and Antimicrobial Effects
Studies have demonstrated curry leaves’ significant anti-inflammatory properties. Research shows that hydroalcoholic extracts rich in carbazole alkaloids significantly reduce inflammatory cytokines including IL-1β, IL-6, and TNF-α. The active compound girinimbine has been specifically identified for its ability to suppress inflammation by reducing pro-inflammatory cytokine levels.
The leaves also exhibit antimicrobial activities against various bacterial and fungal pathogens, making them useful for treating skin conditions, insect bites, and minor wounds.
Neuroprotective Properties
Emerging research suggests curry leaves may offer neuroprotective benefits. Studies indicate that curry leaf extracts can increase levels of brain-protecting antioxidants including glutathione peroxidase, glutathione reductase, and superoxide dismutase in brain cells.
Animal studies have shown that curry leaf extract may help protect against neurodegenerative conditions and improve memory scores in both young and aged subjects with induced dementia. These effects are attributed to the leaves’ ability to reduce oxidative damage in brain cells and enzymes associated with neurodegeneration.
Potential Anti-cancer Effects
Laboratory studies have identified anti-cancer properties in curry leaves. Test-tube research has shown that curry leaf extracts exhibit powerful anticancer effects against aggressive breast cancer cells and can alter the growth of various cancer cell types.
The alkaloid compound girinimbine has been specifically noted for inducing cancer cell death. Additionally, antioxidants in curry leaves including quercetin, catechin, rutin, and gallic acid contribute to these anticancer effects. However, human clinical trials are still needed to confirm these potential benefits.
Additional accessible information about the evidence-based health benefits of curry leaves is available for readers interested in a medically-reviewed overview supporting these health claims.
Uses Of Curry Leaves
Culinary Applications
Curry leaves are primarily valued as a culinary ingredient in South and Southeast Asian cuisines. They are typically fried in vegetable oil along with mustard seeds and chopped onions during the initial stages of cooking to release their aromatic compounds. The leaves are essential ingredients in dishes like kadhi, vada, and rasam, and are commonly used to flavor various curries and rice preparations.
In Cambodia, the leaves are cooked and used as soup ingredients, while in Java, they are often stewed to flavor gulai. While dried curry leaves are available, their aroma and flavor are significantly inferior to fresh leaves.
Traditional Medicine
In Ayurvedic and Siddha medicine, various parts of the curry tree including leaves, roots, and bark are used therapeutically. Traditional applications include using the leaves as tonics for digestion, as antiemetics for nausea, and for reducing fever.
The leaves and roots are traditionally used as analgesics, treatments for hemorrhoids, body heat reducers, and anti-inflammatory agents. They are also employed in managing skin conditions like leucoderma and various blood disorders.
Cosmetic and Hair Care
Curry leaves have traditional cosmetic applications, particularly for hair care. Fresh leaves are boiled with coconut oil until reduced to a black residue, creating an excellent hair tonic for maintaining natural hair color and promoting hair growth. Modern research supports these traditional uses, showing that curry leaf oil formulations can help maintain natural skin pigmentation and provide modest sun protection.
Therapeutic Preparations
Curry leaf supplements are available in tablet form, typically containing powdered organic curry leaves. These tablets are particularly recommended for individuals with iron deficiency due to their high mineral content. The tablets provide approximately 14 mg of iron, which represents about 100% of the average daily requirement for adults.
Conclusion
Curry leaves are a natural powerhouse of antioxidants, vitamins, and bioactive compounds that support multiple aspects of health. From managing blood sugar and cholesterol to promoting digestion, skin, and hair health, these versatile leaves provide easy and natural ways to enhance well-being. Backed by both traditional use and scientific research, incorporating curry leaves into daily meals is a simple, flavorful step toward better health.
There’s no doubt about it: smoothies are the ultimate health hack. They’re a ridiculously easy way to sneak more fruits and veggies into your diet. They can be part of a healthy breakfast or serve as a delicious, post-workout snack. Plus, you can add all sorts of ingredients into smoothies, from matcha and protein powder to flavorful CBD tinctures and so much more.
But if you’re relatively new to the smoothie trend, you may have learned the hard way that some ingredients are better suited to smoothies than others. Once you’ve been burned by a terrible-tasting smoothie, it’s all too easy to fall back on the same old ingredients you always use. To help you break out of your smoothie rut, we’ve rounded up 10 unconventional smoothie ingredients that taste great and do your body good. Enjoy!
Table of Contents
1. Silken Tofu
Yes, you can put tofu in a smoothie — and, yes, it will taste good! However, the key to a deliciously-creamy smoothie is to use silken tofu (aka, Japanese-style tofu). Unlike regular tofu, silken tofu has a softer consistency that blends well and makes a deliciously-creamy shake. It’s also high in protein, making it a great alternative to yogurt-based smoothies. Be aware that silken tofu doesn’t need to be refrigerated until opened, so it may be located in a different section of the grocery store than regular tofu.
2. Turmeric
Have you tried putting turmeric in your smoothie before? If not, consider sprinkling some of the “golden spice” into your next smoothie. A staple in Ayurvedic medicine, turmeric is probably best-known for its potential anti-inflammatory and antioxidant properties. On its own, turmeric has a slightly earthy, bitter taste, but it tastes delicious when combined with sweet fruits such as pineapple and mango.
3. Red Cabbage
If you want your smoothie to be both super-healthy and Instagrammable, look no further than red cabbage. This dark red/purple plant is the secret to turning your smoothie into a vivid, purple miracle that begs to be photographed. Of course, looks aren’t everything, and red cabbage delivers in the health department, too. Specifically, red cabbage is high in anthocyanins, a type of flavonoid that is associated with a reduction in hypertension risk. It’s also rich in vitamins, minerals, and dietary fiber.
4. CBD
Cannabidiol (CBD) products have been having a big moment lately. According to a 2019 Gallup poll, one in seven Americans now uses CBD for its potential therapeutic benefits, which run the gamut from pain relief to stress management. CBD isn’t psychoactive and won’t get you “high” (that’s THC, a different chemical compound from the same plant).
One of the most delicious ways to reap the therapeutic benefits of CBD? Adding it to your smoothie, of course. For extra health benefits, try adding CBD with terpenes to your smoothie. In a nutshell, terpenes are the organic compounds that give many plants — including the cannabis plant — their distinct aromas and flavors. Some terpenes promote energy and focus, while others have a relaxing effect. It’s an easy (and tasty) way to enjoy some extra health benefits in your daily smoothie.
5. Tahini
If you enjoy nut butter, just wait until you try tahini (aka, sesame seed paste). Made from sesame seeds and oil, tahini boasts a rich, nutty flavor that lends itself well to a variety of dishes. It’s also highly nutritious, containing lots of healthy fats and plant-based protein. The best part? It tastes absolutely delicious in a smoothie. On its own, tahini can be slightly bitter, but when it’s combined with other smoothie ingredients — and with cinnamon, in particular — it’s nothing but sweet, creamy perfection.
6. Spirulina
If you’ve never heard of spirulina, it’s time to put this incredible superfood on your radar. Originally used by the Aztecs to boost endurance, spirulina is a type of cyanobacteria (blue-green algae) that first became famous when NASA astronauts began using it as a dietary supplement.
While there aren’t many large-scale studies on spirulina, some research suggests that it may have anti-inflammatory properties, as well as anti-cancer, anti-viral, and anti-allergic effects. It’s also extremely rich in many nutrients, making it one of the most nutrient-dense foods on the planet. As with any dietary supplement, make sure that you talk with your doctor before adding spirulina to your smoothie.
7. Cricket Powder
Eating insects isn’t weird. On the contrary, it’s as old as mankind itself. In fact, munching on bugs is still the norm in many cultures across Latin America, Africa, and Asia.
With those facts in mind, give cricket powder a chance in your smoothies. While it may seem gross, cricket powder is surprisingly tasty. It has an earthy, slightly nutty profile that will give your smoothie a wonderful kick of flavor. Cricket powder is also a great source of proteins, fats, minerals, vitamins, and fiber — all the more reason to jump on board the insect-eating train.
8. Cacao Nibs
If cricket powder is too unconventional for you, here’s a smoothie ingredient that may be more to your liking: cacao nibs. Often called “nature’s chocolate chips,” cacao nibs are simply crumbled pieces of dried cacao beans, which is the same bean used to make chocolate candy. Cacao nibs have a delicious, chocolate-like flavor that pairs amazingly well with mint and peanut butter smoothies. Best of all, they’re rich in antioxidants, fiber, and heart-healthy flavonoids.
9. Lime Juice
Love margaritas, but hate what they do to your waistline? Swap your boozy, summertime drinks with a refreshing smoothie made with lime juice. Limes are low in calories and high in vitamin C and antioxidants — both of which have been linked to improved immunity, healthier skin, and lower blood sugar. Lime juice is also a good source of magnesium and potassium, so drink up!
10. Cactus Paddles (Nopales)
You may have seen cactus paddles at the grocery store before. (If not, you can usually find them at a Mexican market). Cactus paddles, or nopales, are a dietary vegetable and a staple in numerous Mexican cuisine dishes. Some of their many purported health benefits include lowering blood pressure, wound healing, and reducing cholesterol. For best results, pair cactus paddles with pineapple and fresh orange juice.
Building a Better Smoothie
If you want to take your smoothie game to the next level, these ingredients are a delicious and nutritious way to do it. Done right, smoothies can satisfy your hunger while keeping your fitness goals on track.
Balanced Diet seems like an easy task at first glance. However, some do not have the correct information and often confuse what is right and what is not at mealtime.
In this way, “magic” eating plans that promise to lose weight or have the desired shape become one of the worst allies.
The “balanced diet or detox diet” is usually one of the most used methods to achieve this.
Though the intake of juices, teas, raw fruits, and vegetables that contain low carbohydrate foods.
So they seek to detoxify the body, without taking into account the risks involved in eating in this way.
To this, we can add those who do not consume gluten, a fashion that, in general terms, would not seem to be a danger to anyone.
The truth is that celiacs are the ones who, due to their intolerance to this protein, must eliminate everything that contains wheat, oats, barley, and rye.
Unfortunately, some do not suffer from this disease and continue this trend.
Table of Contents
Diet Restriction vs Balanced Diet
So when it comes to eating healthy. And it doesn’t mean that meals should be tasteless, low in calories, and fat-free.
Incorporating different types of nutrients daily is necessary to ensure that the body finds the correct harmony, without having to resort to “extreme” methods.
Eating a few carbohydrates and nutrients increases the feeling of hunger and anxiety.
Keep in mind that the prohibition of certain foods does not help. But instead generates a desire that is difficult to stop.
Every time a person consumes excess food for a short period, what causes is more desire and lack of control for that product. Cotton Kurta
The same happened when eliminated from the diet. So the aspiration to eat that food increases, and there is a “rebound effect.”
Key to Health: Balanced Diet
Vegetables and fruits, dairy products, complex carbohydrates. And such as rice, potatoes, sweet potatoes, corn, bread and flours, lean meats and unsaturated fats, nuts, avocado.
Vegetable olives are some of the options that do not. And they may be absent at mealtime.
Nutritionist Agustina Murcho explained that during the day and every day. So you should consume half a plate of carbohydrates, half of the protein, and one whole of vegetables.
Something important is that the amounts and the occurrence of each food be subject to a lot on each one. So to know how much to eat, we must consult a specialist, he assured.
And additional: The sign is that each proportion contains that variability. So in this way, it provides much more satiety to the body, and there is no imbalance.
Healthy Diet: 8 Key Tips
For a diet to be healthy and balanced. So it must contain all the nutrients and inadequate amounts so that a person has all his needs covered and is not lacking.
This Community of Madrid nutrition guide points out that proteins. So carbohydrates and fats are the only nutrients that provide energy or calories.
Need to be taken every single day in quantities of several grams.
Vitamins and minerals required in smaller proportions. And vitamin C and zinc, it should only take a few milligrams. Also, even less would have to ingest vitamin B12 as folate or vitamin D.
Balanced Diet: Key Tips
1) Variety of Foods to Maintain Well Balanced Diet
The range of nutrients obtained by eating all kinds of food. So they must be added from all groups (cereals, fruits, vegetables, oils, dairy products, meats, etc.), And since no food contains all the necessary nutrients.
2) Eat More Fruits & Vegetables
The diet must include a large amount of plant-based foods, taking those of animal origin in moderation.
A clear example is a Mediterranean diet. And which promotes the consumption of cereals, fruits, vegetables, and legumes, fiber.
It also includes fish, olive oil, and the moderate intake of meat and fats of animal origin.
Vegetables contain water, carbohydrates, fiber. And on the contrary, they do not have much fat and no cholesterol.
They also have almost all water-soluble minerals and vitamins.
3) Reduce the Intake of Industrial Pastries
Industrial pastries, sweets, snacks, sausages, ice cream, or fast food eaten. But in great moderation.
4) The Adequate Proportion of each Food
It is important to eat everything. But also in the right portions. Besides the Spanish Society of Family and Community Medicine (Semfyc), suggests in this guide the rations be taken from each food.
Fish and Shellfish
3-4 servings a week
Lean Meats
3-4 servings a week
Eggs
3-4 servings a week
Vegetables
2-4 servings a week
Nuts
3-7 servings a week
Milk, Yogurt, and Cheese
2-4 servings a day
Olive Oil
3-6 servings a day
Vegetables
2 servings a day
Fruits
3 servings a day
Bread, Cereals, Rice, Pasta, and Potatoes
4-6 servings a day
Water
4-8 servings a day
Wine or beer
Optional and moderate consumption
Physical activity
Daily (at least 30 minutes)
5) Moderation in the Quantities Consumed
The diet must provide the amount of energy necessary for the proper functioning of the body.
Also, it is advisable to eat moderately to avoid obesity.
This measure prevents diseases related to excess weight. And such as high blood pressure, some cardiovascular diseases, diabetes, and some types of cancer.
6) Five Meals a Day
Another key to a healthy diet is the correct distribution of food. Also self recommends five meals a day (breakfast, snack, lunch, snack, and dinner).
7) Make it Appetizing
A healthy intake does not have to be an effort for the person. So It designed in such a way that it is vibrant and appealing to the person taking it.
Otherwise, following her would become very difficult, and she would probably end up leaving.
8) A Good Amount of Liquids
Though Semfyc indicates, water is essential for the maintenance of life. And suggested intake is 1 or 2 liters a day, about 4 to 8 glasses are.
When it‘s a loved one, and that loved one is battling addiction, it‘s every day in one combination of fear, frustration, and hope that something will change. You‘ve likely worn yourself down all available intervention an angry talk, tearful begging, ineffective ultimatums that fall apart before sunlight. The trap of your own words paralyzes you, and silence has failed you also.
If there is an urgent situation involving imminent danger for example, overdose risk, life threatening self harm or violence omit all intervention planning and call emergency services or a crisis line immediately. Planned interventions should only be used when there is no urgent life threatening emergency but the pattern is clearly unsustainable.
A formal intervention offers a structured path forward. When led with professional guidance and careful preparation, some professional intervention organizations report that around 80–90% of professionally led interventions result in the person agreeing to enter a treatment program, when “success” is defined as entering treatment, not long‑term recovery. These outcomes are not guaranteed and depend heavily on planning, follow‑through, and the quality of care that comes afterward.
This comprehensive guide will show you step-by-step how to plan and execute a successful intervention what are the various intervention models, how do you assemble your team, what should you say (and not say), and what you do if your loved one refuses treatment. These are the proven intervention tips that can make sure your intervention is a success whether you’re hiring a professional interventionist or holding it on your own with family.
For family and friends who have accepted that they do not want to wait for the problem to go away.
Table of Contents
Quick Answers
What is an intervention?-> A series of purposely organized structured encounter where family and friends show the consequences of addiction and present an agreed upon treatment strategy.
Do interventions work? -> Some of the intervention packages used by professional intervention organizations say they successfully lead 80–90% of the persons they target to enter treatment but as far as longterm recovery goes, what happens afterwards is what counts.
What is the most common mistake? -> Visiting the dark side without any plan or professional guidance.
Which one is best for my family? -> It depends on time, fidelity, and style see the Johnson, ARISE, and CRAFT models below.
What if they refuse? → Hold your boundaries. Even when people initially refuse, some go on to accept treatment later — sometimes within days or weeks of the intervention.
What Is an Intervention?
Interventions begin with clear, calm communication focused on support
An intervention is a preplanned, highly organized face-to-face meeting, led by a therapist or counselor and attended by family members and close friends, that brings to light tangible evidence the addict‘s substance use has negatively impacted the lives of those he or she loves. An intervention provides a clear course of action toward treatment.
This isn‘t an attack that is meant to shame or punish. This is a well-coordinated, strategic installation that reads: this cannot go on; here‘s where we can go from here.
How Interventions Work (The Core Mechanism)
Addiction changes the brain’s reward system and decision-making circuitry. People struggling with substance use disorders genuinely may not recognize the severity of their situation — this isn’t stubbornness, it’s a feature of the disease itself.
An intervention disrupts that pattern by making the situation impossible to dismiss. When four or five people your loved one genuinely respects sit in the same room — each calmly presenting specific, undeniable evidence — the usual deflections stop working. A ready treatment plan removes the “I don’t know where to go” excuse. And clearly stated consequences show what continuing looks like, in terms the person can feel.
That said, an intervention is not a magic bullet. It’s the beginning of a process, not a cure.
Types of Addiction That May Require an Intervention
What all five have in common: the action has become repetitive, it‘s doing tangible damage and the individual either isn‘t aware that there‘s an issue or is unwilling to take proactive steps.
Types of Intervention Models Compared
Indeed, most guides tend to treat interventions as a one size fits all. They are not. There are three well known models to fit an intervention to a given situation and picking the right one for yours can make a real difference.
The Johnson Model (Traditional / Surprise-Based)
The term intervention is generally associated with this type of intervention, developed by Vernon Johnson in the 1960‘s. It involves family and friends who organize a team to confront an addict without their knowledge about the severity of their addiction and threaten treatment there and then.
Best for: Urgent situations if the client‘s in active crisis or if prior attempts to communicate have failed totally or if time is limited to get the client into a treatment bed.
Risk: The very nature of a surprise might prove an attack. If the client is very defensive or insecure, the result might be complete withdrawal.
The ARISE Model (Invitational / Graduated)
Developed by Dr. Judith Landau, ARISE (A Relational Sequence for Engagement) takes the opposite approach from Johnson. There are no secrets. The individual is invited into the process from the very first conversation.
ARISE uses a graduated three-level system:
Level 1 (The First Call): A professional discusses with the family the possibility of providing support initiation8.
Level 2 (Strength in Numbers): Family meetings that include the patient, motivating him/her to treatment
Level 3 (Formal intervention): a session arranged only when Level 2 is deemed unsuccessful
It is most suitable: With families who want to hold on to trust and transparency, situations where the relationship is not too damaged, and with people who deal better with working as a team rather than a battle.
Time: This method will take longer due to the graduated timeline. It may be inappropriate when there is a time constraint requiring quick action.
CRAFT (Community Reinforcement and Family Training)
Unlike Johnson and ARISE, CRAFT is an evidencebased, behavioral approach that has been developed from research support by the National Institute on Drug Abuse. CRAFT is not a one time intervention, but instead teaches family members specific skills in communication and behavior that:
Strengthen the individual‘s sober behaviors (increase the positive outcomes of sobriety)
Allow natural consequences for substance use (stop enabling)
Enhance your family member‘s own well-being
Slowly bring the person‘s motivation towards the treatment.
Best for: Families of treatment refractory cases, when there is a perception that an exploratory formal intervention is a risk too far and when the family member wishes to re-establish a feeling of control and enhance their own mental health irrespective of the result.
Risk: Involves being persistent on a weekly/monthly basis. There is no fixed point where you have got there, instead you are encouraged to remain consistent.
Intervention Models at a Glance
Feature
Johnson Model
ARISE
CRAFT
Core Style
Confrontational / Surprise
Invitational / Collaborative
Behavioral / Skill-based
Individual Included From Start?
No
Yes
N/A (no formal meeting)
Confrontation Level
High
Low–Medium
None
Timeline
Single meeting
Weeks (graduated)
Weeks to months
Primary Goal
Immediate treatment entry
Voluntary engagement
Behavior change + treatment motivation
Family Focus
Medium
High
Very High
Evidence Base
Clinician-established (1960s)
Research-supported
Strong peer-reviewed evidence (NIDA-funded)
Best When…
Crisis requires immediate action
Relationships are intact; trust matters
Formal intervention feels too risky or has failed
How to choose: For time critical or dangerous situations the Johnson Model with professional Interventionist would be recommended. For long term family healing, ARISE might be better to make sure relationships are healthy. If a formal confrontation is inappropriate for your family or you‘d like to ease into it, CRAFT offers tools to alter the system without ever having the first (or third) meeting.
How to Plan a Successful Intervention Step by Step
Key steps involved in preparing and executing a successful intervention
Preceding planning is what distinguishes between a successful intervention and one that does harm. Having to hurry to get this stage done is the most common reason for intervention failure.
Step 1 — Consult a Professional
Go Ask for Help First! Talk to someone who can help before you do anything else. This might be a licensed psychologist, a licensed addiction counselor, a certified interventionist or a social worker experienced with addiction.
A professional brings three things you can‘t replicate on your own:
Objectivity They“re not emotionally caught up in the situation.
Structure They know how to manage the meeting in a way that is productive and on- track.
Safety management They‘re trained in volatile reactions
This step is especially critical if your loved one has a history of violence, severe mental illness, suicidal ideation, or is using multiple substances. Families can contact SAMHSA’s National Helpline at 1-800-662-4357 for free, confidential, 24/7 guidance on finding local professionals and treatment options.
Step 2 — Assemble Your Intervention Team
You need 4 to 6 people. Not a crowd — a small, deliberate group of people your loved one genuinely cares about. A parent. A sibling. The friend who’s known them since college. A trusted mentor or faith leader. The key is relationship quality, not quantity.
Do not include anyone who:
Has an unmanaged substance use problem themselves
Is likely to become aggressive, overly emotional, or go off-script
Has a hostile or deeply strained relationship with the individual
Might sabotage the process (sometimes an enabling family member, even with good intentions, can undermine the team’s message)
Here’s the part most guides skip: one family member can derail the entire intervention. If someone on the team can’t commit to enforcing boundaries — or is likely to break down and tell the person “you don’t really have to go” — it’s better to have them write a letter that someone else reads aloud.
Step 3 — Research Treatment Options
Have a specific, actionable treatment plan ready before the intervention. Not “we think you should get help.” An actual plan:
Which facility or program (inpatient, outpatient, detox, assessed-based placement)
Whether a bed/slot is available and confirmed
How insurance or payment will be handled
Transportation logistics
Any immediate needs (child care, pet care, work notification)
If inpatient care is appropriate and your family can afford it, you may also consider high-amenity or luxury treatment centers that offer more privacy and comfort alongside clinical services. The key is still medical quality and fit for your loved one’s needs, not just the setting.
The moment your loved one says “okay” — and that moment can be fleeting — you need to be ready to act. Hesitation gives denial time to reassert itself.
Step 4 — Write Impact Statements
This is not the place for improvisation. Each person on the team writes down — in advance, on paper — exactly how the addiction has affected them personally. Not a rant. Not a eulogy. A focused, rehearsed message that’s been thought through and practiced.
The formula that works:
Start with an expression of love or care
Give details of an incident or activity that took place (be specific and to the point) Show you are aware of behavior or incident and that this is not a general comment.
Describe the emotional effect by using “I” statements such as (“I felt scared when…” rather than “You made me feel scared…”).
Finish by asking for something. “I‘m asking you to accept this help today”
Keep each statement under 3 minutes. The intervention should feel focused, not like a marathon of grievances.
Step 5 — Rehearse the Intervention
This step feels awkward, and families often skip it. Don’t.
Run through the entire intervention at least once with all team members. Decide:
Who takes the lead at the beginning and end (sometimes the most prominent, cool voices will give coherence to the meeting)
What happens if the person attempts to leave:
An individual plan of how the team is going to respond to particular deflections (“I can walk out on my own,” “I am not a problem,” “You‘re all ganging up on me”)
Who presents the treatment plan
Who states the consequences
Rehearsal also reveals weak links — team members who may fold under pressure or stray from the plan.
Step 6 — Choose the Right Time and Place
Timing: When is the person most likely to be sober, rested, and not in great crisis? If possible, try to do the intervention in the morning. Do not do an intervention when the patient is intoxicated, as they are unable to process the information you are providing to them, and it increases the chance of blow-up.
Location: (a private, neutral, comfortable environment (not a restaurant, public area, and not where the other person may associate the person with intimidating, conflict-creating situations. A living room, a counselor‘s office, or an empty conference room (is ideal.
Step 7 — Conduct the Intervention
Follow the plan. Read your statements. Stay calm. The individual will likely react with some combination of denial, anger, bargaining, and sadness — sometimes all of them within minutes.
Key ground rules during the meeting:
Send the same message. The same team message.
Don‘t argue. Even when debated or sidetracked, patiently speak again with thesame script.
Say no to manipulation.“I‘ll take care of it myself” or “if only you would give me one more chance” are denial patterns and not ready-to-go.
Keep it for 80-90 minutes. If goes on longer, the emotional energy drops attention wavers.
Step 8 — Be Ready for Immediate Action
If they agree — move immediately. Drive to the facility. Help them pack. Don‘t delay until tomorrow. The willingness window may snap shut quickly. An empty bag, pre-verified insurance, and travel arrangements cut down all the pain points of going from “yes” to in the door.
What to Say During an Intervention (And What to Avoid)
Using “I” Statements Effectively
“I” statements can keep the tone more personal and less accusing. They are also less able to be argued by the other person, since you are just explaining yourself rather than making generalizations about them.
Effective examples:
“I‘m scared whenever the phone rings at night, because I think something‘s happened to you.”.
I love you and I have watched you become someone I hardly recognize. That‘s why I‘m here.
‘I can‘t keep acting like this is okay. You need to realize how much this has ruined our family.’
Words and Phrases That Sabotage Interventions
Certain language patterns trigger defensiveness and shut down communication. Avoid:
Labels: “You‘re an addict,” “You‘re an alcoholic” these will generate shame, not motivation.
Great targets for proof against; the most effortless path to derail the whole conversation.
Threats disguised as consequences: There’s a line between a boundary and a threat, and tone is what separates them. “If you don’t go, I’m done with you” — that’s a threat. “I love you, and I can’t keep paying for something that’s hurting you” — that’s a boundary. Both describe the same action. The difference is whether your loved one hears anger or care.
Guilt trips: “After everything I’ve done for you…” shifts focus from their recovery to your sacrifice
Comparisons: “Your sister never had this problem” — shaming by comparison destroys trust
Common Intervention Mistakes That Cause Failure
Even well-intentioned interventions fail when families fall into predictable traps. Watch for these:
No professional guidance. Families often believe they can handle it alone. The emotional complexity of addiction makes this risky — a trained interventionist keeps the process structured and safe.
Doing it impulsively. An outburst ignited by a splash of rage is not an intervention. Its an argument. Interventions take weeks of preparation.
Having the wrong people present. One combustible or enabling person can unravel hours of preparation. Select the right people to be present those who can manage the issue calmly and stick to the plan, not merely soothe the individual.
Not having a treatment plan prepared. Telling someone “you need help,” but failing to give them a program, admission date, and logistics is like diagnosing a problem without providing a solution.
Approaching them drunk. The drunk individual will not remember you as having this conversation; they will not be able to comprehend the emotion with which it was spoken, and you‘re more likely to receive hostility.
Say consequences that you really won‘t follow through on. If you‘ll take away or reduce their material needs, mean it don‘t reaffirm when they call a week later that you‘ll still pay their phone bill. This way, they learn that you‘ll fudge your own boundaries.
Turning it into a venting session. This session is not an opportunity for you to vomit your accumulated anger. Each thing you say should have one goal in mind to motivate the individual to sign up for treatment.
What Happens If They Refuse Treatment?
This is the question that frightens families most — and it happens. Not every intervention ends with a “yes.”
Setting and Enforcing Boundaries
If your loved one does not accept treatment, each member of the team must follow through on the consequences they told the patient during the intervention. This is not punishment but self-preservation and a refusal to continue enabling the addiction.
Common boundaries include:
Stopping financial support
No longer making excuses to employers, friends, or other family members
Asking the person to find alternative living arrangements
Limiting contact until they’re willing to accept help
Following through is the hardest part of the whole shebang. There are support groups out there, like Al-Anon and Families Anonymous. that are designed to help the family members do right by those lines of boundaries guilt free.
Why Many People Accept Help After the Intervention
This is the part that families need to hear most: “a no today is not a no forever.” A good number of those who decline treatment during the intervention are willing to enter a program at a later time: sometimes a few days, sometimes a few weeks, down the road. The intervention plants a seed. When combined with enforced boundaries — when the enabling stops — the reality of the situation becomes harder to ignore.
Stay firm. Stay available. And keep the treatment option open.
When to Hire a Professional Interventionist
Situations That Require Professional Guidance
Although some families can implement interventions on their own, it is advisable to consult a professional for most families and absolutely necessary when:
Has a history of violence or aggressive behavior.
A known or suspectedco-morbid mental illness (depression, bipolar disorder, PTSD, personality disorder)
The individual presents with expressesuicidal ideationor has a history of self-harm
They are using a sort of mixture
Previous informal conversations or intervention attempts have failed
The family dynamics are highly conflicted or there’s a history of trauma within the family
How to Find a Qualified Interventionist
Look for someone with recognized credentials:
Credentialed by agencies such as the Association of Intervention Specialists (AIS) or the National Association of Addiction Treatment Providers (NAATP)
Licensedas a counselor, social worker, or psychologist in their state
Prepared to give references and to discuss their method
According to industry statistics gathered by professional intervention programs, interventionist fees tend to range from $1,500-$10,000 or more depending on the severity of the problem, travel needs, and the level of intervention required. For families unable to pay for professional intervention services, SAMHSA‘s National Helpline (1-800-662-HELP) offers free, confidential referrals to local treatment facilities, support groups, and community organizations.
Follow-Up and Aftercare: The Part Most Guides Skip
The intervention itself is one moment. Recovery is a long road — and the family’s role doesn’t end when the person enters treatment.
The Critical First 72 Hours
If your “buddy” accepts treatment, many treatment experts report the highest-risk window for reverting to your drug of choice is during this first 72 hours. Keep the difference between “yes” and treatment to the minimum:
Have transportation ready immediately
Pre-pack the essentials (or assist them in packing efficiently)
Support communication, but keep in short longer communication can bring the doubt back.
Do not alter the terms of treatment. During this window, there should be no renegotiation!
Family Support and Recovery
Addiction doesn’t happen in isolation, and recovery doesn’t either. Families need their own support:
Family therapy: Many programs include family appointments, so be sure to play an active role.
Support groups: Al-Anon, Families Anonymous and Nar-Anon offer structured support groups in which other families who are experiencing addiction can be a source of peer support.
Personal counseling: You‘ve been carrying a great deal. A counselor can help you come to terms with that and do it not just for the person you lost, but for yourself.
Relapse education: The National Institute on Drug Abuse cite figures indicating that 40% to 60% of people with substance use disorders relapsed following treatment. This rate compares favorably with relapse rates for other chronic conditions such as diabetes or hypertension. That comparison matters. Nobody says diabetes treatment “failed” because a patient needs their medication adjusted. The same logic applies here: relapse is a signal to adjust the approach, not evidence that the effort was wasted.
Who Should Consider an Intervention — and Who Should Wait
An intervention is appropriate when:
Attempts informal discussions about the issue, which have been ineffective from creating change
The addiction is responsible for tangible, quantifiable negative consequence (health, personal relationships, finances, work, legal 6.7k)
You have identified a specific treatment program and can present it as an option
You can assemble a calm, committed team willing to maintain stated boundaries
A professional has been consulted (or is leading the process)
An intervention is NOT appropriate when:
The individual is violently active, psychotic episode. Dial 911 or local emergency service
The patient is intoxicated or in withdrawal; wait until the patient is sober.
No treatment plan has been arranged — an intervention without a solution creates despair, not motivation
The team includes members who cannot commit to enforcing stated boundaries
Main objective is to punish or vent anger rather than caring about the person‘s well being
If you or someone you know is in immediate danger or experiencing a mental health crisis, call or text the 988 Suicide & Crisis Lifeline or your local emergency services.988 Suicide & Crisis Lifeline or your local emergency services.
Final Verdict
A successful intervention is not an ambush, a confrontation, or a last-ditch effort that is driven by desperation. It‘s a thoughtful, research-based process that provides your loved one with the best chance possible for moving from denial to treatment.
Really significant steps: employ or get a professional to do the work, select the proper type of intervention based on the circumstances, create a concrete treatment alternative in advance of the meeting, practice with your team and ready to act immediately your loved one agrees.
What if they say no. Stick to your guns. Keep yourself present. The work is still important-it‘s planting a seed that frequently grows in the days and weeks that come.
This is difficult. It may be one of the most difficult things you‘ve ever had to go through. But not doing anything certainly isn‘t going to be easier and you‘ve already been paying for it.
So what should you do next? If you have no idea where to turn, contact the FREE, confidential 1-800-662-HELP (4357) from SAMHSA, the Substance Abuse and Mental Health Services Administration. Call 24 hours a day, year-round for guidance. Talk to a well-trained information specialist to locate a professional interventionist, treatment programs, and additional resources in your area whatever your financial situation.
Need Help Now? Free, Confidential Resources
SAMHSA National Helpline: 1-800-662-4357 (free, 24/7, 365 days/year)
Al-Anon Family Groups:al-anon.org — Support for families affected by someone’s addiction
These resources are free and available to anyone, regardless of insurance or ability to pay.
Frequently Asked Questions
Q: Do interventions actually work?
A: According to the National Council on Alcoholism and Drug Dependence, over 90% of professional intervention resulted in the person agreeing to treatment. But, ‘success’ at this stage means agreement to treatment… Long-term recovery is a matter of continued effort, good treatment, good support and aftercare.
Q: How long should an intervention last?
A: Interventions should be 60-90 minutes in duration. Any longer then this and emotional exhaustion is reached, and the process loses focus. Remember impact statements should be brief, and no longer than 3 minutes.
Q: What do you say during an intervention?
A: Use “I” statements to describe specific incidents and their emotional impact (“I felt scared when…”). Express love and concern first. Present the treatment plan clearly. State your personal boundaries calmly. Avoid labels (“addict”), accusations (“you always…”), and guilt trips.
Q: What if the person refuses treatment after an intervention?
A: Follow through on whatever boundaries that you set at the beginning. In reality, most who initially refuse treatment will then accept help one to two weeks down the road when the enabling is reduced. Stick to your boundaries and be prepared to help them when they are ready.
Q: Should children attend an intervention?
A: By and large, no. No children under 18 should be present during the intervention. The emotional intensity may be too overwhelming (or damaging). Their written statement read by an adult (if clinically appropriate) may be included.
Q: How much does a professional interventionist cost?
A: Thefeescanbe from $1,500 to $10,000 or more, depending on the severity of the situation, the travel involved, and theduration of intervention. For those families who maynothave been able to pay for professional services, theSAMHSA National Helpline (1-800-662-4357) offers free referralsources to local agencies.
This article contains tips and advice for information purposes only. It is not intended to be used for medical, psychological or professional advice. Addictions interventions can involve many complex family issues and potential safety hazards. Before planning an intervention, you should always consult a qualified professional such as your professional interventionist, addiction or mental health professional/litigator. If you are or anyone you know is in immediate danger, call 911 or the 988 Suicide & Crisis Lifeline.
You’ve probably Googled teeth whitening and landed on twelve different articles — each one promising the “best” method while quietly ignoring the trade-offs. Here’s the honest version.
Teeth whitening genuinely works. But which method works *best* depends on your stain type, how sensitive your teeth are, your timeline, and your budget. Get it wrong and you risk wasting money on products that won’t move the needle — or worse, using something too aggressive and causing enamel damage that’s difficult to reverse.
This guide covers every major whitening method, the science behind how they work, real safety considerations, and a clear decision framework so you can choose confidently — without consulting twelve more articles after this one.
Whether you’re comparing strips to professional treatment, trying to avoid sensitivity, or researching PAP-based options, you’ll find your answer here.
Table of Contents
Quick Answers:
What is teeth whitening?** → A bleaching process that removes stains from tooth enamel using peroxide or PAP compounds
Best for dramatic, fast results?** → In-office professional whitening (30–90 min, dentist-applied)
Best affordable at-home option?** → OTC whitening strips with 10% hydrogen peroxide
Does it damage teeth?** → Safe when used correctly; overuse can thin enamel over time
How long do results last?** → 6 months to 2+ years depending on your habits and method
## What Is Teeth Whitening?
Teeth whitening is a cosmetic dental procedure that lightens tooth enamel by using bleaching agents — primarily hydrogen peroxide or carbamide peroxide — to break down stain molecules. It can reduce both surface (extrinsic) stains and some deeper (intrinsic) discoloration, though effectiveness varies by stain type and method.
Not all tooth discoloration responds the same way. **Extrinsic stains** — caused by coffee, tea, red wine, and tobacco — sit on the surface of enamel and typically respond well to most whitening methods. **Intrinsic stains** — caused by aging, certain medications (like tetracycline), or trauma — are embedded within the tooth structure and are harder to remove, often requiring stronger professional treatments or specialist evaluation.
One critical limitation: **teeth whitening does not work on dental restorations.** Crowns, veneers, bridges, and tooth-colored fillings won’t change shade. If your smile includes restorations, this matters — a mismatch in whiteness between natural teeth and restorations can look uneven. Discuss this with your dentist before starting.
In‑office whitening is usually carried out by an experienced cosmetic dentist in Beverly Hills or a similar cosmetic dental provider, who can assess your stain type and recommend the safest, most effective approach for your teeth.
## How Teeth Whitening Works
Hydrogen and carbamide peroxide penetrate enamel to break down stain molecules and lighten tooth shade.
### The Peroxide Science
Most whitening products rely on **hydrogen peroxide (HP)** or **carbamide peroxide (CP)**. Both are bleaching agents — but they work slightly differently.
Hydrogen peroxide penetrates the enamel and reaches the dentin layer below. There, it releases oxygen radicals that react with colored chromophore molecules (the compounds responsible for discoloration) and break them apart. The result: tooth shade lightens.
Carbamide peroxide breaks down into hydrogen peroxide plus urea. It releases its active compound more slowly, which is why it’s used in overnight or extended-wear trays. Lower immediate intensity makes it gentler — but it takes longer to achieve results.
Professional in-office treatments use concentrations of **15–40% hydrogen peroxide**. Over-the-counter products typically use **3–10%**. Higher isn’t always better — concentration affects speed, not the maximum whiteness achievable.
As clinical studies on hydrogen peroxide and enamel permeability published via NCBI/PubMed confirm, peroxide does penetrate beyond enamel, which explains both its effectiveness and the temporary sensitivity it can cause.
### PAP — The Peroxide-Free Alternative
A newer compound, **PAP (phthalimidoperoxycaproic acid)**, is gaining traction — especially among people with sensitive teeth. PAP oxidizes stain molecules without generating free radicals, which is the main mechanism behind peroxide sensitivity.
The result: comparable whitening effectiveness with significantly less sensitivity. PAP products are now available in strips, pens, and professional-grade kits. They’re an excellent option for anyone who has abandoned whitening in the past due to pain.
### Light Activation — Does LED Actually Help?
LED and blue-light devices are marketed as “accelerators” for whitening gel. The evidence is mixed. Light activation can speed up the initial oxidation of peroxide — but the final whitening outcome at 2–4 weeks is often similar with or without light, according to several clinical studies.
Where light *does* add consistent value: in-office laser-activated systems, which use calibrated wavelengths at intensities far beyond what consumer devices deliver. A $30 drugstore LED kit is not the same as a clinical light-activation system.
Bottom line: LED is a nice bonus, not a requirement. Don’t let it be the deciding factor.
## Types of Teeth Whitening Methods
In-office, custom trays, strips, and pens vary in strength, speed, cost, and longevity.
Here’s the full comparison across the five main whitening approaches:
Method
Avg. Cost
Whitening Results
Time to Results
Sensitivity Risk
Longevity
In-office professional
$300–$700+
Dramatic (6–10 shades)
1 session (30–90 min)
Moderate–High
1–2 years
Dentist take-home kit
$150–$400
Significant (4–8 shades)
1–2 weeks
Low–Moderate
1–2 years
OTC whitening strips
$20–$60
Moderate (2–5 shades)
1–3 weeks
Low–Moderate
4–6 months
Whitening pen / gel
$15–$40
Mild (1–3 shades)
Ongoing maintenance
Low
2–4 months
Whitening toothpaste
$5–$20
Mild (surface only)
Weeks to months
Very low
Ongoing (maintenance)
### In-Office Professional Whitening
This is the fastest, most dramatic option. A dentist applies a high-concentration peroxide gel (15–40%) and often uses light or laser activation to accelerate the process. Gums and soft tissues are protected with barriers.
A single session typically takes 30–90 minutes and can lighten teeth by 6–10 shades. Results last 1–2 years with proper maintenance.
The downside: cost. In-office whitening typically runs **$300–$700+** depending on location and provider. Post-procedure sensitivity is common for 24–48 hours.
Best for: people who want the fastest possible results with professional supervision.
### Dentist-Prescribed Take-Home Kits
Your dentist takes digital scans or impressions and fabricates custom-fitted whitening trays. You fill them with professional-grade gel (typically 6–16% carbamide or hydrogen peroxide) and wear them at home — usually 30–60 minutes daily for 1–2 weeks.
Results are comparable to in-office treatment over time, though they arrive more gradually. Custom trays provide better gel coverage and less gum irritation than universal-fit OTC trays.
Cost: typically **$150–$400**. These kits also serve as excellent top-up tools after an initial in-office treatment.
Best for: people who want professional-grade results on a flexible schedule.
### OTC Whitening Strips
The most popular at-home option. Thin plastic strips coated with a peroxide gel (typically 6–10% HP) are pressed directly onto the teeth twice daily for 20–30 minutes, usually for 14–21 days.
Strips are effective for mild-to-moderate extrinsic staining. They’re accessible, affordable, and produce noticeable results — 2–5 shades lighter — when used consistently.
The limitation: strips don’t adapt to tooth shape, so coverage can be uneven. The gel also doesn’t reach between teeth. For surface staining on front teeth, they’re excellent. For comprehensive whitening, professional options outperform them.
Best for: budget-conscious users with mild surface staining.
### Whitening Pens and Gels
Brush-on applicators with low-concentration peroxide or PAP. Best used for touch-ups and maintenance between whitening sessions — not as a primary treatment.
Results are subtle. These pens won’t produce a dramatic initial change, but they’re convenient for post-treatment maintenance.
### Whitening Toothpastes and Mouthwashes
Whitening toothpastes work differently — most use mild abrasives to polish surface stains rather than bleaching agents. Some contain low-dose hydrogen peroxide or PAP.
They won’t remove deep staining, but they’re useful for preventing new stain buildup and maintaining results after whitening treatment. Nano-hydroxyapatite (nHAp) toothpastes are an emerging category that both gently brighten and actively **remineralize enamel** — a dual benefit worth considering, particularly after any bleaching treatment.
Best for: daily maintenance; not a standalone whitening solution.
## Is Teeth Whitening Safe?
Whitening is safe when used correctly, but overuse may increase enamel porosity and temporary sensitivity.
### Common Side Effects
The two most reported side effects are **tooth sensitivity** and **gum irritation.**
Sensitivity occurs because peroxide molecules penetrate enamel and stimulate nerve endings in the dentin layer. It’s almost always temporary — resolving within 24–72 hours after treatment. Using a desensitizing toothpaste containing potassium nitrate before and after whitening significantly reduces discomfort.
Gum irritation typically comes from gel contact. Professional protocols protect gum tissue with barriers; at home, ensure gel stays on teeth only.
### Enamel Safety — The Over-Whitening Risk
This is the most underserved safety topic in mainstream whitening content. **Over-whitening is real.**
Repeated, frequent bleaching — especially at high concentrations — can increase enamel porosity over time and contribute to structural weakening. This doesn’t mean whitening is dangerous; it means there’s a threshold you shouldn’t repeatedly cross.
Practically: don’t whiten more often than your dentist or product instructions recommend. When results plateau (there’s a natural ceiling to whiteness), continuing treatment won’t add benefit — it only adds risk.
If you’ve experienced pain with whitening before, PAP-based products are worth switching to.
## How Long Does Teeth Whitening Last?
### Results by Method
Method
Typical longevity
In-office professional
12–24 months
Dentist take-home kits
12–18 months
OTC strips
4–6 months
Whitening pens
2–4 months
These ranges assume consistent oral hygiene and lifestyle. Heavy coffee, tea, red wine, or tobacco consumption shortens results at every level.
### How to Maintain Your Results
1. Follow the 48-hour white diet** after any whitening session — avoid chromogen-rich foods and drinks (coffee, tea, berries, soy sauce, red wine). Enamel is more porous immediately post-treatment.
2. Use a whitening or nHAp toothpaste** daily to prevent new stain accumulation and support enamel remineralization.
3. Drink dark liquids through a straw** to minimize contact with enamel.
4. Schedule touch-up treatments** — a single whitening pen session or a 1-week strip cycle every 3–6 months maintains results without the full cost of retreatment.
5. Quit smoking.** Tobacco staining is aggressive and largely reverses whitening results within months.
supports the same approach: minimize contact with staining agents immediately after treatment and maintain regular oral hygiene.
## Common Mistakes to Avoid
Using OTC products on damaged teeth without a dental check.** If you have untreated cavities, gum disease, or enamel erosion, whitening gel can penetrate damaged areas and cause significant pain or accelerate the problem. Get a dental exam first.
Chasing results past the whitening plateau.** There’s a natural shade ceiling based on your tooth genetics. Once you’ve reached it, additional whitening won’t add further brightness — it just increases enamel exposure risk. Stop when you’ve hit your baseline maximum.
Skipping the 48-hour post-treatment window.** The most common reason whitening results fade fast is consuming staining foods before the enamel has re-hardened. Two days of care dramatically extends your results.
Using activated charcoal products.** Despite marketing claims, activated charcoal is highly abrasive and has no reliable evidence of whitening effectiveness. It can physically scratch enamel and increase sensitivity over regular use.
Assuming whitening works on all teeth.** If your discoloration is caused by tetracycline antibiotics, fluorosis, or trauma — standard whitening will have limited effect. These cases require specialist evaluation and potentially different interventions (e.g., veneers, KöR deep whitening protocol).
## Who Is Teeth Whitening For — And Who Should Avoid It
### Best For:
Adults with healthy enamel and predominantly extrinsic staining (coffee, tea, wine, tobacco)
People with natural teeth (no significant restorations in the smile zone)
Those who want a clinically safe confidence boost for an upcoming event or milestone
Mild intrinsic staining:** Professional treatment may help; manage expectations
Existing dental work in the smile zone:** Discuss the color match issue with your dentist before whitening natural teeth
### Not Recommended For:
Pregnant or nursing individuals (out of precaution; insufficient safety data)
Children and adolescents under 18
Anyone with untreated tooth decay, gum disease, or significant enamel erosion
Teeth severely stained by tetracycline (requires specialist-level intervention)
Users of crowns, veneers, or fillings who expect uniform whitening (won’t change restorations)
## Final Verdict — Choosing the Right Whitening Method
A visual comparison to help choose the safest and most effective whitening method based on sensitivity, budget, and desired speed of results.
Here’s the decision framework:
Your situation
Best approach
Want the fastest, most dramatic result
In-office professional whitening
Want professional results on a budget with flexibility
Dentist take-home kit
Mild surface staining, limited budget
OTC whitening strips (10% hydrogen peroxide)
Sensitive teeth, first-time whitener
PAP-based strips or dentist-supervised low-dose kit
Maintenance after whitening
Whitening or nHAp toothpaste plus occasional whitening pen
Severe intrinsic staining or dental restorations
Consult a dentist before any whitening attempt
No single method wins for everyone. The best choice is the one that fits your stain type, sensitivity tolerance, timeline, and budget. When in doubt — especially if you haven’t had a dental check in over a year — get one before you start. Your dentist can spot contraindications and recommend the appropriate concentration and method.
## Frequently Asked Questions
Q1: Is teeth whitening safe for enamel?
A: Yes, when used as directed. Properly used whitening products don’t permanently damage enamel. Overuse — particularly of high-concentration products used more frequently than recommended — can increase enamel porosity over time. Follow product instructions and consult a dentist if you’re unsure.
Q2: How long do whitening results last?
A: Results vary by method. In-office professional whitening typically lasts 12–24 months; OTC strips average 4–6 months. Longevity depends heavily on diet and lifestyle — frequent coffee, tea, wine, or tobacco use shortens results significantly.
Q3: What is the difference between hydrogen peroxide and PAP whitening?
A: Hydrogen peroxide whitens via free radical oxidation, which is effective but can cause sensitivity by penetrating dentinal tubules. PAP (phthalimidoperoxycaproic acid) oxidizes stains without free radicals, producing comparable whitening with significantly less sensitivity. PAP is the preferred choice for people who have experienced discomfort with traditional peroxide products.
Q4: Does teeth whitening work on crowns or veneers?
A: No. Whitening agents do not change the color of dental restorations — crowns, veneers, bridges, or tooth-colored fillings are unaffected. Whitening natural teeth while you have visible restorations may create a color mismatch. Discuss this with your dentist before starting.
Q5: Can I whiten my teeth if I have sensitive teeth?
A: Yes, with the right product. PAP-based whitening products are specifically formulated to minimize sensitivity. Alternatively, a dentist-prescribed low-concentration carbamide peroxide kit with desensitizing agents (potassium nitrate, fluoride) is a safe approach. Avoid aggressive OTC products or prolonged wear times.
Q6: How often can I whiten my teeth safely?
A: Follow manufacturer guidelines — typically once every 3–6 months for in-office or strip treatments. Daily whitening toothpaste is fine for ongoing maintenance. Don’t repeat clinical-strength treatments more than twice per year without dental supervision. Your teeth have a natural whiteness ceiling; exceeding treatment frequency past that point adds risk without additional benefit.
Disclaimer
This guide is for general information and does not replace professional dental advice, diagnosis, or treatment. Teeth whitening is not suitable for everyone, and results and risks can vary. Always consult a licensed dentist about your specific teeth, existing dental work, and any sensitivity before starting, changing, or repeating a whitening treatment.”
Working a 9 — 5 isn’t an easy job. Having to deal with a regular schedule might seem a lot easier for most individuals however, for most people, this can end up being a stressful and joyless task. So how do you deal with this? Here’s an article to tell you about some of the most common workplace issues and methods to deal with them.
With hundreds of articles and newsletters every day delivering shocking news of effects that stem from working too long, you might see many people suffering from serious mental and physical issues from being confined to the workspace. Here is a list of some of the most common examples:
Table of Contents
1. Stress:
Stress is one of the most common issues that arise from long, restless days of working and even bringing the workload back home. Sometimes office work seems to pile up or an urgent call arrives at an odd hour, you might be forced to attend to these stressing both yourself and the relationships with your loved ones.
Financial concerns are one of the most concerning causes of this particular issue.
With the pandemic season in full swing, you will see hundreds of people in terrible conditions due to financial stresses and migraine problems caused due to leading such a life.
2. Insomnia:
Sleep deprivation is another stressful effect of long hours in the workplace. With a very unsteady work pattern, employees might lose their sense of time and end up with bad sleep patterns or in some cases, insomnia.
Sleep deprivation by itself can cause many other side effects such as a weakened immune system and therefore a body more compromised to illness, hallucinations, or can even spiral into insanity if unchecked.
This is why it is essential for employers to keep their businesses restricted to the workplace as much as possible to prevent such a situation from unfolding.
3. Changes in behaviour:
An odd work schedule will leave people with personality changes almost always for the worse. Financial burdens coupled with this could lead many down a dark path of substance abuse. This is ultimately going to affect the company that forces them in turn, to convert a talented employee into a tired addict.
These changes need not be limited to the consumption of goods but could also affect the way they act and the way the rest of their day goes.
4. Anxiety:
Anxiety about when the monthly wages will be cashed out and whether they will be able to pay the bills on time must be on top of everyone’s mind. However, for the standard employee, this might boil down to fear and incredible stress about whether they will be able to cover bills on time, take care of their family or keep their job.
Workers will never be able to perform at their best in such a state and it is thus important for companies to ensure regular pay as well as fair wages.
Some of the simplest ways to help reduce mental health problems in your workplace and make life a lot more enjoyable for your employees would be :
Timely payment: This will ensure that your employees have stable financial backing allowing them to dedicate more to the company.
Taking Help: Taking the aid of mental health services for a checkup might help your employees reveal their grievances helping you find a better and more efficient way to run the company while also increasing employee happiness.
Offering Support: Being supportive to your employees in their time of need will ensure that they give their best to the company and help you in your time of need.
Financial education: Training employees on how to handle money will be incredibly helpful especially for newer employees and can save them from years of financial instability thereby saving your company from losing more employees due to financial stress.
If you follow the aforementioned guidelines, you can be sure of the fact that the number of mental problems in your workspace will drastically decrease and you will leave a positive impact on the world.
Feeling stiff, stressed, or stuck in a fitness rut? A yoga routine might be exactly what you need. Unlike sporadic stretching sessions, a structured yoga routine is a planned sequence of poses performed regularly to systematically improve flexibility, build strength, and cultivate mental clarity.
Whether you’re completely new to yoga or looking to establish a consistent home practice, this guide breaks down everything you need: beginner-friendly sequences, goal-based customization strategies, realistic progression timelines, and the most common mistakes to avoid.
By the end, you’ll know exactly which routine matches your goals, how to perform it correctly, and what to expect week by week.
Table of Contents
Quick Summary
Looking for a yoga routine? → Structured sequences improve flexibility, reduce stress, and build strength through regular practice
Complete beginner? → Start with 5-10 minute routines using basic poses like Child’s Pose, Cat-Cow, and Downward Dog
Want specific results? → Customize routines based on your primary goal (flexibility, strength, or stress relief)
How often should you practice? → 3-5 times per week for noticeable results within 3-4 weeks
Worried about doing it wrong? → Focus on the 5 essential poses and avoid the 3 most common mistakes (skipping warm-up, holding breath, pushing too hard)
What Is a Yoga Routine?
Definition and Components
A yoga routine is a structured sequence of yoga poses (asanas) performed in a specific order, typically combined with breathing techniques (pranayama). It can range from 5 to 60 minutes and is designed to improve flexibility, build strength, reduce stress, and enhance overall well-being through regular practice.
According to the National Center for Complementary and Integrative Health (NCCIH), yoga is a mind-body practice that typically includes physical postures, breathing exercises, and meditation or relaxation. NCCIH notes that research suggests yoga may help with stress management, mental and emotional health, healthy activity habits, sleep, and balance, although findings are not yet definitive for every condition.
Most yoga routines include three core components:
Warm-up poses – Gentle movements to prepare muscles and joints (Cat-Cow, gentle twists)
Main sequence – The primary poses targeting specific benefits (strength, flexibility, balance)
Cool-down/relaxation – Restorative poses and final relaxation (Corpse Pose, deep breathing)
Types of Yoga Routines
Yoga routines can be categorized by timing, intensity, or goal:
By Time of Day:
Morning routines – Energizing sequences to wake up the body (Sun Salutations, standing poses)
Evening routines – Calming practices for relaxation and better sleep (forward folds, restorative poses)
By Goal:
Flexibility-focused – Longer holds in stretching poses (5-8 breaths per pose)
Strength-focused – Dynamic flows and challenging holds (planks, warriors, arm balances)
Stress-relief focused – Gentle, restorative poses with emphasis on breathing
Vinyasa routines – Flow-based, linking breath with movement
Restorative routines – Passive poses held for extended periods
Benefits of a Daily Yoga Routine
Physical Benefits
Flexibility Improvement
Regular yoga practice progressively lengthens muscles and connective tissue. Studies show that flexibility can improve over several weeks of consistent yoga, with some research reporting meaningful gains after about 8–10 weeks of practice.
Strength Building
Yoga uses bodyweight resistance and isometric holds to build functional strength. Poses like Plank, Warrior sequences, and Boat Pose engage multiple muscle groups simultaneously, improving core stability and overall body strength. According to research from Harvard Medical School, participants practicing yoga twice weekly for eight weeks experienced substantial improvements in muscle strength and endurance, comparable to traditional resistance training for beginners.
Posture Enhancement
Many yoga poses strengthen the muscles supporting your spine while stretching tight areas (chest, hip flexors). This creates better postural alignment and reduces strain from prolonged sitting. A study published in the journal Spine found that participants who practiced yoga twice weekly for 24 weeks experienced a 56% reduction in back pain and significant improvements in posture-related disability.
Mental Benefits
Stress Reduction
Yoga activates the parasympathetic nervous system through controlled breathing and mindful movement. A comprehensive meta-analysis of 42 randomized controlled trials published in Psychoneuroendocrinology found that yoga interventions were associated with significant reductions in evening cortisol levels, waking cortisol, and ambulatory systolic blood pressure compared to control groups. The research demonstrates that yoga helps regulate stress by modulating the hypothalamic-pituitary-adrenal (HPA) axis, which controls your body’s stress response.
Improved Focus
The concentration required to hold poses and coordinate breath with movement trains mental focus that extends beyond your practice session. Research from Harvard Health Publishing indicates that yoga practitioners develop greater body awareness and mindfulness that transfers to other areas of life, improving decision-making and concentration.
Better Sleep Quality
Evening yoga routines, particularly those emphasizing gentle stretches and breathing exercises, can improve sleep quality by calming the nervous system before bed.
How Long Until You See Results?
Consistent yoga practice leads to gradual improvements in flexibility, strength, and stress reduction.
Weight management support – 8-12 weeks (combined with diet)
Consistency matters more than session length. In practice, short daily sessions (around 10 minutes) usually lead to better progress than doing a long session only once a week.
The 5 Essential Poses Every Yoga Routine Must Include
Child’s Pose gently stretches the lower back and promotes relaxation.
These foundational poses appear in nearly every effective yoga routine because they address the body’s primary movement patterns and needs.
Child’s Pose (Balasana)
What it does: Gently stretches the lower back, hips, thighs, and ankles while promoting relaxation.
Why it’s essential: Serves as a resting position between more challenging poses and provides a safe way to release lower back tension.
How to do it:
Kneel on your mat with big toes touching
Sit back on your heels
Fold forward, extending arms in front or resting them alongside your body
Rest forehead on the mat
Hold for 5-10 breaths
Cat-Cow (Marjaryasana-Bitilasana)
What it does: Warms up the spine, improves spinal flexibility, and coordinates breath with movement.
Why it’s essential: Perfect warm-up that prepares the body for deeper poses while teaching breath-movement coordination.
How to do it:
Start on hands and knees (tabletop position)
Inhale: Drop belly, lift chest and tailbone (Cow)
Exhale: Round spine, tuck tailbone, drop head (Cat)
Repeat 5-10 rounds, flowing with breath
Downward-Facing Dog (Adho Mukha Svanasana)
What it does: Stretches hamstrings, calves, and shoulders while building arm and core strength.
Why it’s essential: Full-body pose that serves as both a stretch and a strengthener, central to many flow sequences.
How to do it:
From tabletop, tuck toes and lift hips up and back
Press palms firmly into mat, fingers spread
Work toward straightening legs (bent knees okay for beginners)
Hold for 5-8 breaths
Warrior I (Virabhadrasana I)
What it does: Strengthens legs, opens hips and chest, improves balance and focus.
Why it’s essential: Builds lower body strength and stamina while teaching proper alignment in standing poses.
How to do it:
Step right foot forward into lunge, back foot turned slightly inward
Bend front knee to 90 degrees, keeping knee over ankle
Reach arms overhead, palms facing each other
Square hips forward
Hold for 5-8 breaths, then repeat other side
Corpse Pose (Savasana)
What it does: Allows body and nervous system to integrate the practice, promotes deep relaxation.
Why it’s essential: Final relaxation is when many physical and mental benefits consolidate; skipping it reduces overall effectiveness.
How to do it:
Lie flat on back
Let feet fall open naturally
Rest arms alongside body, palms up
Close eyes and breathe naturally
Hold for 2-5 minutes minimum
Essential Poses Comparison Table
Pose
Primary Benefits
Muscles Worked
Difficulty
Child’s Pose
Lower back release, relaxation
Hips, thighs, ankles
Beginner
Cat-Cow
Spinal mobility, warm-up
Entire spine, core
Beginner
Downward Dog
Full-body stretch, strength
Hamstrings, shoulders, arms, core
Beginner-Intermediate
Warrior I
Leg strength, hip opening
Quads, glutes, hip flexors, shoulders
Intermediate
Corpse Pose
Stress relief, integration
None (relaxation)
Beginner
Beginner Yoga Routine (5-10 Minutes)
Cat–Cow warms up the spine and prepares the body for yoga practice.
Perfect for complete beginners or busy mornings when time is limited.
5-Pose Morning Sequence
Total time: 5-8 minutes
Child’s Pose – 5 breaths (centering and gentle back stretch)
Cat-Cow – 8 rounds (warm up spine)
Downward Dog – 5 breaths (full-body wake-up)
Warrior I – 5 breaths each side (build strength and focus)
Corpse Pose – 2 minutes (integrate and relax)
Step-by-Step Instructions
Follow this sequence:
Start in a comfortable seated position. Take 3 deep breaths to center yourself.
Move into Child’s Pose for gentle stretching. Focus on relaxing your lower back.
Transition to tabletop position for Cat-Cow. Match each movement to your breath—inhale for Cow, exhale for Cat.
From tabletop, press into Downward Dog. Don’t worry if your heels don’t touch the ground; bent knees are perfectly acceptable.
Step right foot forward into Warrior I. Hold, then switch sides.
Finish in Corpse Pose, allowing your body to completely relax.
Breathing Guidelines
Never hold your breath during poses
Inhale through your nose to expand and lengthen
Exhale through your nose to fold and contract
Breathe steadily – each breath should take 3-5 seconds
If you lose your breath, return to Child’s Pose and reset
Intermediate Yoga Routine (15-20 Minutes)
Warrior I strengthens the legs while opening the hips and chest.
For those comfortable with basic poses and ready for more challenge.
10-Pose Full-Body Sequence
Total time: 15-20 minutes
Child’s Pose – 5 breaths
Cat-Cow – 8 rounds
Downward Dog – 8 breaths
Plank – 3-5 breaths (core strength)
Cobra or Upward Dog – 5 breaths (chest opening)
Warrior I – 8 breaths each side
Warrior II – 8 breaths each side (hip opening, endurance)
Triangle Pose – 8 breaths each side (deep side stretch)
Sun Salutations (Surya Namaskar) are dynamic sequences linking multiple poses. One complete round takes about 2-3 minutes.
Basic Sun Salutation sequence:
Mountain Pose (standing)
Arms reach overhead (inhale)
Forward Fold (exhale)
Halfway Lift (inhale)
Step back to Plank (exhale)
Lower to floor or Chaturanga
Cobra or Upward Dog (inhale)
Downward Dog (exhale, hold 5 breaths)
Step forward to Forward Fold
Rise to standing, arms overhead
Return to Mountain Pose
Intermediate routine suggestion: Begin with 3-5 Sun Salutations to warm up, then add standing poses and finish with seated poses and Savasana.
Modifications and Progressions
If poses feel too easy:
Hold standing poses longer (10-12 breaths)
Add balancing variations (Warrior III)
Include arm balances (Crow Pose)
If poses feel too challenging:
Use props (blocks under hands, strap for binds)
Reduce hold times (5 breaths instead of 8)
Skip advanced variations
Advanced Yoga Routine (30+ Minutes)
For experienced practitioners seeking challenge and depth.
15-Pose Challenge Sequence
Total time: 30-45 minutes
This routine includes the intermediate sequence plus:
Headstand or Forearm Stand (3-5 breaths) – full inversion
Crow Pose (5-10 breaths) – arm balance
Pigeon Pose (8-10 breaths each side) – deep hip opening
Wheel Pose (3-5 breaths) – full backbend
Boat Pose (5-8 breaths) – intense core work
Advanced practitioners should warm up thoroughly with Sun Salutations (5-10 rounds) before attempting challenging poses.
Balance and Inversion Work
Inversions and balances develop strength, focus, and body awareness but require proper preparation:
Always warm up for at least 10 minutes before inversions
Use a wall for support when learning
Focus on alignment over duration
Exit immediately if you feel strain in your neck or wrists
How to Customize Your Yoga Routine
Not all yoga routines serve the same purpose. Here’s how to tailor your practice to your primary goal.
For Flexibility
Key strategy: Longer holds in passive stretches
Best poses:
Seated Forward Fold (1-2 minutes)
Pigeon Pose (2-3 minutes per side)
Wide-Legged Forward Fold (1-2 minutes)
Reclining Hand-to-Big-Toe Pose (1-2 minutes per side)
Butterfly Pose (2-3 minutes)
Routine structure:
Warm up with gentle flows (5-10 minutes)
Hold each stretch for 1-3 minutes
Focus on relaxing into poses, not forcing depth
Practice 4-5 times per week
Expected timeline: Noticeable gains in 3-4 weeks
Evidence: Research on women with knee osteoarthritis found that those who practiced yoga in a 60‑minute weekly class plus about 112 minutes at home reported a 38% reduction in pain and a 35% reduction in stiffness after eight weeks, suggesting yoga can help improve joint comfort and mobility in some people.
For Strength
Key strategy: Dynamic flows and challenging holds
Best poses:
Plank and Side Plank (30-60 seconds)
Chaturanga push-ups (8-12 reps)
Chair Pose (30-60 seconds)
Warrior sequences held longer (15-20 breaths)
Boat Pose variations (30-60 seconds)
Routine structure:
10-15 Sun Salutations to start
Focus on holding poses longer than comfortable
Repeat challenging sequences 2-3 times
Practice 3-4 times per week with rest days
Expected timeline: Strength gains in 4-6 weeks
Evidence: Harvard Health reports on a study of sedentary adults who practiced yoga for eight weeks, at least twice a week for a total of about 180 minutes. Participants developed greater muscle strength, endurance, flexibility, and cardio‑respiratory fitness, showing that yoga can be an effective strength‑building option even for beginners.
For Stress Relief
Key strategy: Restorative poses with extended breathing
Best poses:
Child’s Pose (3-5 minutes)
Legs-Up-the-Wall (5-10 minutes)
Reclining Butterfly (3-5 minutes)
Supported Bridge (3-5 minutes)
Extended Corpse Pose (5-10 minutes)
Routine structure:
Use props (blankets, bolsters, blocks) for support
Hold each pose 3-10 minutes
Practice deep, slow breathing (4-count inhale, 6-count exhale)
Practice daily or whenever stressed
Expected timeline: Immediate stress relief during practice; cumulative benefits in 1-2 weeks
Routine Customization Matrix
Goal
Key Poses
Hold Time
Frequency
Results Timeline
Flexibility
Forward folds, Pigeon, Butterfly
1-3 minutes
4-5x/week
3-4 weeks
Strength
Plank, Warriors, Boat, Chair
30-60 seconds
3-4x/week
4-6 weeks
Stress Relief
Child’s Pose, Legs-Up-Wall, Savasana
3-10 minutes
Daily
Immediate + 1-2 weeks
Building Your Routine: Progression Framework
Week 1-2: Foundation Building
Focus: Learning proper form and establishing consistency
Practice 3-4 times per week
Stick to beginner routine (5-10 minutes)
Prioritize form over depth or duration
Common experience: Some muscle soreness, moderate flexibility gains
Goal: Build the habit, learn the poses
What to expect: You’ll likely feel stiff in unfamiliar positions. That’s normal. Focus on showing up consistently rather than achieving perfect poses.
Week 3-4: Consistency and Refinement
Focus: Refining alignment and increasing duration
Practice 4-5 times per week
Extend sessions to 10-15 minutes
Start holding poses 1-2 breaths longer
Common experience: Noticeable flexibility improvement, poses feel more familiar
Goal: Deepen poses, improve breath control
What to expect: Poses that felt impossible in Week 1 now feel accessible. You’ll notice improved flexibility, especially in hips and hamstrings.
Month 2+: Adding Complexity
Focus: Challenging yourself with new poses and longer sessions
Practice 5-6 times per week (or 4 times with longer sessions)
Progress to intermediate routine (15-20 minutes)
Add 1-2 new challenging poses each week
Common experience: Significant strength and flexibility gains, mental clarity
What to expect: Your practice becomes self-sustaining. You’ll crave the routine on days you skip it. This is when yoga transforms from exercise to lifestyle. Reports from Harvard Health describe that people who maintain a regular yoga practice over many weeks often develop greater body awareness, more mindful eating habits, and broader improvements in overall well‑being that extend beyond the mat.
Common Mistakes to Avoid
Even experienced practitioners make these errors. Here’s how to prevent them:
1. Skipping the warm-up
Jumping into deep stretches or challenging poses without preparation increases injury risk. Always start with gentle movements like Cat-Cow or easy twists.
2. Holding your breath during poses
Breath-holding creates tension and reduces the effectiveness of poses. If you can’t maintain steady breathing, ease out of the pose slightly.
3. Pushing too hard into stretches
Yoga is not about achieving Instagram-worthy poses. Forcing your body into deep stretches can cause strains. Work at 70-80% of your maximum range.
4. Inconsistent practice
Practicing once a week yields minimal results. The sweet spot is 3-5 times per week. Even 5-minute daily sessions outperform sporadic longer sessions.
5. Ignoring alignment cues
Proper alignment protects your joints and maximizes benefits. When in doubt, reduce the depth of the pose to maintain correct form.
Who Should (and Shouldn’t) Follow These Routines
Best For:
Complete beginners wanting to start a yoga practice at home
Intermediate practitioners looking to establish consistency
People with flexibility or posture goals
Those seeking stress management tools
Anyone preferring home workouts to studio classes
Not For (or Requires Modification):
Recent injuries or surgeries – Consult your doctor or physical therapist before starting
Pregnancy – Prenatal yoga classes are specifically designed for pregnancy modifications
Severe back or joint problems – Work with a physical therapist to adapt poses
Complete immobility – Chair yoga or therapeutic yoga may be better starting points
Health experts at the Mayo Clinic recommend consulting a healthcare provider before starting yoga if you have high blood pressure, glaucoma, sciatica, or are pregnant.
Final Verdict: Choosing the Right Yoga Routine
Start here based on your situation:
If you’re a complete beginner: Begin with the 5-10 minute beginner routine 3-4 times per week. Focus on the 5 essential poses until they feel comfortable (typically 2-3 weeks).
If you want flexibility: Use the flexibility-focused customization with longer holds (1-3 minutes per pose). Practice 4-5 times weekly. Expect noticeable results in 3-4 weeks.
If you want strength: Follow the strength-focused approach with dynamic flows and challenging holds. Practice 3-4 times weekly with rest days. Expect strength gains in 4-6 weeks.
If you want stress relief: Practice the restorative routine daily or whenever stressed. Use props for support and emphasize breathing. Immediate relief during practice, cumulative benefits in 1-2 weeks.
Key principle: Consistency beats intensity. A simple 5-minute routine performed daily outperforms a complex 60-minute routine done sporadically.
Frequently Asked Questions
Q: How long should a yoga routine be for beginners?
A: Beginners should start with 5-10 minutes. This is enough to learn proper form without overwhelming the body. After 2-3 weeks of consistency, gradually increase to 15-20 minutes.
Q: What is the best time of day to do yoga?
A: The best time is whenever you’ll actually do it consistently. That said, morning yoga tends to energize and improve focus for the day, while evening yoga promotes better sleep. Many practitioners prefer morning for this reason.
Q: Can I do yoga every day?
A: Yes, gentle to moderate yoga can be practiced daily. If you’re doing intense strength-focused sequences, take 1-2 rest days per week to allow muscle recovery. Listen to your body—soreness is normal, but sharp pain means you need rest.
Q: What are the basic yoga poses for a routine?
A: The 5 essential poses are Child’s Pose, Cat-Cow, Downward Dog, Warrior I, and Corpse Pose. These form the foundation of most yoga routines and address the body’s primary movement needs.
Q: How do I start a yoga routine at home?
A: Start with the beginner routine in this guide. You need only a yoga mat (or soft surface) and comfortable clothing. Set a specific time each day, start with 5-10 minutes, and gradually progress as poses become familiar.
Q: What’s the difference between a yoga routine and a yoga class?
A: A yoga routine is a self-directed sequence you can practice independently. A yoga class is instructor-led and often includes more variety, adjustments, and community support. Routines are ideal for consistent home practice; classes are great for learning new techniques.
Q: How long before I see results from a yoga routine?
A: Energy boost and stress relief appear immediately. Flexibility improvements become noticeable in 3-4 weeks. Strength gains and posture changes typically appear in 4-8 weeks. Consistency is the key factor—practicing 3-5 times per week accelerates results.
Q: Do I need equipment for a yoga routine?
A: Minimal equipment needed. A yoga mat provides cushioning and grip but isn’t mandatory. Optional props (blocks, strap, blanket) make poses more accessible but aren’t required for beginner routines.
About Health4fitnessblog
Health4fitnessblog publishes practical, easy-to-understand content on health, technology, business, marketing, and lifestyle. Articles are based mainly on reputable, publicly available information, with AI tools used only to help research, organise, and explain topics more clearly so the focus stays on real‑world usefulness rather than jargon or unnecessary complexity.
Disclaimer
This article is for general information only and is not medical advice. Always consult a healthcare professional before starting a new yoga or exercise routine, especially if you have health conditions, are pregnant, or are recovering from an injury. Stop immediately if you feel pain, dizziness, or unusual discomfort.
Every cigarette you don’t smoke is already changing your body — starting 20 minutes from now.
That’s not motivation speak. It’s biology. The moment you stop inhaling tobacco smoke, your body launches a recovery process that begins with your heart rate and doesn’t stop for decades. Quit smoking benefits are measurable, progressive, and backed by decades of medical research.
But here’s what most guides won’t tell you: the benefits go far beyond your lungs. Quitting rewires your brain chemistry, restores proteins in your skin, and saves you thousands of dollars every single year.
This guide covers the complete timeline of what happens to your body when you quit smoking — from the first 20 minutes to 15 years and beyond. You’ll also find the science behind mental health recovery, financial savings projections, and skin restoration that most articles skip entirely.
Whether you’re thinking about quitting, already quit, or supporting someone through the process, this is for you.
Table of Contents
Quit Smoking Benefits at a Glance:
When do benefits start? → Within 20 minutes — heart rate and blood pressure begin dropping toward normal
What’s the biggest long-term benefit? → Heart disease risk halved at 1 year; lung cancer risk halved at 10 years
Does mental health improve? → Yes — anxiety and depression typically decrease after the initial 2–4 week withdrawal period
How much money will I save? → A pack-a-day smoker saves $3,000–$3,500+ per year in direct costs alone
Is it too late to quit? → No — benefits occur at every age, even after 30+ years of smoking
What Are the Benefits of Quitting Smoking?
Quit smoking benefits are the measurable health improvements that begin within minutes of your last cigarette and continue accumulating for years. These benefits include reduced heart disease and cancer risk, improved lung function, better mental health, clearer skin, and significant financial savings.
What makes smoking cessation remarkable is the speed. Your body doesn’t wait weeks or months to start healing. The recovery process — what researchers describe as a cascade of physiological repair — begins almost immediately.
How Your Body Begins Healing Immediately
Heart rate and blood pressure begin normalizing within minutes of quitting
The first change happens before you even feel different. Within 20 minutes of your last cigarette, your heart rate starts dropping from its nicotine-elevated state back toward normal levels.
This happens because nicotine is a stimulant. Every cigarette artificially spikes your heart rate and constricts your blood vessels. Remove the stimulant, and your cardiovascular system begins recalibrating.
By the 12-hour mark, something critical happens in your blood. Carbon monoxide — a toxic gas you inhale with every puff — begins clearing out. Carbon monoxide binds to hemoglobin roughly 200 times more effectively than oxygen does. That means while you smoke, your blood carries less oxygen to every organ, every muscle, every cell. Within 12 hours of quitting, your blood oxygen levels start returning to normal.
The Science Behind Smoking Recovery
Your body’s repair process follows a predictable pattern that scientists call progressive tissue recovery. Different systems heal at different speeds, but they all follow the same principle: remove the toxin, and the body begins rebuilding.
Understanding this timeline is powerful. It turns an abstract decision (“I should quit”) into a concrete, trackable process (“my heart disease risk drops 50% at the one-year mark”). That shift from vague intention to measurable progress is what separates people who quit successfully from those who don’t.
Quit Smoking Benefits Timeline — From 20 Minutes to 15 Years
The body begins healing within minutes and continues for years after quitting
Cardiovascular system fully recovered from smoking damage
The pattern is clear. Every milestone you reach compounds the one before it.
Immediate Benefits (20 Minutes to 72 Hours)
The first three days are where the most dramatic physiological changes happen — and ironically, where most people feel the worst.
Within 20 minutes, your heart rate and blood pressure start dropping. By 12 hours, carbon monoxide leaves your bloodstream and your oxygen levels climb back to normal. At 48 hours, nicotine is completely eliminated from your body.
That 48-hour mark is important. Your nerve endings begin regenerating, which is why many ex-smokers notice food tasting better and smells becoming sharper within the first few days.
Here’s what most people don’t expect: feeling worse during the first 72 hours is actually evidence that healing has started. Irritability, headaches, and cravings are withdrawal symptoms — signs that your brain is recalibrating to function without nicotine. They’re temporary. The recovery they signal is permanent.
Short-Term Benefits (2 Weeks to 9 Months)
Between two weeks and three months, your circulation improves significantly. Blood flows more freely to your extremities. Physical activities like walking, climbing stairs, and exercising become noticeably easier.
By the one-to-nine-month mark, a critical repair process kicks in: cilia regeneration. Cilia are tiny hair-like structures lining your airways. Their job is to sweep mucus, bacteria, and debris out of your lungs. Smoking paralyzes and destroys cilia, which is why smokers cough constantly — their lungs have lost their natural cleaning system.
When you quit, cilia begin regrowing. As they recover, your chronic cough fades, wheezing decreases, and your risk of respiratory infections drops significantly.
Long-Term Benefits (1 Year to 15+ Years)
At the one-year mark, your excess risk of coronary heart disease drops to about half that of a current smoker. This is one of the most significant milestones in the quit journey, and it applies to people with all smoking histories, although the absolute benefit is greatest the earlier you quit.
By 5–15 years, your stroke risk can fall to a level similar to someone who has never smoked. The risk of mouth, throat, esophageal, and bladder cancers is reduced by about half. The risk of mouth, throat, esophageal, and bladder cancers is reduced by half.
At 10 years, your risk of dying from lung cancer is approximately half that of a continuing smoker. Precancerous cells in your lungs are gradually replaced by healthy tissue.
At 15 years, your risk of coronary heart disease returns to nearly the same level as a lifelong non-smoker. According to the American Cancer Society’s cessation research, the risk of pancreatic and cervical cancer also continues declining during this period.
Heart and Cardiovascular Benefits of Quitting Smoking
Heart disease is the number one killer linked to smoking — and it’s also where quitting delivers the fastest, most dramatic results.
How Quitting Reduces Heart Attack and Stroke Risk
Smoking damages your cardiovascular system through three simultaneous mechanisms:
Nicotine constricts blood vessels and raises heart rate
Carbon monoxide reduces oxygen delivery to the heart muscle
Tar and toxins promote inflammation and plaque buildup in arteries
When you quit, all three mechanisms begin reversing. Your blood vessels dilate, oxygen delivery improves, and arterial inflammation starts decreasing. Within one year, your excess heart disease risk is cut in half.
Blood Pressure and Circulation Recovery
Blood pressure begins dropping within 20 minutes of your last cigarette. But here’s the deeper benefit: over weeks and months, the chronic vessel constriction caused by years of nicotine exposure gradually relaxes.
Improved circulation means better blood flow to your hands, feet, and skin. Many ex-smokers notice warmer extremities, faster wound healing, and more energy within the first few months.
Lung and Respiratory Benefits After Quitting
Lung function improves as airways recover and cilia regenerate
Your lungs take longer to recover than your heart — but the recovery is profound.
How Cilia Recovery Restores Lung Function
Think of cilia as your lungs’ built-in cleaning crew. In an active smoker, these tiny structures are flattened and paralyzed by toxic chemicals. Without functioning cilia, mucus and debris accumulate, creating the chronic “smoker’s cough.”
Within 1–9 months of quitting, cilia begin regenerating. As they regrow, your lungs can clear mucus normally again. The persistent cough fades. Shortness of breath decreases. Your lung function measurably improves.
One honest caveat: if you’ve smoked heavily for decades, some lung damage — particularly from COPD — may not fully reverse. Scarring from chronic obstructive pulmonary disease can be permanent. That said, quitting still slows disease progression dramatically and improves quality of life at every stage.
Cancer Risk Reduction Over Time
Lung cancer risk decreases steadily after quitting. At the 10-year mark, your risk of dying from lung cancer drops to about half that of a current smoker. Other smoking-related cancers — including mouth, throat, esophagus, bladder, kidney, and pancreatic cancer — also decline progressively.
The mechanism is straightforward: smoking causes DNA damage that leads to abnormal cell growth. When you stop exposing your cells to carcinogens, your body can repair damaged DNA and replace precancerous cells with healthy ones. The longer you stay smoke-free, the more complete this cellular renewal becomes.
Mental Health Benefits of Quitting Smoking
This is the section most quit smoking guides either skip or bury in a single sentence. That’s a mistake, because the mental health benefits are substantial — and widely misunderstood.
How Nicotine Hijacks Your Stress Response
Here’s a belief most smokers hold: “Cigarettes help me manage stress.” The reality is the opposite.
Nicotine creates an artificial dopamine cycle. Each cigarette triggers a short burst of dopamine — the brain’s reward chemical — followed by a rapid crash. That crash produces irritability, restlessness, and anxiety. The next cigarette “fixes” the crash, which reinforces the belief that smoking reduces stress.
But smoking didn’t solve the stress. It created the stress cycle in the first place.
When you quit, your brain’s natural dopamine and serotonin production gradually rebalances. The first 2–4 weeks can feel worse as your neurochemistry adjusts. After that adjustment period, most ex-smokers report lower baseline anxiety, fewer depressive episodes, and better concentration than when they were smoking.
Anxiety, Depression, and Mood Improvement After Quitting
Research consistently shows that quitting smoking is associated with reduced anxiety, depression, and psychological stress. In some studies, the improvement in mood is similar in magnitude to what is seen with antidepressant treatment.
This matters because fear of worsening mental health is one of the top reasons people avoid quitting — or relapse during withdrawal. Knowing that the initial mood disruption is temporary, and that long-term mental health improves, can be the difference between pushing through and giving up.
If you have a history of severe depression, bipolar disorder, or other serious mental health conditions, discuss your quit plan with a healthcare professional so your mood can be monitored and your support tailored to your needs.
Skin, Appearance, and Anti-Aging Benefits
Improved circulation restores skin health and natural glow
Smoking ages your skin faster than almost any other external factor. The good news: much of the damage is reversible.
Collagen Restoration and Complexion Recovery
Smoking degrades collagen and elastin — the two proteins responsible for skin firmness and elasticity. It also constricts blood vessels in the outer layers of skin, starving it of oxygen and nutrients.
When you quit, circulation to your skin improves within weeks. Collagen production begins normalizing. Many ex-smokers notice a healthier complexion, reduced sallowness, and improved skin texture within 1–3 months.
While deep wrinkles from years of smoking may not fully disappear, quitting prevents further accelerated aging and allows your skin’s natural repair processes to function properly again.
Teeth, Hair, and Nail Improvements
The appearance benefits extend beyond skin:
Teeth: Staining slows and stops; gum disease risk decreases significantly
Hair: Reduced exposure to toxins can slow premature graying and hair thinning
Nails: Yellow staining fades; nail strength improves
Breath and scent: Clothes, hair, home, and car no longer carry tobacco odor
These changes are often the first benefits other people notice — which provides powerful social reinforcement during the quit process.
Financial Benefits of Quitting Smoking
The health benefits get most of the attention. But the financial impact is staggering — and consistently underestimated.
Annual Savings Calculation
The direct cost calculation is straightforward:
The examples below use an average US price of about 9 USD per pack for illustration; actual costs vary widely by country and state.
Cost per pack × Packs per day × 365 = Annual savings
Smoking Rate
Pack Cost ($9 avg.)
Annual Savings
5-Year Savings
10-Year Savings
Half pack/day
$9.00
$1,643
$8,213
$16,425
1 pack/day
$9.00
$3,285
$16,425
$32,850
1.5 packs/day
$9.00
$4,928
$24,638
$49,275
Hidden Costs Most Smokers Don’t Calculate
The price of cigarettes is only part of the equation. Smokers face additional financial burdens that most savings calculators completely ignore:
Health insurance premiums: Smokers typically pay 15–50% more for life and health insurance
Medical expenses: Smoking-related healthcare costs average significantly higher over a lifetime
Home and auto maintenance: Smoke damage to upholstery, paint, and electronics adds cleaning and replacement costs
Dental care: Higher frequency of gum disease, staining removal, and oral health treatments
Productivity: Smoke breaks, increased sick days, and reduced energy carry real economic costs
When you factor in these hidden costs, the true financial benefit of quitting can be 2–3 times higher than the pack-price calculation alone.
Common Mistakes When Quitting Smoking
Understanding what goes wrong helps you avoid derailing your quit attempt:
Expecting instant results. The benefits are real but progressive. Feeling worse in week one doesn’t mean quitting isn’t working — it means your body is actively withdrawing from nicotine.
Confusing withdrawal symptoms with permanent changes. Irritability, brain fog, and increased appetite are temporary. They typically peak at 3–5 days and fade significantly by 2–4 weeks.
Not using available support. Nicotine replacement therapy (NRT), prescription medications, quit hotlines, and behavioral counseling all significantly improve success rates. Trying to quit through willpower alone reduces your odds.
For many people, combining behavioral support with medication offers the best chance of long-term success. Prescription treatments such as Champix (varenicline), along with options like Nicorette and other nicotine replacement therapies, can significantly reduce cravings and make withdrawal more manageable. If you’d like to explore a full range of treatment options to quit smoking, you can visit Pharmica’s online stop smoking service.
Underestimating the mental health timeline. Many people relapse during the first 2–4 weeks because anxiety temporarily spikes. Understanding that this is a neurochemical adjustment — not a sign you need cigarettes — helps you push through.
Ignoring triggers. Stress, alcohol, social situations, and habitual cues (morning coffee, driving) can trigger cravings months after quitting. Having a plan for these moments matters.
Who Benefits Most From Quitting — and When
Best for:
Heavy smokers (20+ cigarettes/day): The greatest absolute risk reduction and the most dramatic health improvements
Long-term smokers (20+ years): Significant life expectancy gains even after decades of smoking
Young adults (under 40): Quitting before 40 reduces smoking-related mortality risk by approximately 90%
Pregnant individuals: Dramatically reduces the risk of premature birth, low birth weight, and complications
People with existing conditions: Even those already diagnosed with heart disease or COPD see meaningful improvements in disease progression and quality of life
Not for: Nobody. There is no age, health status, or smoking history where continuing to smoke is safer than quitting. The research is unequivocal on this point.
Important note: Even people over 60 gain significant benefits. Studies show that quitting at age 60 adds roughly 3 years to life expectancy. At age 50, the gain can be 6 years. The math always works in your favor.
Final Verdict — Why Quitting Smoking Is the Single Best Health Decision
The quit smoking benefits are not abstract or exaggerated. They are measured, documented, and begin within minutes.
Your heart starts recovering before you finish reading this article. Your blood oxygen normalizes overnight. Your cancer risk declines for years. Your brain chemistry rebalances. Your skin restores itself. Your wallet grows heavier.
No single health decision delivers this breadth of benefit — for this low a cost.
Practical recommendation: Start today. Not Monday. Not after this pack. Use evidence-based cessation tools — NRT, prescriptions, counseling, or a quit hotline. Track your timeline milestones. And know this: every failed attempt still teaches your body and your brain how to quit. The research shows that success rates increase with each attempt.
Your body is ready to heal. It’s been ready since your last cigarette.
Frequently Asked Questions About Quit Smoking Benefits
Q1: What happens to your body when you quit smoking?
Your body begins healing within 20 minutes — heart rate drops, blood pressure normalizes, and carbon monoxide clears from your blood within 12 hours. Over weeks and months, lung function improves, cilia regrow, circulation strengthens, and your risk of heart disease, stroke, and multiple cancers progressively declines. By 15 years, your heart disease risk matches a non-smoker.
Q2: How long does it take for lungs to heal after quitting smoking?
Lung recovery begins within 72 hours as bronchial tubes relax and breathing becomes easier. Cilia — the tiny cleaning structures in your airways — start regenerating within 1–9 months. Lung cancer risk halves at 10 years. However, permanent scarring from conditions like COPD may not fully reverse, though quitting still slows progression significantly.
Q3: Is it too late to quit smoking at 50 or 60?
No. Quitting at age 50 can add approximately 6 years to life expectancy. Quitting at 60 adds roughly 3 years. Research shows that quitting before age 40 reduces smoking-related mortality risk by approximately 90%. Benefits occur at every age, regardless of how long you’ve smoked.
Q4: Does quitting smoking improve anxiety and depression?
Yes. After an initial adjustment period of 2–4 weeks, most ex-smokers experience lower baseline anxiety, fewer depressive episodes, and improved concentration. This happens because quitting allows your brain’s natural dopamine and serotonin systems to rebalance after nicotine disruption.
Q5: How much money do you save by quitting smoking?
A pack-a-day smoker at average U.S. prices ($9/pack) saves approximately $3,285 per year. Over 10 years, that’s nearly $33,000 — before factoring in reduced insurance premiums, lower healthcare costs, and decreased home maintenance expenses, which can double or triple the total savings.
Q6: What are the hardest days after quitting smoking?
Days 3–5 are typically the most intense, as nicotine withdrawal peaks and cravings are strongest. Symptoms include irritability, headaches, increased appetite, and anxiety. These withdrawal effects are temporary and usually diminish significantly by weeks 2–4. Using nicotine replacement therapy or prescription cessation aids can substantially reduce withdrawal severity.
Disclaimer
This content is for general information only and is not a substitute for professional medical advice, diagnosis, or treatment. Always consult a qualified healthcare provider with questions about your health, medications, or quitting smoking, and never disregard or delay seeking medical guidance because of something you read here. Use of this information is at your own risk, and no liability is accepted for actions taken or not taken based on this content.


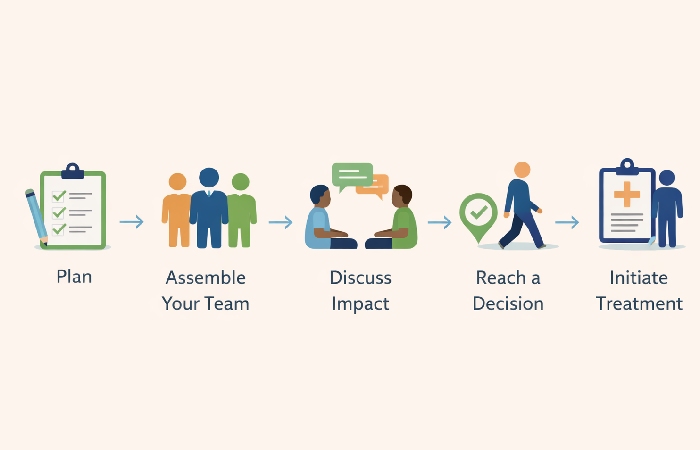
")


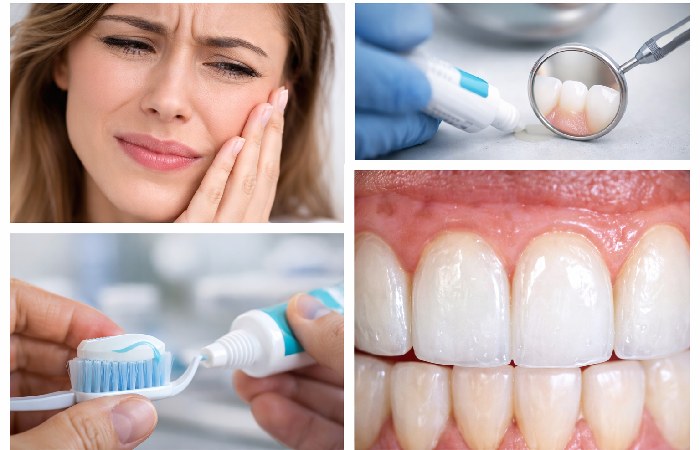
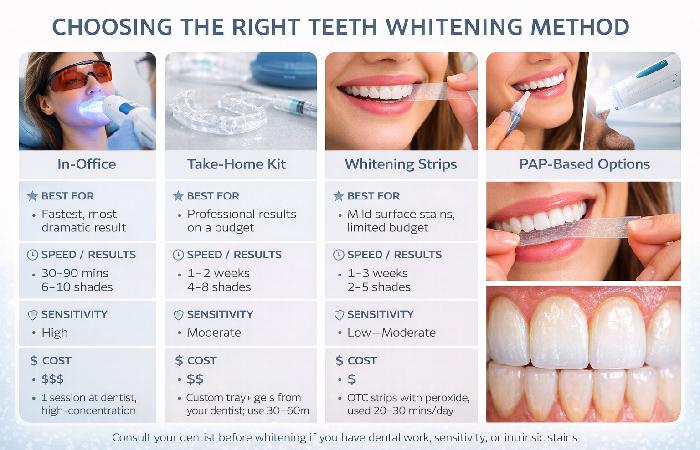

")
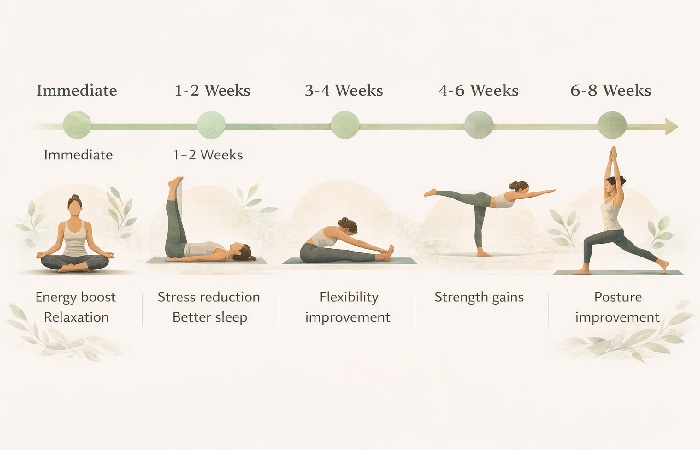


")