Home Blog Page 39

Camp Lejeune’s Crisis: Health Effects & Your Rights (2026)

0

For 34 years, military families at Camp Lejeune drank, cooked with, and bathed in water laced with industrial solvents. Most never knew. By the time the contaminated wells were finally shut down in the mid-1980s, government estimates suggest as many as one million people — service members, spouses, children, and civilian workers — had been exposed to chemicals linked to cancer, organ damage, and neurological disorders.

This isn’t ancient history. Veterans are still getting diagnosed decades after leaving the base. Legal claims are still being filed under a law that didn’t exist until 2022. And the government is still figuring out how to process all of them.

Below is a simple, easy-to-understand outline: of what occurred, the realities of the science (and its limitations), how you can take advantage of this benefit, and how you can get the most from it, free of false claims or a sales pitch that much of Camp Lejeune material on the internet.

Table of Contents

Camp Lejeune’s Crisis at a Glance:

  • What happened?→ Industrial solvents (TCE, PCE, benzene, vinyl chloride) added to water supplies at Camp Lejeune, NC during 1953-87 by off-base dry cleaner and on-base industrial activities.
  • What health conditions are associated?-> 8 conditions are eligible for VA disability pay; 15 are eligible for VA healthcare with no copay including several types of cancer, Parkinson‘s disease, and kidney disease.
  • Can affected people get benefits? → Yes — through VA disability claims (no lawyer needed) and/or the Camp Lejeune Justice Act of 2022 (federal lawsuit or Navy’s elective option).
  • Does a lawsuit affect VA benefits? → Filing does not. But a court-awarded judgment may be reduced by prior VA payments related to Camp Lejeune exposure.

What Happened at Camp Lejeune? A 34-Year Timeline

Camp Lejeune‘s water crisis is the contamination of drinking water at Marine Corps Base Camp Lejeune in Jacksonville, North Carolina from 1953 through 1987. Several industrial solvents, most notably trichloroethylene (TCE) and perchloroethylene (PCE), leaked from an off-base dry cleaner and numerous on-base industrial plants into the base‘s water supply, possibly exposing as many as one million people to chemicals well in excess of federal drinking water limits.

That definition barely scratches the surface. Here’s how it unfolded.

The Contamination Sources (1953–1985)

Water supply systems at Tarawa Terrace and Hadnot Point
Tarawa Terrace and Hadnot Point had different contamination sources and risks

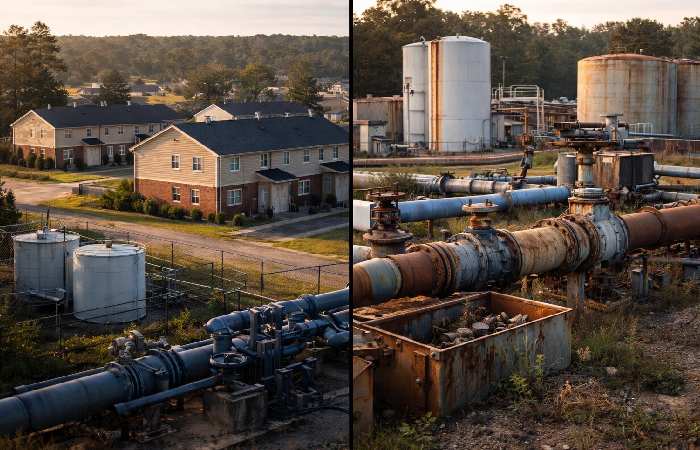
Camp Lejeune, itself, had two water treatment systems Tarawa Terrace and Hadnot Point and each had its own contamination story. It is important to distinguish which is which, because the science, the data gaps, and the legal implications for each are different.

Tarawa Terrace served enlisted family housing. Its primary contaminant was PCE, which seeped into the groundwater from ABC One-Hour Cleaners, an off-base dry cleaning operation. Spills and improper disposal practices sent PCE migrating through the soil and into the wells that fed this system. According to a National Research Council report published through the National Institutes of Health, ATSDR modeling estimated that PCE concentrations in Tarawa Terrace’s finished water exceeded the EPA’s maximum contaminant level (MCL) of 5 μg/L from as early as November 1957 until the wells were closed in 1985.

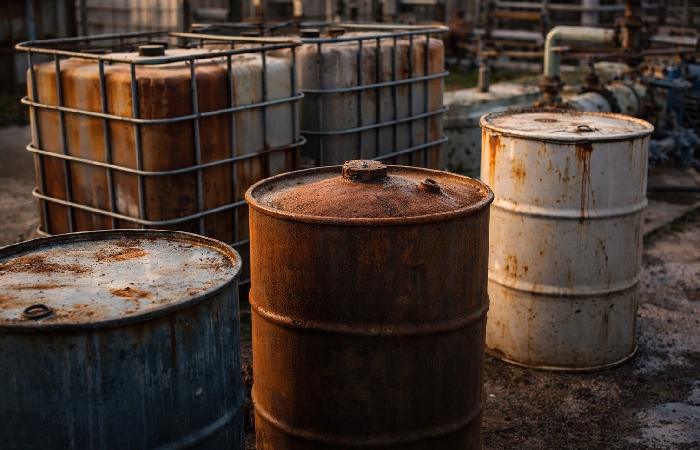
Hadnot Point supplied water to barracks, administrative offices, the base hospital, and an industrial area. Its contamination was far more complex — multiple sources, multiple chemicals. TCE was the most prevalent contaminant. It was probably the result of spills at industrial sites, leaking underground storage tanks, drums at dump sites and a former fire training area. They also found the following chemicals: PCE; vinyl chloride; benzene; methylene chloride; toluene.

Put plainly: we still don’t have a complete picture of what happened at Hadnot Point. While ATSDR completed historical modeling for Tarawa Terrace, no equivalent modeling has been completed for Hadnot Point. The full extent of contamination there remains scientifically uncharacterized — which is a significant gap, given that Hadnot Point served the base hospital, barracks, and administrative buildings.

How the Crisis Was Discovered — and Why It Took So Long

It took until the early 1980s — roughly three decades into the contamination — for routine water testing to flag the problem. Once identified, contaminated wells were shut down between November 1984 and May 1985. The entire Tarawa Terrace treatment plant followed in 1987.

Yet, there is a long 34-year interval from the start of the source (1953) and the actual response (1984–1987). During that period, the water supply had turned on-and-off, during which time the level of substance in the water would come and go sometimes significantly based on which wells were turned on. The ingoing resident had no way of knowing if that sip was substantially contaminated or just okay.
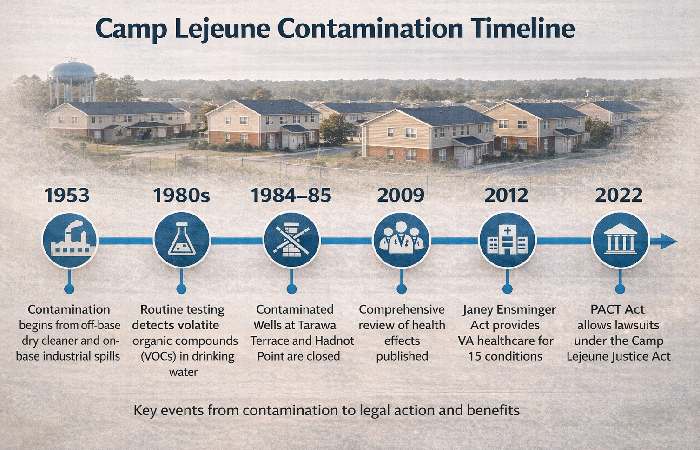
Key Milestones

Timeline of Camp Lejeune water contamination and key events
Key events from contamination to legal action and benefits
Year Event
1953 ABC One-Hour Cleaners begins operations near Tarawa Terrace wells
1957 ATSDR models estimate PCE first exceeded EPA limits in Tarawa Terrace water
1980s Routine testing reveals VOC contamination in multiple wells
1984–85 Contaminated wells at both systems are closed
1987 Tarawa Terrace water-treatment plant shut down entirely
2009 National Research Council publishes comprehensive health effects review
2012 Janey Ensminger Act provides VA healthcare for 15 covered conditions
2017 VA establishes 8 presumptive conditions for disability compensation
2022 PACT Act signed — includes Camp Lejeune Justice Act allowing lawsuits

What Chemicals Contaminated the Water?

Four primary contaminants drove Camp Lejeune’s crisis. Each has a distinct toxicological profile.

TCE, PCE, Benzene, and Vinyl Chloride — Explained

industrial-solvents-water-contamination
Industrial solvents like TCE and PCE were major contaminants in the water supply

Trichloroethylene (TCE) — An industrial degreasing solvent. TCE was the dominant contaminant at Hadnot Point. It is classified as a known human carcinogen by the EPA’s Integrated Risk Information System. Chronic exposure is associated with kidney cancer, liver damage, and neurological effects.

Perchloroethylene (PCE) — A dry-cleaning solvent. PCE was the primary contaminant at Tarawa Terrace, supplied by an on-base dry cleaner. PCE undergoes natural groundwater degradation into TCE, trans-1,2-dichloroethylene, and vinyl chloride–a single source producing many toxic compounds. EPA ranks PCE as a probable human carcinogen.

Benzene — A volatile organic compound found in fuels and industrial chemicals. Benzene is a known human carcinogen with strong associations with leukemia and blood disorders. It was detected in Hadnot Point supply wells.

Vinyl Chloride a breakdown product of TCE and PCE. Vinyl chloride is a human carcinogen which has been most frequently associated with liver (hepatic angiosarcoma) cancer. Vinyl chloride was found at Camp Lejeune as a secondary product of the original solvent/contaminant.

Tarawa Terrace vs. Hadnot Point: Two Contamination Scenarios

Factor Tarawa Terrace Hadnot Point
Primary Contaminant PCE TCE
Source Off-base dry cleaner (ABC One-Hour Cleaners) Multiple on-base industrial sites, leaking tanks, dump sites
Population Served Enlisted family housing Barracks, admin offices, base hospital, industrial area
Contamination Complexity Single primary source Multiple sources, multiple chemicals
Historical Modeling Completed? Yes (ATSDR) No — not yet characterized
MCL Exceedance Duration ~1957 to 1985 (estimated) Unknown (insufficient data)
Other Chemicals Detected TCE, vinyl chloride (degradation products) PCE, vinyl chloride, benzene, methylene chloride, toluene

However, it was not only drinking that caused the exposures. What made the contamination at Camp Lejeune so insidious were the volatile organic compounds (VOCs) substances at room temperature tend to evaporate so readily that when one is using the water at any moment, one is also inhaling and absorbing those compounds in the air. Both TCE and PCE are VOCs. In addition to drinking using the water to drink, cook, and wash one‘s hands people were absorbing them through bathing, showering, dishwashing, laundry, and swimming.

Health Effects Linked to Camp Lejeune’s Crisis

Here’s where most other sources either overstate the case or dodge it entirely. The reality sits in an uncomfortable middle ground — and understanding it honestly is more useful than false certainty in either direction.

How Strong Is the Evidence? Understanding the Science

Federal scientific review of the health impacts of Camp Lejeune is by a National Research Council committee report at the request of Congress. That committee used a 5-level classification system of strength of evidence. Only two were relevant for TCE and PCE:

  • Limited/suggestive evidence of an association — Studies suggest a link, but chance and bias cannot be fully ruled out. Not sufficient to infer causation.
  • Inadequate/insufficient evidence — Not enough data to determine whether an association exists.

Absolutely none of the health outcomes we looked at met the threshold for “sufficient evidence of a causal relationship”. I don‘t want to scare you (or the chemicals), but instead to let you know that the studies we have just weren‘t powerful enough: they involved small sample sizes, had imperfect estimates of chemical exposures and struggled to assess health outcomes in a highly mobile military population over a long period of time.

Here’s what the science does support, and to what degree.

Cancers Associated with TCE and PCE Exposure

The epidemiologic literature provides limited/suggestive evidence of associations between chronic TCE or PCE exposure and:

  • Kidney cancer — The strongest concordance between human and animal data; kidney tumors observed in workers exposed to high levels of TCE
  • Bladder cancer
  • Breast cancer
  • Esophageal cancer
  • Lung cancer

Animal studies additionally showed liver cancer in mice and testicular cancer in male rats exposed to TCE, and mononuclear-cell leukemia in rats exposed to PCE. However, many of these tumors were species-, gender-, and strain-specific — meaning direct extrapolation to humans requires caution.

Non-Cancer Health Conditions

Beyond cancer, the research identified several other health concerns:

  • Hepatic steatosis (fatty liver disease) Limited/suggestive evidence at high exposure levels
  • Renal toxicity (kidney damage) – Inadequate/ suggestive evidence at high chronic exposure
  • Neurobehavioral effects Limited/suggestive evidence for visuomotor deficits, fatigue, headache, concentration impairment; most effects found during active exposure, limited data on persistence.
  • Scleroderma Limited for SSc or supportsiveness, especially if exposed to TCE
  • Male infertility — Some evidence from animal studies; human data inconsistent
  • Miscarriage — Epidemiologic evidence suggests increased risk during (not before) pregnancy exposure
  • Immune system effects — TCE acts as a skin sensitizer and may modulate autoimmune diseases in genetically susceptible individuals

Neurological conditions, especially Parkinson’s disease, have drawn growing attention as more research has emerged on environmental risk factors at Camp Lejeune. According to Neurology Live, Marines stationed at the base showed a higher risk of Parkinson’s disease, with volatile organic compounds (VOCs) and TCE identified as key contributors.

The 8 Presumptive Conditions vs. The 15 Covered Conditions

This distinction confuses many people — and for good reason. They serve different purposes within different VA programs.

According to the Department of Veterans Affairs’ official guidance on Camp Lejeune water contamination, here’s how they differ:

Category 8 Presumptive Conditions (Disability Compensation) 15 Covered Conditions (Healthcare Benefits)
Purpose VA disability compensation payments VA healthcare with no copay for that condition
What “presumptive” means VA automatically presumes your service caused the condition — you don’t need to prove causation You’re covered for treatment of these conditions without copay
Conditions Adult leukemia, Aplastic anemia/myelodysplastic syndromes, Bladder cancer, Kidney cancer, Liver cancer, Multiple myeloma, Non-Hodgkin’s lymphoma, Parkinson’s disease All 8 above PLUS: Breast cancer, Esophageal cancer, Female infertility, Hepatic steatosis, Lung cancer, Miscarriage, Neurobehavioral effects, Renal toxicity, Scleroderma
Eligibility 30+ days at Camp Lejeune/MCAS New River (Aug 1953–Dec 1987) + diagnosis Same service requirement + diagnosis
Who qualifies Veterans, Reservists, National Guard Veterans AND eligible family members

Note:“Presumptive“isn‘tthe same asautomatic. You‘ll still have to provide documentation military documents demonstrating you served at Camp Lejeune for the required period of time, and medical records establishing that you have the disease. The“Biblic“category simply means that you don‘thave to prove that you were exposedto the contamination causedyour illness not that you don‘t have to prove you were thereandthat you‘re sick.

Main Point: The evidence of association between the water and certain diseases at Camp Lejeune is genuine but a “limited / suggestive” body of evidence has not proven causation. There is a connection but not one you can establish based solely on population studies. You do not need to establish causation for the VA benefits presumptions to apply — the presumption establishes causation. However, the Justice Act established the statute that is an alternative to establishing causation for filing claims.

VA Benefits for Camp Lejeune Veterans and Families

Two separate VA benefit tracks exist for Camp Lejeune exposure. Understanding which applies to your situation is the first practical step.

Disability Compensation — The 8 Presumptive Conditions

If you were stationed at Camp Lejeune or MCAS New River for 30 cumulative days or more between August 1, 1953 and December 31, 1987, and were diagnosed with 1 of the 8 presumption illnesses, then you are eligible to apply for VA disability compensation.

The key advantage: you don’t need to prove your condition was caused by the contaminated water. The VA presumes the connection based on your qualifying service.

What you need to file:

  1. Military records indicating service on 30 or more cumulative days at Camp Lejeune, North Carolina, or MCAS New River, North Carolina, during the time period specified.
  2. Medical record evidence supporting the presence of one or more of the 8 presumptive conditions
  3. An established disability claim download application file using online at VA.gov, by taking it by mail, directly to a veterans regional office, or with the assistance of a veterans service organization (VSO)

What you do NOT need:

  • A lawyer
  • Proof that the water caused your condition
  • A specific water test result or exposure record

Healthcare Benefits — The 15 Covered Conditions

In addition to disability compensation, eligible veterans who served at Camp Lejeune are eligible for VA health care. For any of the 15 covered conditions, you will not be charged a copay for treatment of that condition.

The 15 presumption covered conditions are all 8 presumption covered conditions as well as: Breast cancer, esophageal cancer, female infertility, hepatic steatosis, lung cancer, miscarriage, neurobehavoral effects, renal toxicity and scleroderma.

For many people, the first question is whether their current health problems might be related to the contaminated water. Common symptoms of contaminated water at Camp Lejeune include various cancers, neurological disorders such as Parkinson’s disease, and reproductive issues. This kind of symptom checklist can help you decide when to talk with your doctor and the VA about a possible connection.

Family Member Benefits

Applicable family members aka spouses, children (biological or adopted), or dependents were residents at Camp Lejeune and/or MCAS New River for 30 days or more during the qualifying period.

Supporting documentation to be submitted with a request to activate: VA Form 10-10068 and documentation showing eligibility: relationship to veteran, residence at Camp Lejeune during qualifying period(s), documentation of covered condition diagnosis.

In-utero exposure is considered. If you were in utero and your mother resided at Camp Lejeune any time during the qualifying period then you could qualify.

How to File a VA Claim (Step-by-Step)

  1. Collect your evidence-Gather your military service records that indicate your dates of Camp Lejeune assignment and medical records containing your diagnosis.
  2. Select your way to file Internet (va.gov), by mail, in person or VSO.
  3. Indicate Camp Lejeune When applying for benefits, say you are applying for one or more of the presumptive illnesses due to the Camp Lejeune water contamination
  4. Track and submit VA processes your claim, and you can track the status through VA.gov
  5. Think about VSO help Veterans Service Organizations will help you file claims at no cost. Don‘t pay anyone to do this.

Section 804 of the Honoring our Promise to Address Comprehensive Toxics (PACT) Act established an independent legal avenue (separate from VA benefits) for those injured by the water contamination at Camp Lejeune. This legal avenue is called the Camp Lejeune Justice Act of 2022.

It’s important to understand: this is a different track from VA benefits. You can pursue both simultaneously. But they work differently.

Who Can File Under the Justice Act?

You (or your legal representative) may file if:

  • You lived, worked, or were otherwise exposed at Camp Lejeune for at least 30 cumulative days between August 1, 1953, and December 31, 1987, or
  • Your mother met that requirement while pregnant with you

This is broader than VA disability eligibility — it includes civilian workers, contractors, and anyone who was on base, not just service members.

The Navy Elective Option vs. Filing a Lawsuit

Two paths exist under the Justice Act:

Factor Navy Elective Option Federal Lawsuit
How it works Administrative claim filed with the Department of the Navy for a faster settlement decision Lawsuit filed in the U.S. District Court, Eastern District of North Carolina
Speed Designed to be faster than litigation Standard federal court timeline — potentially years
Who decides Department of the Navy Federal judge or jury
Offset rule No offset — prior VA benefits do NOT reduce your settlement Court must reduce award by the amount of any Camp Lejeune-related VA disability payments previously received
When to use If you want a faster resolution without litigation risk If the Navy denies your administrative claim, or you wait more than 6 months without a decision, or you prefer to pursue full litigation
Best when… You want speed and certainty with no VA benefit offset risk The Navy denies your claim, or you prefer full litigation with potential for a higher award

One critical detail: accepting a settlement through the Navy’s elective option means resolving that claim administratively. If you choose this path, you’re accepting the Navy’s offer rather than pursuing the claim through federal court. Make sure you understand the terms before accepting.

You start by filing an administrative claim with the Department of the Navy. From there, you can either accept the Navy’s elective option for a faster settlement, or proceed to federal court if the claim is denied or unresolved after 6 months.

For information on filing, the Department of the Navy’s Camp Lejeune Justice Act claims portal provides official guidance and forms.

Will Filing a Claim Affect My VA Benefits?

Filing a Camp Lejeune Justice Act claim — whether administrative or lawsuit — will not affect your VA disability compensation or healthcare eligibility. Period.

However, there’s a nuance:

  • If you pursue the Navy elective option and receive a settlement, that settlement does NOT reduce your VA benefits.
  • If you file a federal lawsuit and a court awards you relief, the court is required to reduce (“offset”) that award by the amount of any VA disability payments or benefits you’ve already received that are related to Camp Lejeune water exposure specifically. VA benefits unrelated to Camp Lejeune are not affected.

This offset rule applies only to court judgments from lawsuits — not to the elective option settlements.

Worth noting: the Camp Lejeune Justice Act includes provisions designed to protect claimants from excessive legal fees. If you do choose to work with an attorney, be aware that fee structures in these cases are subject to federal oversight.

For questions about the claims process, you can contact the Department of Justice at 202-353-4426 or email camplejeune.pactact@usdoj.gov.

Common Mistakes and Misconceptions

Offered below are just a few of the common misconceptions you may have heard if you‘ve watched a Camp Lejeune commercial on the television. Thanks to both the flashy legal advertising campaigns and realities of two benefit systems working simultaneously, misinformation abounds. Here’s what actually holds up.

  • Myth: You need a lawyer to get VA benefits.

Reality: You do not need a lawyer for VA disability compensation or healthcare benefits. Veterans Service Organizations (VSOs) provide free claim assistance. The VA itself warns against commercials and firms claiming you can’t get benefits without their help. To report suspected fraud, call the VA at 800-488-8244.

  • Myth: “Presumptive” means your claim is automatically approved.

Reality: Presumptive designation eliminates the need to prove causation — not the need to prove you served at Camp Lejeune during the qualifying period and that you have a qualifying diagnosis. You still need documentation.

  • Myth: Filing a Camp Lejeune Justice Act claim will reduce your VA benefits.

Reality: Filing has no impact whatsoever on VA benefits. Only a court-awarded judgment (not the Navy‘s elective option settlement) can be offset, and only to the extent of the VA payments attributable to Camp Lejeune exposure.

  • Myth: Settlement amounts are predictable.

Reality: There is no credible, publicly available data on common settlement amounts as of early 2026 and averages. The dollar amounts discussed by anyone are the result of guesswork. The claims process is continuing to evolve and depends on the facts of each situation.

  • Myth: Everyone who was at Camp Lejeune will get cancer.

Reality: No disease occurs solely by exposure. The NIH/NRC review rated the evidence as “limited/suggestive,” that is, some associations have been observed but that does not mean it‘s a proven cause at the population level. Many factors influence individual risk, including dose, duration, and route, genetics, etc.

Who This Guide Is For — and Who Should Seek Specialist Help

This guide is for:

  • Veterans who were stationed at Camp Lejeune or MCAS New River (1953 1987) and want to know about health risks and benefits will be able to access this information.
  • Qualifying period to: spouses, children, and dependents who resided on base
  • People exposed to in utero; whose mothers were residing at Camp Lejeune during pregnancy
  • Anyone who is doing research, writing about, or championing an issue and needs a broad, unbiased, balanced, scholarly, and evidence-based overview.

This guide is NOT a substitute for:

  • Personalized medical advice — if you have symptoms or a diagnosis, consult your healthcare provider
  • Legal counsel for complex cases — if you’re deciding between the elective option and federal litigation, a qualified attorney experienced in Camp Lejeune claims can advise on your specific circumstances
  • VA claims adjudication — this guide explains the process, but your individual claim will be evaluated based on your specific records

Final Verdict

The Ilene crisis is the most sustained(and one of the most significant) incidents of toxic exposure in American military history. For more than thirty years, service members and their families drank and bathed from water tainted by industrial chemicals. And despite years of investigation, the full picture — especially at Hadnot Point — is still incomplete.

What IS clear: federal law now provides two distinct pathways for affected individuals. VA benefits (disability compensation and healthcare) are accessible without a lawyer and carry no risk to existing benefits. The Camp Lejeune Justice Act of 2022 offers an additional legal pathway — through either the Navy’s elective option or federal court.

Practical recommendation: Start with VA benefits. They’re free to pursue, don’t require legal representation, and won’t be affected by any future legal claims. If you’re also considering a Justice Act claim, the elective option avoids the offset rule that applies to court judgments. Consult a VSO for claims assistance — their help is free.

The science is imperfect. It may never deliver the clear-cut answers people deserve. But the legal and benefit infrastructure is real, it’s accessible, and it’s available right now — and that’s worth acting on.

Frequently Asked Questions

Q: What diseases are linked to Camp Lejeune water contamination?

A: The VA lists 8 presumptive conditions for compensation (adult leukemia, kidney cancer, bladder cancer, liver cancer, multiple myeloma, Non-Hodgkin‘s lymphoma, aplastic anemia and Parkinson‘s disease) and for healthcare benefits (those listed for compensation, plus breast cancer, esophageal cancer, lung cancer, female infertility, hepatic steatosis, miscarriages, neurobehavioral effects, renal toxicity and scleroderma).

Q: How do I file a Camp Lejeune VA disability claim?

A: Gather your military service records showing 30+ days at Camp Lejeune or MCAS New River (August 1953–December 1987) and medical records confirming a presumptive condition diagnosis. File online at VA.gov, by mail, in person, or with a free Veterans Service Organization.

Q: Do I need a lawyer to get Camp Lejeune benefits?

A: No. VA disability and healthcare benefits do not require a lawyer. VSOs offer free assistance. The VA warns against TV commercials or firms claiming you can’t get benefits without paying for legal help.

Q: What is the Camp Lejeune Justice Act of 2022?

A: Camp Lejeune Justice Act. Title part of the PACT Act, it creates a mechanism for PACT Act claimants exposed to waters contaminated with solvents to obtain relief through either an administrative claim against the Navy (with an elective option for expedited settlement) or in a federal suit in the Eastern District of North Carolina.

Q: Will filing a Camp Lejeune lawsuit affect my VA benefits?

A: Filing will not affect your VA benefits. However, if a court awards you relief through a lawsuit (not via the Navy’s elective option), the award must be reduced by the amount of Camp Lejeune-related VA disability payments you’ve previously received.

Q: 8 Presumptive vs. 15 Covered Conditions

A: The 8 presumptive conditions qualify veterans for VA disability compensation payments — the VA presumes service connection without requiring proof of causation. The 15 covered conditions (which include all 8 plus seven more) qualify veterans and eligible family members for VA healthcare with no copay for those specific conditions.

Breast Augmentation: Procedure, Cost & Recovery 2026

0

Breast augmentation is one of the most commonly performed cosmetic surgeries in the United States. If you’re considering this procedure, you probably have questions about safety, costs, recovery, and results.

This guide covers everything you need to know, from choosing the right implants to understanding realistic recovery timelines. We’ve based this information on medical research, FDA data, and guidelines from board-certified plastic surgeons.

Table of Contents

What is Breast Augmentation?

Breast augmentation, medically called augmentation mammaplasty, is a surgical procedure that increases breast size using implants or fat transfer. According to the American Society of Plastic Surgeons, more than 300,000 breast augmentation procedures were performed in 2023, making it one of the most popular cosmetic surgeries in the country.

The procedure involves placing implants under breast tissue or chest muscles to add volume and improve shape. It typically takes one to two hours and is performed under general anesthesia.

What Breast Augmentation Can Do

Breast augmentation is a cosmetic surgery that increases breast size and enhances shape using implants or fat transfer. Breast augmentation in Dallas is an example of this procedure, where saline or silicone implants are placed into the breast tissue to achieve fuller, more balanced breasts.

What Breast Augmentation Cannot Do

This procedure won’t fix significant sagging. If your nipples point downward or sit below your breast fold, you likely need a breast lift instead of or in addition to augmentation.

It also won’t guarantee perfect symmetry—most people have naturally asymmetric breasts, and surgery can improve but not eliminate this.

Who is a Good Candidate for Breast Augmentation?

The FDA approves breast implants for people who are at least 18 years old for saline implants and 22 years old for silicone gel implants.

Beyond age requirements, good candidates are physically healthy, have realistic expectations, and are bothered by small breast size or asymmetry.

You should be in good overall health without conditions that impair healing or increase surgery risks. Smoking significantly increases complications, so surgeons typically require you to quit at least several weeks before surgery.

You may not be a good candidate if you have active breast cancer or untreated precancerous breast lesions, are currently pregnant or breastfeeding, have uncontrolled diabetes or serious autoimmune conditions, or have unrealistic expectations about outcomes.

Some surgeons also recommend waiting if you’re planning pregnancy in the near future, as pregnancy and breastfeeding can change breast shape and potentially affect results.

Emotional Readiness and Expectations

Beyond medical factors, emotional readiness matters just as much. Breast augmentation is more likely to feel satisfying when you’re doing it for yourself—not to please a partner, friends, or social media.

Surgeons also watch for signs of body dysmorphic disorder or very unrealistic expectations. If you struggle with severe body image concerns, depression, or anxiety, it’s important to discuss this honestly with your surgeon and, if needed, a mental health professional before surgery.

A good consultation should feel like shared decision-making. That means your surgeon explains options, risks, and likely outcomes clearly, and you both decide together whether surgery fits your goals and lifestyle.

Medical Disqualifications

You may not be a good candidate if you have active breast cancer or untreated precancerous breast lesions, are currently pregnant or breastfeeding, have uncontrolled diabetes or autoimmune conditions, or have unrealistic expectations about outcomes.

Some surgeons also recommend waiting if you’re planning pregnancy in the near future, as pregnancy and breastfeeding can change breast shape and potentially affect results.

Good Candidate Not a Good Candidate
18+ (saline) or 22+ (silicone) Under minimum age
Healthy non-smoker Active smoker
Realistic expectations Expects perfection
Stable weight Planning major weight changes
Finished with childbearing (preferred) Currently pregnant/breastfeeding
Bothered by small size Happy with current size

When You May Need to Wait or Avoid Surgery

Your surgeon may advise delaying or avoiding breast augmentation if your chronic health conditions are poorly controlled, you smoke and are unwilling to quit, or you have an active infection anywhere in your body.

Surgery may also be postponed if you have major untreated mental health or body‑image issues, or if your goals don’t match what your anatomy can safely achieve—for example, wanting very large implants on a very narrow chest.

Waiting until your health, expectations, and life circumstances are stable usually leads to safer surgery and better long‑term satisfaction.

Types of Breast Implants

Choosing the right implant involves decisions about fill material, shape, texture, and size. Each option has different benefits and considerations.

Saline vs. Silicone Implants

Different breast implant types including saline and silicone displayed on sterile surface
Common implant options used in modern breast augmentation procedures.

Saline implants are filled with sterile salt water. They’re inserted empty and filled during surgery, which means they can use smaller incisions.

If a saline implant ruptures, your body safely absorbs the saline and the deflation is usually obvious within a short time.

Silicone implants are pre-filled with silicone gel that feels more like natural breast tissue. Most people find them softer and more natural-feeling than saline.

Because silicone implant ruptures can be “silent,” the FDA recommends periodic imaging (such as MRI or ultrasound) to check for rupture in women with silicone gel implants.

Feature Saline Implants Silicone Implants
Feel Firmer, may ripple Softer, more natural
FDA minimum age 18 years old 22 years old
Rupture detection Immediately obvious May need MRI to detect
Incision size Smaller (filled after insertion) Larger (pre-filled)
Average cost difference Slightly less expensive Slightly more expensive

Implant Shapes: Round vs. Teardrop

Round implants are the most common choice. They provide more fullness in the upper breast and maintain their appearance even if they rotate.

Teardrop implants, also called anatomical or “gummy bear” implants, have more volume at the bottom to mimic a natural breast slope. They are made with highly cohesive silicone gel that helps them hold their shape.

If a teardrop implant rotates, it can create an unnatural appearance and may require corrective surgery.

Implant Texture: Smooth vs. Textured

Smooth implants have a softer feel and can move naturally with breast tissue. They’re the most commonly used type in the United States.

Textured implants were designed to reduce capsular contracture risk and prevent rotation in teardrop implants. However, textured implants have been linked to a rare cancer called breast implant-associated anaplastic large cell lymphoma (BIA-ALCL).

As of mid‑2024, updates summarizing FDA data report roughly 1,300+ global cases and over 60 deaths related to BIA‑ALCL, highlighting that the condition is rare but serious.

Because of this risk, many surgeons now prefer smooth implants unless there’s a specific reason to use textured devices.

Choosing Your Implant Size

Implant size is measured in cubic centimeters (cc), not cup sizes. Cup sizes vary between bra manufacturers, but cc volume is consistent. Most breast augmentations use implants between 300cc and 500cc.

Your surgeon will help you choose based on your body frame, existing breast tissue, and desired outcome. Many surgeons use sizers during your consultation—you wear them in a sports bra under your clothes to see how different sizes look.

How Surgeons Help Choose Size and Shape?

Surgeons don’t just pick a cup size—they match implant width and projection to your chest width, skin stretch, and existing breast tissue. This helps avoid implants that are too wide or too narrow for your frame.

Many practices use in‑office sizers, 3D imaging, or photo galleries of patients with similar body types so you can see how different volumes and shapes might look on you. These tools reduce guesswork and help you feel more confident in your final choice.

The “Rice Test” for Sizing

Some surgeons recommend the rice test at home. Fill knee-high stockings with measured amounts of rice (300cc, 400cc, etc.) and place them in a non-padded bra. This gives you a rough idea of how different volumes look under clothing.

Remember that implants add volume behind your existing breast tissue, so the final result will look different than sizers worn in a bra. Photos of patients with similar builds to yours are often the most helpful sizing tool.

Popular Size Ranges

Based on plastic surgery data, here are typical implant sizes by body type:

  • Petite frame (under 5’3″, 100-130 lbs): 250-350cc
  • Average frame (5’3″-5’7″, 130-160 lbs): 350-450cc
  • Athletic/larger frame (over 5’7″, 160+ lbs): 400-550cc

These are general guidelines only. Your chest width, existing breast tissue, and personal preference matter more than body weight alone.

Implant Placement Options

Medical illustration showing breast implant placement under and over chest muscle
Common implant placement techniques used in breast augmentation surgery.

Where your surgeon places the implant affects recovery time, appearance, and long-term risks.

Placement Recovery Time Look/Feel Rippling Risk Best For
Submuscular (under the muscle) 2–3 weeks Very natural Low Thin tissue, active lifestyle
Subglandular (over the muscle) 1–2 weeks More fullness on top Higher Adequate natural breast tissue
Dual plane (partial under muscle) ~2 weeks Natural look with good projection Low Most average patients

Submuscular (Under the Muscle)

Submuscular placement puts the implant under your pectoralis major muscle. This provides more tissue coverage over the implant, which typically creates a more natural appearance, especially if you have minimal breast tissue.

Benefits include easier mammogram readings, lower rippling risk, and potentially lower capsular contracture rates. The main downside is a longer, more uncomfortable recovery period because the muscle must stretch to accommodate the implant.

Subglandular (Over the Muscle)

Subglandular placement puts the implant behind your breast tissue but in front of the chest muscle. This creates a shorter, less painful recovery and may provide more cleavage.

However, this placement has a higher risk of visible rippling, especially if you have thin breast tissue. Mammograms can also be slightly more difficult.

Dual Plane (Partial Submuscular)

Dual plane is a hybrid approach where the implant’s upper portion sits under the muscle while the lower portion sits under breast tissue only. This combines benefits of both placements—natural upper breast appearance with better lower breast projection.

Placement Recovery Time Natural Appearance Rippling Risk Best For
Submuscular 2-3 weeks Very natural Low Thin tissue, active lifestyle
Subglandular 1-2 weeks More fullness on top Higher Adequate breast tissue
Dual Plane 2 weeks Natural + projection Low Most patients

Incision Options

Your surgeon can access the breast pocket through several incision locations. Each has advantages regarding scarring and surgical precision.

  • Inframammary (under breast fold): This is the most common approach. The incision sits in the natural fold under your breast, making it well-hidden. It provides excellent visibility during surgery and allows precise implant placement.
  • Periareolar (around nipple): This incision follows your areola’s edge. Scars blend into the color transition between areola and skin. However, this approach has a slightly higher risk of decreased nipple sensation and may interfere with breastfeeding.
  • Transaxillary (armpit): The incision is made in your armpit crease, leaving no scars on the breast itself. This approach requires an endoscope and offers less precision than other methods.
  • Transumbilical (belly button): This rare approach uses an incision at your belly button. It only works with saline implants and offers the least surgical precision. Few surgeons perform this technique.

Most surgeons prefer the inframammary approach because it provides the best access and control during surgery while producing well-hidden scars.

Pre‑Surgery Evaluation and Preparation

Before surgery, your surgeon will review your medical history, examine your breasts, and sometimes recommend tests such as blood work or, in some cases, a baseline mammogram based on your age and risk factors.

You’ll usually be asked to stop smoking, avoid certain medications and supplements that increase bleeding (like some pain relievers or herbal products), and arrange for someone to drive you home and stay with you after surgery.

It also helps to set up your recovery space in advance. Keep essentials like medications, water, snacks, phone charger, and pillows within easy reach so you’re not stretching or lifting more than you should in the first few days.

The Breast Augmentation Procedure: Step-by-Step

Plastic surgeon performing breast augmentation surgery in accredited operating room
Breast augmentation performed in a sterile surgical environment.

Understanding what happens during surgery can help ease anxiety. Here’s the typical process:

Before Surgery

You’ll receive instructions to stop eating and drinking at midnight the night before. Certain medications, particularly aspirin and anti-inflammatory drugs, must be stopped one to two weeks before surgery because they increase bleeding risk.

Arrive at the surgical center in comfortable, loose-fitting clothing that buttons or zips in front. You won’t be able to lift your arms overhead easily after surgery.

During Surgery

Most breast augmentations take one to two hours. You’ll receive general anesthesia, meaning you’ll be completely asleep. Some surgeons offer twilight sedation for certain cases, but general anesthesia is more common.

Your surgeon makes the chosen incision, creates a pocket for the implant (either under muscle or breast tissue), inserts and positions the implant, then closes the incisions with layered sutures. Surgical drains are rarely needed for breast augmentation.

Immediately After Surgery

You’ll wake up in a recovery room wearing a surgical bra or compression garment. Most people feel groggy, sore, and tight in the chest. This is normal. You’ll need someone to drive you home and stay with you for at least the first 24 hours.

Recovery Timeline: What to Expect Week by Week

Woman recovering at home after breast augmentation wearing surgical support bra
Early recovery phase following breast implant surgery.

Recovery varies by individual, but here’s what most people experience:

Week 1: Immediate Recovery

Pain peaks in the first 48-72 hours. Most people describe it as tightness, soreness, or feeling like you did 1,000 push-ups. Prescription pain medication helps during this time.

Your breasts will be swollen, bruised, and sit high on your chest. This is temporary—implants “drop and fluff” over several weeks as swelling decreases and muscles relax.

Activity restrictions: No lifting anything over 5-10 pounds. No raising your arms above shoulder height. Sleep on your back with your upper body elevated. Most people take one week off work for desk jobs.

Weeks 2-4: Gradual Healing

Pain should significantly improve by week two. Many people switch to over-the-counter pain relievers or stop pain medication entirely.

Swelling continues decreasing. You can usually shower normally once your surgeon approves (typically 48 hours after surgery). You’ll have a follow-up appointment to check incision healing.

Activity restrictions: You can do light walking and gentle movement. No heavy lifting or vigorous exercise. Continue wearing your surgical bra or a supportive sports bra.

Months 2-3: Implants Settling

This is the “drop and fluff” phase. Your implants gradually settle into a more natural position. Swelling continues decreasing, and your breast shape becomes more defined.

Most people return to normal exercise at six to eight weeks, once their surgeon approves. Start with light cardio and gradually increase intensity.

Activity milestones: Most people can return to full exercise, including upper body workouts, by three months. High-impact activities may take longer.

Long-term Recovery (3-6 months)

Final results typically appear around six months. Your incision scars fade from red to pink to white over 12-18 months. Silicone scar sheets or gels can help minimize scarring.

Your implants should feel like a natural part of your body by six months. Initially firm breasts soften as your tissues adapt.

Timeline Pain Level Swelling Activity Level Work Return
Days 1-3 High (7-9/10) Severe Bed rest No
Week 1 Moderate (4-6/10) High Light activity Desk job possible
Weeks 2-4 Mild (2-4/10) Moderate Walking, daily tasks Yes (most jobs)
Months 2-3 Minimal (0-2/10) Mild Exercise returning Full activity
Month 6+ None Resolved Unrestricted Full normal

Post-Operative Care & What to Wear

Following post-op instructions carefully reduces complications and improves results.

Bra Requirements

You’ll wear a surgical bra or compression garment continuously for the first two to four weeks. This supports your breasts and helps control swelling. Your surgeon will tell you when you can switch to a regular sports bra.

Avoid underwire bras for at least six to eight weeks. Underwires can irritate incisions and interfere with healing. Once cleared, you can gradually introduce underwire bras.

Sleep Position

Sleep on your back with your upper body elevated at 30-45 degrees for at least two weeks. This reduces swelling and prevents pressure on incisions. Use pillows to prop yourself up, or sleep in a recliner if you have one.

Most surgeons allow side sleeping after four to six weeks and stomach sleeping after eight to twelve weeks.

Scar Care

Once incisions are fully closed (usually two weeks), you can begin scar massage. Gently massage scars with vitamin E oil or silicone scar gel in circular motions for five minutes, twice daily. This helps soften and flatten scars.

Protect scars from sun exposure for at least one year. UV exposure can darken scars permanently. Use sunscreen or keep scars covered when outdoors.

Warning Signs to Watch For

Contact your surgeon immediately if you experience fever over 101°F, increasing pain after initial improvement, foul-smelling discharge from incisions, or significant asymmetry that develops suddenly. These could indicate infection or other complications requiring medical attention.

Results: What Your Breasts Will Look Like

Side profile comparison showing proportional breast augmentation results
Example of proportional breast enhancement following augmentation surgery.

Setting realistic expectations helps ensure satisfaction with your results.

Initial Appearance

Immediately after surgery, your breasts will look swollen, sit high on your chest, and appear unnaturally round. This is temporary. As swelling decreases and muscles relax, implants drop into a more natural position over six to twelve weeks.

One breast may drop faster than the other, causing temporary asymmetry. This usually resolves on its own.

Final Results

At six months, you’ll see your true results. Your breasts should feel soft and move naturally. The degree of naturalness depends on your implant choice, placement, and existing breast tissue.

Larger implants tend to look less natural, especially on petite frames. Submuscular placement typically looks more natural than subglandular placement.

Cleavage Considerations

How much cleavage you get depends on your chest anatomy, not just implant size. If your breasts naturally sit wide apart on your chest, implants won’t create significant cleavage. Submuscular placement also creates less cleavage than subglandular placement because muscle keeps implants slightly separated.

Push-up bras can still enhance cleavage after augmentation, just as they did before surgery.

Long-term Changes

Your breast size and shape will change over time due to aging, weight fluctuations, and gravity. Implants themselves don’t sag, but the surrounding breast tissue does. Maintaining a stable weight helps preserve results longer.

Pregnancy and breastfeeding can also change breast appearance. Some people choose revision surgery after having children.

Risks and Complications

Like any surgery, breast augmentation carries risks. Understanding these helps you make an informed decision.

Common Side Effects

Nearly everyone experiences temporary swelling, bruising, and soreness. These resolve within weeks. Many people also have temporary nipple sensitivity changes—either increased sensitivity or numbness. Sensation typically returns to normal within a few months, though permanent changes occur in approximately 15% of patients.

Serious Complications

  • Capsular contracture is the most common serious complication, occurring in approximately 10-20% of patients according to research published in medical journals. Your body naturally forms a capsule of scar tissue around any implant. If this capsule tightens and squeezes the implant, it can cause firmness, distortion, or pain. Severe cases require surgery to release or remove the capsule.
  • Implant rupture can occur from trauma, compression during mammography, or spontaneous deflation. Saline implant ruptures are immediately obvious—the breast deflates within hours. Silicone ruptures may be “silent” and only detectable through MRI screening.
  • Infection occurs in less than 2% of cases but can be serious. Most infections develop within the first few weeks after surgery. Treatment usually involves antibiotics, but severe infections may require temporary implant removal.
  • Bottoming out happens when the implant drops below the natural breast fold, creating an empty upper breast and overly full lower breast. This requires surgical correction.
  • Breast implant illness (BII) is a term some people use to describe symptoms they believe are related to their implants, including fatigue, joint pain, and cognitive issues. Large studies, including research published by the National Institutes of Health, have shown mixed results, and there is still no single proven cause, but some people do report symptom improvement after implant removal.

Talking to Your Surgeon About Breast Implant Illness

  • If you’re worried your implants might be affecting your health, your concerns should be taken seriously. A good surgeon will listen, ask about your symptoms, and explain what tests or next steps make sense for you.

  • Keep simple notes about when your symptoms started, how often they happen, and what makes them better or worse. This can help your surgeon decide on blood tests, scans, referrals, or whether to talk about implant removal as an option.

  • Even though research on BII is still ongoing, you should feel heard and supported and be given a clear follow‑up plan—not made to feel like you’re imagining things.

BIA-ALCL (Breast Implant-Associated Anaplastic Large Cell Lymphoma) is a rare type of lymphoma that can develop in the scar tissue around textured breast implants. As of 2024, the FDA has confirmed approximately 1,000 cases worldwide and 60 deaths. The condition is extremely rare but serious. Because of this risk, many surgeons now use smooth implants instead of textured.

Complication Frequency Treatment Required
Swelling/bruising Nearly 100% None (resolves naturally)
Temporary sensation changes 60-70% None (usually resolves)
Capsular contracture 10-20% Possible revision surgery
Permanent sensation changes ~15% None available
Implant rupture (10-year rate) 10-15% Implant replacement
Infection <2% Antibiotics ± removal
BIA-ALCL (textured implants) Very rare Implant removal + treatment

Breast Augmentation vs. Breast Lift: Which Do You Need?

Many people confuse these procedures, but they address different concerns.

Cosmetic Augmentation vs. Reconstruction

Cosmetic breast augmentation is done to enhance the size and shape of naturally developed breasts. Breast reconstruction with implants is different—it rebuilds the breast after mastectomy or major breast surgery.

Reconstruction often involves additional steps such as tissue expanders and staged procedures, and it is usually covered by health insurance under specific laws, unlike most cosmetic augmentation.

Breast Augmentation

Breast augmentation adds volume using implants or fat transfer. It’s best for people who want larger breasts but have minimal sagging. Augmentation doesn’t lift the nipple position or remove excess skin.

If your nipples point forward and sit above your breast fold, augmentation alone will likely give you the results you want.

Breast Lift (Mastopexy)

A breast lift repositions your nipples and reshapes breast tissue by removing excess skin. It doesn’t add volume—in fact, your breasts may appear slightly smaller after surgery due to tissue tightening.

If your nipples point downward or sit below your breast fold, you need a lift. The “pencil test” can help—if you can hold a pencil under your breast without it falling, you have some degree of sagging.

Combined Procedure

If you want larger breasts AND have significant sagging, you may need both procedures. This can be done simultaneously or staged (lift first, augmentation later).

Combined surgery means one recovery period but a longer, more complex operation. Discuss the risks and benefits with your surgeon.

Procedure Adds Volume Lifts Position Removes Skin Scars Recovery
Augmentation Yes No No Minimal 2-4 weeks
Lift No Yes Yes Extensive 3-6 weeks
Combined Yes Yes Yes Extensive 4-6 weeks

Non-Surgical Alternatives

If you’re not ready for implants, some alternatives exist, though results are limited.

Fat Transfer Breast Augmentation

Fat transfer, also called autologous fat grafting, removes fat from one body area via liposuction and injects it into your breasts. This is the only non-implant surgical option that actually increases breast size.

Results are subtle—typically one cup size maximum. You need enough body fat for harvesting, and approximately 30-40% of transferred fat is reabsorbed by your body. Multiple sessions may be needed for desired results.

Benefits include a very natural look and feel, no foreign material in your body, and body contouring at the liposuction site. Downsides include limited size increase, unpredictable reabsorption rates, and higher cost per unit of volume added compared to implants.

Types of Breast Augmentation and Alternatives

You can think about breast enhancement in three main groups: standard implant surgery, surgery without implants, and non‑surgical options with limited effect.

  • Breast implants (saline or silicone): The most common option, using implants placed under or over the muscle through different incision sites.

  • Hybrid augmentation (implant + fat): In some practices, surgeons combine a smaller implant with fat grafting around it for softer edges and a more natural contour.

  • Fat transfer only: Uses your own fat (taken with liposuction) to give a subtle, usually one‑cup‑size increase and improve shape without an implant.

  • External expansion devices: Vacuum/expander devices can cause mild tissue expansion with very consistent use over months, but changes are usually modest.

  • Skin‑tightening and “non-surgical lift” treatments: Lasers, radiofrequency, or threads may slightly tighten the skin but don’t truly increase breast volume.

  • Exercise and posture: Strengthening chest and back muscles can make your chest look better supported, but it doesn’t increase actual breast tissue.

What Doesn’t Work

  • Breast enhancement pills and creams are widely marketed but don’t work. No oral supplement or topical cream has been proven to increase breast size in scientific studies. Save your money.
  • Exercises can strengthen chest muscles, which may slightly improve breast shape and posture, but they don’t increase actual breast tissue size.

Breast Augmentation Cost

Breast augmentation is typically not covered by insurance because it’s considered cosmetic. You’ll pay out-of-pocket unless the procedure is reconstructive (for example, after mastectomy).

Average Cost Breakdown

According to American Society of Plastic Surgeons 2023 statistics, the average surgeon’s fee for breast augmentation is approximately $4,500. However, this is just one component of the total cost.

Total typical costs range from $5,000 to $10,000 depending on location, surgeon experience, implant choice, and surgical facility. Urban areas and coastal cities tend to be more expensive.

Cost Component Typical Range
Surgeon’s fee $3,500–$6,000
Anesthesia $1,000–$1,500
Surgical facility $800–$1,500
Implants $1,000–$2,000
Pre-op testing $200–$500
Post-op garments $50–$150
Follow-up visits Usually included
Total $5,000–$10,000

Geographic Variations

Costs vary significantly by location. Major metropolitan areas like New York, Los Angeles, and San Francisco typically charge 20–40% more than smaller cities or rural areas. However, traveling far for surgery isn’t always recommended—you need local access to your surgeon for follow-up appointments and any complications.

Financing Options

Many plastic surgery practices offer financing through companies like CareCredit or Alphaeon. These medical credit cards provide payment plans, often with promotional interest-free periods.

Some surgeons also offer in-house payment plans. Always read the fine print regarding interest rates, fees, and what happens if you miss a payment.

Insurance Coverage

Insurance typically doesn’t cover cosmetic breast augmentation. However, reconstructive breast surgery after mastectomy is covered under the Women’s Health and Cancer Rights Act of 1998, which requires insurance plans that cover mastectomy to also cover reconstruction.

If you have tuberous breast deformity or severe asymmetry, insurance may cover surgery in some cases, but detailed documentation and pre-authorization are essential.

Typical Cost by Country

Costs vary widely between countries. The ranges below are approximate package prices that often include the surgeon’s fee, anesthesia, facility, and implants, but details depend on the clinic and city.

Country Typical Total Cost (approx.) Notes
United States $5,000 – $10,000 Higher fees for surgeon, facility, and implants; major cities often at the top of the range.
Canada $6,000 – $8,000 Prices vary by province and clinic; often similar to or slightly below large U.S. metro areas.
United Kingdom £3,500 – £7,000 Private clinics set their own fees; London tends to be more expensive than regional centers.
Australia AUD 10,000 – 15,000 Often includes surgery, anesthesia, and hospital costs; big-city clinics sit at the higher end.
India $3,000 – $4,500 Typically lower labour and facility costs; popular for medical tourism but surgeon and hospital quality vary.
Mexico $3,500 – $4,500 Frequently marketed to medical tourists; total price may include travel-support packages.
Turkey $3,000 – $5,000 Known as a lower-cost hub for cosmetic surgery with package deals that may include hotel and transfers.
Brazil $3,800 – $6,000 Large cosmetic surgery market with many high-volume surgeons in major cities.

Lower prices abroad can be attractive, but it’s important to check the surgeon’s credentials, facility accreditation, infection control standards, and what aftercare is realistically available once you return home.

Special Considerations

Several important topics deserve extra attention if you’re considering breast augmentation.

Most people can breastfeed successfully after breast augmentation, and implant surgery does not automatically prevent milk production. However, some factors can make breastfeeding more difficult, such as periareolar incisions that may affect milk ducts and nerves, pre‑existing breastfeeding problems, or very limited natural breast tissue.

If future breastfeeding is important to you, tell your surgeon during your consultation. In many cases, an inframammary (breast fold) incision is preferred because it has the lowest chance of interfering with breastfeeding.

You can and should continue getting mammograms after breast augmentation. Implants do not increase breast cancer risk, but they can make images harder to interpret, which is why you must always tell the technician you have implants. They can then use implant displacement views, which gently move the implant back against the chest wall so more breast tissue can be seen.

The FDA recommends periodic imaging such as MRI or ultrasound for people with silicone implants to check for silent ruptures, although not all insurance plans cover this. Submuscular placement generally makes mammogram interpretation easier than subglandular placement because more breast tissue sits in front of the implant.

Implant Lifespan and Replacement

MRI imaging used to monitor silicone breast implants for rupture
Imaging such as MRI may be recommended to evaluate silicone implant integrity.

Breast implants are not lifetime devices. They don’t have a fixed expiration date, but the longer you have them, the more likely you are to develop issues such as rupture, capsular contracture, or changes in position that may require surgery.

According to FDA guidance, many surgeons suggest thinking about the possibility of replacement somewhere in the 10–20‑year range, but if your implants look and feel normal and you have no symptoms, routine replacement isn’t automatically required.

Common reasons for revision surgery include implant rupture or deflation, capsular contracture causing firmness or distortion, a desired size change, implant shifting or “bottoming out,” and normal aging changes in breast shape. Around 1 in 5 augmentation patients will need some form of additional breast or implant surgery within about 10 years.

Long‑Term Follow-Up and Monitoring

Breast implants require long‑term follow-up, even when you feel fine. Most surgeons recommend periodic visits to check breast shape, firmness, and any new symptoms over the years.

For silicone gel implants, your surgeon may suggest MRI or ultrasound at intervals, especially if you notice changes in how your breasts look or feel.

Contact your surgeon promptly if you notice sudden swelling, a new lump, marked asymmetry, persistent pain, or fluid around the implant area. These signs don’t always mean a serious problem, but they should be evaluated quickly to rule out complications.

How to Choose a Qualified Plastic Surgeon

Your surgeon choice is the single most important factor affecting your safety and results.

Board Certification

Choose a surgeon certified by the American Board of Plastic Surgery (ABPS). This is the only board recognized by the American Board of Medical Specialties for plastic surgery. Board certification requires:

  • Completion of plastic surgery residency training (typically 6-7 years after medical school)
  • Passage of comprehensive written and oral examinations
  • Ongoing continuing medical education

Some doctors claim to be “board certified” in cosmetic surgery by lesser-known boards that don’t require the same rigorous training. Always verify ABPS certification at the American Board of Medical Specialties website.

Experience and Specialization

Ask how many breast augmentations your surgeon performs annually. Surgeons who regularly perform a procedure tend to have better outcomes and lower complication rates. Look for someone who performs at least 50-100 breast augmentations per year.

Review before-and-after photos of the surgeon’s actual patients, particularly those with builds similar to yours. Be wary of stock photos or photos that look too perfect—they may not be real patient results.

Hospital Privileges

Make sure your surgeon has admitting privileges at a nearby hospital. This indicates the hospital has vetted their credentials and skills. If a complication occurs, you want your surgeon able to provide hospital care if needed.

Red Flags to Avoid

Be cautious if a surgeon:

  • Isn’t board certified by ABPS
  • Pressures you to book surgery during the first consultation
  • Offers prices significantly below the market average
  • Guarantees perfect results
  • Dismisses your concerns or questions
  • Doesn’t require a physical examination before providing recommendations
  • Performs surgery in an unlicensed facility

Questions to Ask at Your Consultation

Come prepared with questions:

  1. Are you board certified by the American Board of Plastic Surgery?
  2. How many breast augmentations do you perform each year?
  3. What’s your complication rate for this procedure?
  4. What’s your revision rate (percentage of patients needing additional surgery)?
  5. What size and type of implant do you recommend for my goals and body type?
  6. What placement and incision approach do you suggest, and why?
  7. May I see before-and-after photos of patients with similar builds?
  8. What happens if I need revision surgery—what are the costs?
  9. Where will you perform my surgery? Is it an accredited facility?
  10. Who will administer anesthesia? What are their credentials?

A qualified surgeon will answer these questions thoroughly and make you feel comfortable.

Frequently Asked Questions

1. Am I a good candidate for breast augmentation?

You may be a good candidate if you’re healthy, at least 18 for saline or 22 for silicone, a non‑smoker or willing to quit, and bothered by small or uneven breasts. Your surgeon will also review your medical history, breast anatomy, and expectations before recommending surgery.

2. How long is breast augmentation recovery and when can I go back to work?

Most people feel the worst discomfort in the first 2–3 days and then improve over the first week. Many return to desk jobs in about a week, but heavy lifting and intense workouts are usually restricted for 4–6 weeks, depending on your surgeon’s advice.

3. Will breast implants affect my ability to breastfeed?

Many people breastfeed normally after augmentation. However, periareolar incisions and pre‑existing breastfeeding problems can make it harder, so if breastfeeding is important to you, tell your surgeon so they can choose the safest incision and technique.

4. Will breast implants interfere with mammograms or cancer screening?

You can still have regular mammograms with implants. Always tell the imaging center you have implants so they can use special implant displacement views to see more tissue. Implants don’t increase breast cancer risk but do require extra care in imaging.

5. Do breast implants need to be replaced every 10 years?

There is no strict 10‑year rule. Implants are not lifetime devices, and many people eventually need another surgery for rupture, capsular contracture, or shape changes, but if your implants look and feel fine and you have no issues, routine replacement at exactly 10 years isn’t mandatory.

6. What is the difference between implants under vs over the muscle?

Under‑the‑muscle placement usually looks more natural and may make imaging easier but can mean more soreness early on. Over‑the‑muscle placement often has a quicker recovery and more upper‑pole fullness but can show more rippling in people with thinner tissue.

7. How much does breast augmentation cost?

In the US, most people pay somewhere between $5,000 and $10,000 including surgeon, facility, anesthesia, and implants. Costs vary by city, surgeon experience, implant choice, and whether you’re having surgery at a hospital or a private surgical center.

You can replace your current FAQ block with just these 7 and you’re still well‑aligned with search + voice intent.

Final Thoughts

Breast augmentation can significantly improve your confidence and satisfaction with your appearance when performed for the right reasons with realistic expectations. The key to a positive outcome is choosing a qualified surgeon, understanding the procedure thoroughly, and being honest with yourself about your motivations and expectations.

Take your time making this decision. Consult with multiple board-certified plastic surgeons, review their work, and ensure you feel comfortable with your choice. A good surgeon will answer all your questions, never pressure you, and prioritize your safety above all else.

Remember that while complications are relatively uncommon, they do occur. Understanding the risks helps you make an informed decision and recognize when something needs medical attention.

If you decide breast augmentation is right for you, following your surgeon’s pre-op and post-op instructions carefully will give you the best chance of a smooth recovery and beautiful results.

Implant-Based Breast Reconstruction: A Clear Guide for Patients

0

Facing breast reconstruction after mastectomy is deeply personal—and often overwhelming. If you’re researching implant-based options, you likely want straightforward answers: What actually happens during this surgery? What will recovery feel like? Could this be right for me? This guide cuts through medical jargon to explain implant-based breast reconstruction in plain language, covering how it works, key risks to understand, and practical steps to prepare for a confident conversation with your surgical team. Important: This information is for educational purposes only and does not replace personalized medical advice from a board-certified plastic surgeon.

Summary

  • What it is: Surgery using silicone or saline implants to restore breast shape after mastectomy.
  • Two main approaches: Two-stage (tissue expander first) or direct-to-implant (single surgery).
  • Key decision point: Prepectoral (over muscle) vs. subpectoral (under muscle) placement affects recovery and aesthetics.
  • Critical consideration: Prior or planned radiation therapy significantly increases complication risks—discuss timing carefully with your team.
  • Next step: Prepare 3–5 specific questions for your surgeon consultation using our checklist below.
  • This is one option; flap reconstruction and choosing to go flat are valid alternatives that your team can help you compare.

What Is Implant-Based Breast Reconstruction?

Implant-based breast reconstruction is surgery that restores breast shape using a silicone or saline implant after mastectomy. Unlike flap reconstruction (which uses your own tissue), this approach places a medical-grade implant to recreate volume and contour. The procedure is typically performed by a board-certified plastic surgeon, often in coordination with your breast cancer surgical team. While it cannot replicate the exact sensation or appearance of natural breast tissue, many patients report improved body confidence and comfort in clothing after healing, as described in the Mayo Clinic’s overview of breast reconstruction.

It is one of several reconstruction options. Some patients choose autologous (flap) reconstruction using their own tissue, and others choose no reconstruction (“going flat”). Your team can help you compare these paths based on your health, anatomy, and treatment plan.

How the Procedure Works: Two Main Pathways

tissue expander and implant reconstruction stages visual
Visual comparison of expander-based and direct implant reconstruction

Most implant-based reconstructions follow one of two pathways. Understanding the difference helps set realistic expectations.

Two-Stage Reconstruction with Tissue Expander

This remains the most common approach, especially when skin preservation is limited or radiation is planned.

  • Stage 1 (Mastectomy day or soon after): A temporary, balloon-like tissue expander is placed under the chest skin and muscle. A small valve remains under the skin for access.
  • Expansion phase (weeks to months): In clinic visits, your care team gradually injects saline through the valve, slowly stretching the skin and muscle to create space for a permanent implant.
  • Stage 2 (Exchange surgery): Once expansion is complete, a second surgery replaces the expander with a permanent silicone or saline implant.

Why choose this path? It allows careful adjustment of breast size and shape over time and is often preferred if postmastectomy radiation is needed, as expansion can pause during treatment, as outlined in the National Cancer Institute breast reconstruction fact sheet.

Direct-to-Implant (DTI) Reconstruction

In select cases, a permanent implant is placed immediately during mastectomy, skipping the expander phase.

  • Best suited for: Patients with adequate skin preservation, no planned radiation, and favorable anatomy.
  • Advantage: Fewer surgeries and a faster overall timeline.
  • Trade-off: Less flexibility to adjust size and shape after initial placement; higher likelihood of revision if complications arise or cosmetic goals change.

In practice, surgeons often make a final decision about two-stage vs. DTI during surgery, based on how healthy and well-vascularized the mastectomy skin flaps appear.

Implant Placement: Prepectoral vs. Subpectoral

implant placement over muscle vs under muscle comparison
Differences between over-muscle and under-muscle implant placement

Where the implant sits relative to your chest muscle significantly impacts recovery and long-term results.

Feature Prepectoral (Over Muscle) Subpectoral (Under Muscle)
Placement Implant sits directly under skin/fat, above pectoral muscle Implant placed beneath pectoralis major muscle
Recovery Typically less pain, faster return to arm movement More initial discomfort due to muscle manipulation
Aesthetics May show more implant edge/rippling in thin patients Muscle coverage can create smoother upper-pole contour
Radiation impact Higher risk of problems if radiation is needed after surgery; may not be suitable in this setting Muscle may offer some protection against radiation effects
Best for Patients with good skin quality, no radiation planned Patients with thinner tissue or planned radiation

Note: Surgeons may use acellular dermal matrix (ADM)—a biological or synthetic mesh—to support implant positioning and improve contour, especially in prepectoral cases. These materials act as an internal scaffold and can help define the breast fold and lower-pole shape.

Types of Implants: Silicone vs. Saline

Both options have a silicone outer shell; the difference is the filler.

Factor Silicone Gel Implants Saline Implants
Feel Softer, more closely mimics natural breast tissue Firmer; may feel less natural, especially in thinner patients
Rupture detection “Silent rupture” possible; for silicone implants the FDA recommends periodic ultrasound or MRI to check integrity Deflation is obvious (implant loses volume quickly)
Incision size Requires slightly larger incision for pre-filled implant Can be filled after placement, allowing smaller incision
FDA status Approved for reconstruction; smooth-shell implants are generally preferred because of lower BIA-ALCL risk compared with older macrotextured devices Approved for reconstruction; no known association with BIA-ALCL

Current practice note: Smooth, round silicone implants are most commonly used in the U.S. for reconstruction due to their safety profile and natural feel. Textured implants carry a small but real risk of breast implant-associated anaplastic large cell lymphoma (BIA‑ALCL) and are no longer considered first-line in most settings, as detailed on the FDA page on BIA‑ALCL.

Key Risks and Complications to Understand

All surgeries carry risks. Being informed helps you weigh benefits thoughtfully with your team. Your individual risk depends on factors like smoking status, diabetes or other health conditions, any prior or planned radiation, and your surgeon’s technique and experience.

Surgical Risks (Short-Term)

  • Infection, bleeding, or slow wound healing (reported in a small but meaningful percentage of patients, and higher in smokers or those with other medical conditions).
  • Reaction to anesthesia.
  • Fluid buildup (seroma) requiring drainage.
  • Skin or nipple healing problems if blood supply is compromised.

Implant-Specific Risks (Long-Term)

  • Capsular contracture: Scar tissue tightens around the implant, causing firmness, distortion, or pain. It is graded on the Baker Scale (I–IV); grades III–IV may require revision surgery.
  • Implant rupture or leakage: Silicone implants can rupture without obvious external change, which is why imaging surveillance is advised; saline ruptures are immediately visible because the implant deflates.
  • Changes in sensation: Numbness or altered feeling in the breast/chest wall is common and may be long-lasting.
  • Need for future surgery: Implants are not lifetime devices. Many patients need replacement or removal at some point due to complications, cosmetic changes, or normal aging of the body.

Critical Factor: Radiation Therapy

Postmastectomy radiation therapy (PMRT) significantly increases risks of problems such as infection, capsular contracture, and implant loss. These effects have been observed across multiple clinical studies and are especially important to consider for prepectoral reconstruction. If radiation is planned or likely, discuss timing strategies with your oncology and reconstruction teams. Some patients opt for delayed reconstruction, a staged expander approach, or flap-based options in this scenario.

Who Is a Good Candidate? Key Considerations

Implant-based reconstruction isn’t right for everyone. Factors your surgical team will evaluate:

✅ May be a good fit if you:

  • Have adequate chest skin and tissue after mastectomy.
  • Are not planning postmastectomy radiation (or have completed it with good healing and acceptable tissue quality).
  • Maintain a stable, healthy weight.
  • Do not smoke (or can quit well before surgery—smoking drastically increases complication risks; organizations like Macmillan Cancer Support stress this).
  • Prefer shorter initial surgery and recovery compared with flap procedures.

❌ Proceed with caution or consider alternatives if you:

  • Require or have recently completed radiation therapy to the chest wall.
  • Have significant obesity or a very large natural breast on the other side, which can make symmetry more challenging.
  • Are an active smoker (most surgeons require documented cessation before proceeding).
  • Have uncontrolled medical conditions affecting healing (e.g., poorly controlled diabetes, vascular disease).

Remember: Candidacy is highly individual. A board-certified plastic surgeon will assess your anatomy, cancer treatment history, and personal goals to recommend the safest, most effective option for you, including whether flap reconstruction or going flat may better meet your priorities. You can learn more about these options in the American Society of Plastic Surgeons breast reconstruction information.

If you’re still deciding whether implants match your goals and medical situation, this guide to implant-based breast reconstruction offers additional context on candidacy and expectations.

What to Expect: Recovery Timeline Guide

breast reconstruction recovery timeline stages
Healing stages from surgery to full recovery

Recovery is gradual. Setting realistic expectations reduces anxiety.

Weeks 1–2: Initial Healing

  • Hospital stay: Typically 1–2 days for expander placement; some direct-to-implant procedures may be done as outpatient or overnight stays, depending on your health and hospital protocol.
  • Activity: Rest with arms at sides; avoid lifting more than about 5 lbs, overhead reaching, or driving until cleared.
  • Pain management: Prescription medication initially, transitioning to over-the-counter options as you improve.
  • Drain care: Temporary tubes may collect fluid; your team will instruct you on emptying and monitoring.

Weeks 3–6: Gradual Return to Activity

  • Expansion visits begin (if two-stage): Weekly or biweekly saline injections to stretch tissue.
  • Movement: Light walking is encouraged; avoid strenuous exercise, heavy lifting, or high-impact activity.
  • Appearance: Swelling and bruising gradually improve; your final breast shape is not yet visible.

Months 2–6: Refinement and Final Steps

  • For two-stage: Exchange surgery typically occurs 3–6 months after expansion completes (longer if radiation was given or if healing is delayed).
  • Daily life: Most patients resume normal daily activities by about 6–8 weeks; full aesthetic settling may take 6–12 months.
  • Nipple reconstruction: If desired, this is usually performed after implant healing is complete, followed by areola tattooing for color.

Tip: Keep a symptom journal and attend all follow-ups. Report sudden pain, redness, fever, or unusual swelling immediately.

Preparing for Your Surgeon Consultation: 5 Essential Questions

Come prepared to make the most of your consultation. These questions help clarify options and align expectations:

  1. “Given my cancer treatment history (especially radiation), which reconstruction approach do you recommend and why?”
  2. “What are your personal experience and outcomes with prepectoral vs. subpectoral placement?”
  3. “What is your protocol if capsular contracture or infection occurs?”
  4. “What does long-term implant surveillance involve for me, and who manages it?”
  5. “Can I see before-and-after photos of patients with anatomy and treatment plans similar to mine?”

Pro tip: Bring a trusted friend or family member to take notes. Record the conversation (with permission) if helpful.

Common Mistakes to Avoid

  • Rushing the decision: Take time to understand options. Many centers offer second opinions, and waiting for clearer pathology or treatment plans is often appropriate.
  • Overlooking surgeon credentials: Verify board certification in plastic surgery (not just “cosmetic surgery”) and hospital privileges; you can search via the American Board of Plastic Surgery.
  • Underestimating recovery: Plan for 6–8 weeks of modified activity; arrange help at home, especially if you have young children or a physically demanding job.
  • Ignoring long-term commitment: Implants require monitoring over many years. Factor in future imaging for silicone implants and potential revision surgeries.
  • Comparing only to pre-cancer appearance: Focus on symmetry, comfort, and confidence in clothing—not perfectly replicating your exact prior breast.

Final Verdict: Is Implant-Based Reconstruction Right for You?

Implant-based breast reconstruction offers a well-established path to restore breast shape after mastectomy, with advantages of shorter initial surgery and no donor-site scarring compared to flap procedures. However, it involves trade-offs: potential for future surgeries, implant-specific risks, and sensitivity to radiation history. The strongest predictor of satisfaction is not the technique alone—it is clear communication with a skilled, board-certified surgical team who listens to your priorities. If you’re considering this option, prioritize consultations with surgeons who transparently discuss risks, show relevant outcome photos, and partner closely with your oncology team.

Frequently Asked Questions

Q: How long do breast implants last after reconstruction?

A: Implants aren’t lifetime devices. Many last 10–15+ years, but factors like radiation, aging, or complications may require earlier replacement. For silicone implants, the FDA recommends imaging (ultrasound or MRI) starting around 5–6 years after placement and every few years thereafter, according to the FDA screening recommendations for silicone breast implants. Regular follow-up with your surgeon is essential.

Q: Can I have implant reconstruction if I need radiation therapy?

A: Yes, but radiation increases risks of capsular contracture, healing problems, and implant loss. Your team may recommend delaying reconstruction, using a staged expander approach, choosing a subpectoral plane, or considering flap-based options. Timing discussions with both oncology and plastic surgery are critical.

Q: What is capsular contracture, and can it be prevented?

A: Capsular contracture is scar tissue tightening around the implant, potentially causing firmness or distortion. While it cannot be completely prevented, techniques such as careful surgical handling, minimizing infection risk, and selective use of mesh or ADM may help lower the chance. Treatment ranges from observation to revision surgery.

Q: Will I have feeling in my reconstructed breast?

A: Nipple and breast sensation is often reduced or altered after mastectomy and reconstruction. Some sensation may return over 1–2 years, but full restoration is uncommon. Ask your surgeon about nerve-sparing techniques or emerging nerve graft (“neurotization”) options if sensation is a priority at your center.

Q: How soon can I return to work or exercise?

A: Most patients resume desk work in about 2–4 weeks and light exercise around 6 weeks. Full activity, including heavy lifting or high-impact exercise, typically requires 8–12 weeks. Always follow your surgeon’s personalized guidance, which may differ based on your specific procedure and healing.

Q: Are there alternatives to implant-based reconstruction?

A: Yes. Flap reconstruction (using your own tissue from the abdomen, back, or thighs) offers a more natural feel and does not require implants, but involves longer surgery and donor-site recovery. Some patients also choose to go flat without reconstruction. Your surgeon can compare all options based on your anatomy, cancer plan, and goals.

Meticore Reviews: Scam or Legit? (2026 Update)

0

When Meticore first appeared on the market, it promised something most weight loss supplements never dare to explain — a specific mechanism. The claim was bold: low core body temperature is the hidden cause of slow metabolism, and Meticore could fix it.

Thousands searched for Meticore reviews hoping to find proof that this metabolism-boosting supplement actually delivered results. Some users reported positive changes. Many others called it a waste of money. And now, heading into 2026, the landscape has shifted dramatically.

The product’s official website appears to be offline. Customer support channels have gone silent. Yet people are still searching for answers.

This review cuts through the noise. We examine every ingredient against published research, break down the science behind the core body temperature theory, and give you an honest assessment of whether Meticore was ever worth the hype — and what you should do instead.

This guide is for you if:

  • You’re researching Meticore before buying (or wondering if you still can)
  • You already purchased and want to understand what you took
  • You want a science-backed framework for evaluating any weight loss supplement

Meticore Reviews at a Glance:

  • What is it? → A dietary supplement claiming to boost metabolism by raising core body temperature
  • Does it work? → No peer-reviewed clinical trials support the specific Meticore formula
  • Is it a scam? → The product existed, but key marketing claims were unsubstantiated
  • Available in 2026? → The official website appears offline; the product seems discontinued, but status may change over time
  • What should you do? → Consult a healthcare provider and rely on evidence-based weight management strategies

What Is Meticore?

Meticore is a dietary supplement marketed as a natural metabolism booster that claims to promote weight loss by increasing core body temperature. The product was introduced around 2020 and gained rapid popularity through aggressive online marketing, sponsored press releases, and affiliate-driven review sites.

The supplement comes in capsule form and contains a blend of plant-based ingredients. The manufacturer positioned it as stimulant-free, vegetarian-friendly, and safe for daily use.

But here’s what most review sites don’t mention: Meticore is not a pharmaceutical product. It was never evaluated or approved by the U.S. Food and Drug Administration (FDA) for safety or effectiveness. Like all dietary supplements in the United States, it only needed to avoid making explicit drug-like claims to remain on the market.

The Core Body Temperature Theory

Illustration of body heat and metabolism relationship
Conceptual link between body heat and metabolic activity

The central claim behind Meticore was that low core body temperature is a root cause of slow metabolism and weight gain. The idea is that by raising your internal temperature, your body would naturally burn more calories — even at rest.

There is a kernel of truth here, but it gets stretched far beyond what the science supports.

Research published by the National Institutes of Health confirms that metabolic processes produce heat and that metabolic rate and body temperature are interconnected. Higher metabolic activity does generate more heat.

However, the relationship is not a simple on/off switch. You cannot “fix” a slow metabolism by taking a capsule that marginally affects internal temperature. The body’s thermoregulatory system is tightly controlled, and no over-the-counter supplement has been clinically proven to alter core body temperature enough to produce meaningful fat loss.

That sounds promising on paper — until you examine the actual evidence for the ingredients Meticore uses.

Meticore Ingredients — What’s Actually Inside?

Natural ingredients used in Meticore supplement
Key plant-based ingredients found in Meticore

Meticore’s formula includes several plant-based ingredients that have been studied individually for various health properties. The problem is that Meticore uses a proprietary blend, which means the exact amount of each ingredient per capsule is not disclosed.

This is a red flag that most review sites gloss over.

Without knowing exact dosages, it’s impossible to determine whether the formula contains enough of any single ingredient to have a measurable effect. A supplement could list turmeric on the label but include such a small amount that it does nothing.

Full Ingredient Breakdown

Here’s what Meticore contains, with an honest look at what the research actually shows:

Ingredient Claimed Benefit Scientific Evidence Level Key Notes
Turmeric (Curcumin) Anti-inflammatory, metabolism boost Moderate for inflammation; Weak for weight loss Curcumin has legitimate anti-inflammatory properties, but weight loss effects in humans are minimal and inconsistent
Ginger Root Thermogenesis, digestion Moderate for digestion; Limited for fat burning May support digestive health; thermogenic effect is too small to drive meaningful weight loss
Moringa Oleifera Nutrient support, energy Low-to-Moderate Rich in vitamins and antioxidants; no strong evidence for weight loss
African Mango Extract Appetite suppression, fat reduction Low A few small studies showed modest effects, but results have not been replicated in larger, rigorous trials
Brown Seaweed Extract (Fucoxanthin) BAT activation, fat oxidation Low-to-Moderate Promising results in animal studies; very limited human data
Vitamin B12 Energy metabolism Strong for deficiency correction Essential nutrient, but supplementing beyond adequate levels does not increase metabolism or cause weight loss
Chromium Blood sugar regulation Moderate for blood sugar; Minimal for weight loss May help with insulin sensitivity; does not independently drive fat loss

The “Proprietary Blend” Problem

Here’s where people go wrong when evaluating supplements like Meticore.

Having “clinically studied ingredients” is not the same as having a “clinically studied product.” Turmeric has hundreds of published studies. Ginger does too. But those studies used specific, measured doses — often far higher than what a proprietary blend capsule typically contains.

When a company hides behind a proprietary blend, they’re essentially saying: “Trust us on the dosages.” For a health product making bold weight loss claims, that’s not good enough.

Does Meticore Actually Work? A Science-Based Analysis

Let’s be direct: there are no peer-reviewed, double-blind, placebo-controlled clinical trials testing the Meticore formula on human subjects.

This is the single most important fact that separates honest reviews from affiliate marketing.

What Research Says About Core Body Temperature and Weight Loss

The idea that body temperature and metabolism are connected is scientifically valid. Research into brown adipose tissue (BAT) — a specialized type of fat that burns calories to produce heat — is a legitimate and active area of obesity research.

When activated, BAT increases energy expenditure through a process called non-shivering thermogenesis. Scientists at institutions like Stanford and Harvard have studied BAT activation through cold exposure, and some compounds have shown promise in animal models.

However, the practical weight loss impact of BAT activation in adults is currently considered modest. According to research reviewed by the NIH, the energy expenditure increase from activating brown fat in humans is relatively small and has not been demonstrated as a viable standalone strategy for significant weight loss.

The Gap Between Individual Ingredients and the Final Formula

This is the ingredient paradox that most Meticore reviews completely ignore.

Even if every ingredient in Meticore had strong individual evidence (and several don’t), that wouldn’t validate the combined formula. Ingredients can interact, compete for absorption, or be present in doses too small to matter.

No one has tested whether these seven specific ingredients, in these unknown proportions, actually raise core body temperature or produce any measurable metabolic change in humans. That’s not a minor detail — it’s the entire foundation of the product’s marketing claim.

Meticore Side Effects and Safety Concerns

Reported Side Effects

Because Meticore uses generally recognized natural ingredients, severe side effects appear uncommon based on available user reports. However, some users have reported:

  • Digestive discomfort — nausea, bloating, or stomach upset (particularly from turmeric and ginger in concentrated forms)
  • Headaches — reported by some users, especially during the first week
  • Allergic reactions — possible for individuals sensitive to any plant-based ingredient in the blend

Drug Interactions and Precautions

Several ingredients in Meticore have known interaction potential:

  • Turmeric/curcumin may interact with blood thinners (warfarin, aspirin) and diabetes medications
  • Chromium can affect blood sugar levels and may interact with insulin or diabetes drugs
  • Ginger in high doses may interact with anticoagulant medications

Important: Always consult with your healthcare provider before starting any dietary supplement, especially if you take prescription medications, have underlying health conditions, or are pregnant or nursing.

Is Meticore a Scam or Legit?

The answer depends on how you define “scam.”

Legitimate Product vs. Unsubstantiated Claims

Meticore was a real, manufactured product. It wasn’t a phantom company charging credit cards without shipping anything. Capsules were produced, packaged, and delivered to customers.

But the marketing surrounding Meticore pushed well beyond what the evidence supports. Claims about “triggering” metabolism, “fixing” low core body temperature, and enabling rapid fat loss without diet changes are not substantiated by any published clinical research on this specific formula.

That gap between the marketing promises and the scientific evidence is where legitimate criticism is justified.

Counterfeit Product Warnings

Because Meticore was sold primarily through its own website rather than retail stores, there have been reports of counterfeit versions on Amazon, eBay, and other third-party marketplaces. Multiple consumer complaints involved products that didn’t match the official formula — a risk that’s grown even more significant now that the official sales channel appears to be down.

The “FDA Approved” Misconception

Some Meticore marketing materials implied the product was “FDA approved.” This is misleading. The FDA does not approve dietary supplements. Supplements may be manufactured in FDA-registered facilities that follow Good Manufacturing Practices (GMP), but the product itself does not undergo the approval process that prescription drugs require.

This is why understanding supplement regulation matters.

Meticore Customer Reviews — What Real Users Say

Positive Experiences

A subset of users reported:

  • Modest weight loss over 60–90 days (typically combined with diet and exercise changes)
  • Slight increase in energy levels
  • Improved digestion

It’s worth noting that users who changed their diet and exercise habits simultaneously would likely see results with or without a supplement.

Negative Experiences and Common Complaints

Many independent reviews (on Reddit, Trustpilot, and consumer forums) trend negative:

  • No noticeable weight loss after 30–60 days of consistent use
  • Reports of difficulty obtaining refunds despite the advertised 60-day money-back guarantee
  • Customer support unresponsive or difficult to reach
  • Feeling “nothing different” — no energy boost, no appetite suppression, no visible changes
  • Suspicion of fake positive reviews on affiliate websites

The pattern on platforms like Trustpilot and Reddit is clear: most users who paid out of pocket and had no affiliate incentive reported disappointing results.

Meticore in 2026 — Current Availability and Status

This is the part most review sites still haven’t updated.

As of 2026, Meticore’s official website appears to be offline based on recent checks. The product does not seem to be available through its original primary sales channel, though status may change over time. Customer support email addresses associated with the brand appear inactive.

Some third-party sellers on marketplaces like Amazon or eBay may still list “Meticore” capsules. However, purchasing from these sources carries significant risk:

  • No way to verify authenticity without the official manufacturer
  • No active refund policy if the original company is no longer operating
  • Potential for expired or counterfeit products

If you’re reading this in 2026 hoping to buy Meticore — the safest recommendation is to avoid third-party purchases entirely.

How to Evaluate Any Weight Loss Supplement (5-Point Safety Checklist)

Checklist for evaluating weight loss supplements safely
Key factors to evaluate before choosing any supplement

Whether you’re considering Meticore or any other supplement, use this framework before spending your money:

1. Check for Clinical Trials on the Actual Product

Not just individual ingredients — the specific formula. Look for peer-reviewed, human studies published in reputable journals.

2. Verify Ingredient Dosage Transparency

Reject any supplement that hides behind a “proprietary blend” without disclosing individual ingredient amounts. You deserve to know what you’re taking.

3. Confirm Third-Party Testing

Look for certifications from independent labs like NSF International, USP, or ConsumerLab. These verify that the product contains what the label says.

4. Research the Company’s Track Record

Check for a verifiable business address, responsive customer service, clear refund policies, and a history of transparent communication.

5. Consult Your Healthcare Provider

This isn’t just a disclaimer — it’s practical. Your doctor can evaluate whether a supplement’s ingredients are safe given your medications, health conditions, and goals. According to CDC guidelines on weight management, evidence-based approaches combining nutrition, physical activity, and behavioral strategies remain the most effective path to sustainable weight loss.

Common Mistakes When Choosing Weight Loss Supplements

  • Mistake 1: Confusing “natural” with “safe” or “effective.” Arsenic and hemlock are natural too. “Natural ingredients” is a marketing phrase, not a safety certification.
  • Mistake 2: Trusting review sites that sell the product. If the reviewer earns a commission from your purchase, their incentive is to sell — not to inform. Look for reviews from sources with no financial stake.
  • Mistake 3: Ignoring the “proprietary blend” label. This single phrase should immediately prompt skepticism. Reputable supplement companies disclose every ingredient and its exact dosage.
  • Mistake 4: Expecting supplements to replace fundamentals. No capsule can substitute for a caloric deficit, regular physical activity, and adequate sleep. Supplements are — at best — marginal additions to a strong foundation.
  • Mistake 5: Not checking the company’s current status. As Meticore demonstrates, supplement companies can disappear. Before purchasing, verify that the company is actively operating and reachable.

Who Should Consider Metabolism Supplements — and Who Should Avoid Them

May benefit from evidence-based metabolism support:

  • Adults with confirmed nutrient deficiencies (e.g., B12, iron) contributing to fatigue
  • Individuals who have consulted a healthcare provider and been recommended specific supplementation
  • People using supplements as a small addition to an established diet and exercise routine

Should avoid metabolism supplements (or proceed with extreme caution):

  • Anyone expecting a “magic pill” for weight loss without lifestyle changes
  • People taking prescription medications (especially blood thinners, diabetes drugs) without doctor approval
  • Pregnant or nursing individuals
  • Anyone under 18
  • People with a history of eating disorders — supplements can reinforce unhealthy fixation on quick fixes

Final Verdict on Meticore

After reviewing the ingredients, the scientific claims, customer feedback, and current market status, here is our honest assessment:

Meticore reviews paint a mixed-to-negative picture for good reason. The product relied on a plausible-sounding but unproven mechanism, used a proprietary blend that prevented dosage verification, lacked any clinical trials on its specific formula, and has now apparently exited the market entirely.

The core body temperature theory has a basis in real science — but Meticore’s application of that science was never validated through rigorous research. Most users who reported positive results were also making diet and exercise changes, making it impossible to attribute results to the supplement alone.

Our recommendation: Don’t attempt to purchase Meticore from third-party sellers. Instead, invest your time and money in evidence-based weight management strategies. If you’re interested in supplements, consult your healthcare provider and choose products with transparent ingredient labels, published clinical research, and third-party testing certifications.

Frequently Asked Questions

Q: What is Meticore and how does it claim to work?

Meticore is a dietary supplement that claims to boost metabolism by raising core body temperature. It contains a proprietary blend of natural ingredients including turmeric, ginger, moringa, and African mango extract. The manufacturer stated that low core body temperature causes slow metabolism and weight gain, and that Meticore could correct this. However, no clinical trials have tested this specific product.

Q: Does Meticore actually work for weight loss?

There is no published clinical evidence demonstrating that Meticore’s specific formula produces weight loss in humans. While some individual ingredients have been studied for various health benefits, those studies used specific dosages that Meticore’s proprietary blend does not disclose. Users who reported positive results were typically also changing their diet and exercise habits.

Q: Is Meticore a scam?

Meticore was a real, manufactured product — not a phantom operation. However, its marketing claims significantly overstated what the available scientific evidence supports. The lack of clinical trials on the specific formula, combined with a proprietary blend that hides dosages and aggressive affiliate marketing, justifies skepticism about the product’s effectiveness.

Q: What are the side effects of Meticore?

Reported side effects include digestive discomfort (nausea, bloating), headaches, and potential allergic reactions to plant-based ingredients. Turmeric and ginger can interact with blood-thinning medications, and chromium may affect blood sugar levels. Consult your healthcare provider before taking any dietary supplement.

Q: Is Meticore still available to buy in 2026?

As of 2026, Meticore’s official website appears to be offline, and the product seems to be discontinued. Some third-party sellers may still list it on platforms like Amazon or eBay, but purchasing from these sources carries significant risks including counterfeit products, expired formulas, and no active refund policy.

Q: Is Meticore FDA approved?

No. The FDA does not approve dietary supplements in the same way it approves pharmaceutical drugs. Supplements are not required to prove safety or effectiveness before being marketed. While Meticore may have been manufactured in a GMP-certified facility, the product itself was never FDA evaluated or approved.

Disclaimer

This review is for informational purposes only and does not constitute medical advice. Always consult a licensed healthcare professional before starting, stopping, or changing any supplement or weight loss plan.

Treadmill Desk: Benefits, Setup & Guide (2026)

0

The average office worker spends more than 10 hours a day sitting. That number climbs higher for remote workers who skip the commute and rarely leave their desk. The health consequences are well documented — higher risks of cardiovascular disease, metabolic disorders, and chronic back pain.

A treadmill desk offers a surprisingly simple fix. It lets you walk at a slow, comfortable pace while answering emails, joining calls, and working through your to-do list. No gym clothes. No separate workout block. Just low-effort movement built directly into your workday.

This guide covers everything you need to know before buying or building a treadmill desk setup — from how it works and what the research actually says, to ergonomic setup, the types available, and who should (and shouldn’t) use one.

Key Takeaways

  • What is a treadmill desk? → A workstation that pairs a slow-speed treadmill with a height-adjustable desk so you can walk while working.
  • Why use one? → Reduces the health risks of prolonged sitting, burns 100+ extra calories per day, and can improve focus and creativity.
  • Best walking speed? → 1–2 mph for most work tasks; slow enough to type comfortably.
  • Treadmill desk vs. standing desk? → More active, higher calorie burn, but requires a short adaptation period.
  • Who should skip it? → Those doing precision-heavy tasks (CAD, graphic design) all day or working in very small spaces.

What Is a Treadmill Desk?

A treadmill desk is an active workstation that combines a low-speed treadmill with a desk surface, allowing you to walk at a gentle pace while performing everyday work tasks. Unlike gym treadmills designed for running, treadmill desks typically max out at 2–4 mph and prioritize quiet, continuous operation over speed.

The concept is built around one idea: replace hours of sitting with hours of light walking — without interrupting your productivity.

How Treadmill Desks Work

The treadmill component runs at walking speeds between 0.5 and 2 mph. A height-adjustable desk sits above or beside it, positioned so your elbows rest at roughly 90 degrees while you type. Most setups include a simple control panel for speed adjustments and basic metrics like steps, distance, and calories.

The key mechanical difference from a fitness treadmill is the motor. Treadmill desks use continuous-duty motors rated for 6–9 hours of daily use at low speeds. Fitness treadmills use intermittent-duty motors built for shorter, higher-intensity sessions. This distinction matters for durability and noise.

Key Components

Every treadmill desk setup has three parts:

  • Treadmill base — A low-profile walking belt with a quiet motor (typically 2–3 CHP)
  • Desk surface — Usually a height-adjustable standing desk (electric or manual)
  • Controls — Speed adjustment, step counter, and sometimes app connectivity

Health and Productivity Benefits of a Treadmill Desk

The benefits of a treadmill desk go beyond “getting more steps.” Research points to measurable improvements in both physical health and mental performance.

Physical Health Benefits

Prolonged sitting slows your metabolism, compresses your spine, and raises your risk of chronic disease. Research from the National Institutes of Health highlights observational studies showing that excessive sedentary time is associated with increased rates of heart disease, type 2 diabetes, and certain cancers — an association, not proof of direct causation.— an association, not proof of direct causation.

Walking on a treadmill desk — even at 1 mph — counteracts several of these risks:

  • Cardiovascular health — Light walking improves blood flow and enhances flow-mediated dilation (FMD), an early marker of heart health.
  • Metabolic function — Movement after meals reduces blood sugar spikes and improves insulin sensitivity. Fasting triglyceride levels also tend to decrease with regular use.
  • Musculoskeletal relief — Walking reduces spinal compression and can ease chronic lower back pain. Weight-bearing movement also supports bone density.
  • Reduced sedentary time — Users typically walk an additional about 2,000+ steps and burn around 100 extra calories per hour compared to sitting, based on small workplace studies rather than guaranteed results.

Mental and Cognitive Benefits

Walking doesn’t just move your body — it changes your brain chemistry. Increased blood flow delivers more oxygen and glucose to the brain, supporting sharper focus and better memory retention.

Here’s what the research shows:

  • Creativity — A Stanford University study on walking and creativity found that walking boosts creative output by an average of 60% compared to sitting.
  • Focus and alertness — Users commonly report fewer afternoon slumps and more sustained energy throughout the day.
  • Mood and stress — Movement triggers endorphin release, which helps lower anxiety and improve overall mood.
  • Cognitive trade-off — Research from Brigham Young University found a modest 9% decrease in typing speed and a small dip in working memory during walking. For most knowledge workers, this trade-off is minimal — especially at speeds below 1.5 mph.

People who use a treadmill desk often report better focus and less fatigue compared to sitting all day. Some studies have found that workers on treadmill desks can perform common office tasks nearly as well as those seated, while also reducing feelings of tiredness and discomfort over time. This combination of light movement and maintained productivity is a key benefit for many desk workers.

Weight Management and Calorie Burn

Walking at 1.5 mph on a treadmill desk typically burns about 100–130 extra calories per hour compared to sitting, depending on body weight and pace, depending on body weight and pace. Over a full workday, that adds up to 300–500+ additional calories burned.

That alone won’t transform your body composition. But combined with consistent use over months, treadmill desks contribute meaningfully to weight management — particularly for people who currently get little to no daily movement.

Types of Treadmill Desks

integrated treadmill desk and under desk walking pad setup
Different treadmill desk setups for various workspaces

Not all treadmill desks are built the same. The right type depends on your workspace, budget, and how much you want to customize.

Feature Integrated Treadmill Desk Under-Desk Treadmill (Walking Pad) DIY Setup
What it is Complete unit: treadmill + desk sold together Compact treadmill that slides under an existing standing desk Treadmill + desk arranged manually
Best for Dedicated home offices with space Flexible setups, smaller spaces Budget-conscious users with existing equipment
Price range $1,000–$2,500+ $200–$800 Varies widely
Ease of setup Plug and play Simple — pair with any standing desk Requires trial and error
Portability Low (heavy, large) High (many fold flat for storage) Medium
Noise level Generally quiet Varies by model Depends on treadmill

Integrated Treadmill Desks

These are purpose-built workstations where the treadmill and desk are designed to work together. Brands like iMovR and LifeSpan offer integrated units with optimized desk heights, cable management, and matched motor ratings.

Best for: Users who want a premium, no-compromise setup and have dedicated space.

Under-Desk Treadmills (Walking Pads)

Under-desk treadmills are the most popular option. They’re compact, foldable, and designed to slide under a standing desk you already own. Models from WalkingPad, Urevo, and Sperax are common choices.

Best for: Remote workers who want flexibility, portability, and a lower price point.

How to Set Up Your Treadmill Desk (Ergonomic Guide)

correct ergonomic posture using a treadmill desk
Correct posture improves comfort and productivity

A treadmill desk only works if the ergonomics are right. Get the setup wrong, and you’ll create posture problems worse than sitting.

Desk Height and Monitor Placement

  • Adjust your desk so your elbows bend at 90–120 degrees while typing. Remember to account for the treadmill’s step-up height (usually 5–6 inches above the floor).
  • Position your monitor at arm’s length, with the top of the screen at or slightly below eye level.
  • If you use multiple monitors, consider switching to one while walking. Turning your head side to side while in motion can strain your neck.

Following workplace ergonomic guidelines from NMSU’s Environment, Health & Safety department helps ensure a neutral body position that minimizes strain.

Keyboard, Mouse, and Posture

  • Keep your wrists straight and parallel to the desk surface. A split keyboard or ergonomic keyboard can help.
  • Use a trackball mouse instead of a standard mouse — it’s easier to control while walking.
  • Stand tall with relaxed shoulders. Avoid leaning forward into the screen.
  • Wear supportive walking shoes or athletic shoes. Slippers and bare feet increase fatigue and reduce stability.

The Sit-Stand-Walk Rotation Protocol

sit stand walk rotation workflow for treadmill desk users
Alternating between walking sitting and standing improves results

The biggest mistake treadmill desk users make is trying to walk all day. Your body needs variety. Here’s a structured rotation framework:

Time Block Position Best Tasks
First 90 min Walk (1–1.5 mph) Email, Slack, light reading, phone calls
Next 60 min Sit Deep focus work, writing, complex analysis
Next 60 min Stand Meetings, brainstorming, reviewing documents
Next 90 min Walk (1–1.5 mph) Admin tasks, project updates, research browsing
Final 60 min Sit End-of-day wrap-up, detailed tasks

Rules of thumb:

  • Walk for tasks that require moderate focus (emails, calls, reading)
  • Sit for tasks requiring high precision or deep concentration
  • Stand for meetings and collaborative work
  • Alternate positions every 60–90 minutes
  • Start with 2 walking sessions per day and increase gradually

Treadmill Desk vs. Standing Desk

Both treadmill desks and standing desks reduce sitting time. But they’re not interchangeable. Here’s how they compare:

Factor Treadmill Desk Standing Desk
Calorie burn 100–130 cal/hr extra 20–50 cal/hr extra
Movement level Active (continuous walking) Static (standing in place)
Noise Some motor/footstep noise Silent
Space needed Large (treadmill footprint) Moderate (desk footprint only)
Price range $200–$2,500+ $150–$1,500
Learning curve 2–4 weeks to adapt Minimal
Best for Extended active movement throughout the day Reducing sitting with minimal setup change
Risk Slight typing speed reduction Leg/foot fatigue from prolonged standing

When to Choose a Treadmill Desk

A treadmill desk makes sense if you want consistent, low-effort movement during work hours and your tasks don’t require precision mouse control. It’s ideal for remote workers, knowledge workers, and anyone managing a desk-bound job with limited exercise time.

When a Standing Desk Is Better

A standing desk is the simpler, quieter option. It works well in shared offices, requires no adaptation period for most tasks, and costs less. If you need absolute stability for precise work, standing beats walking.

The best approach for most people? A sit-stand-walk workstation that lets you alternate all three positions throughout the day.

Common Mistakes to Avoid

Most treadmill desk setups fail not because the product is wrong — but because the habits are. Here are the most common mistakes:

  1. Walking too fast — Anything above 2 mph makes typing, mousing, and reading significantly harder. Stick to 1–1.5 mph for work tasks.
  2. Wrong desk height — If your desk doesn’t account for the treadmill’s step-up height, your wrists and shoulders will pay. Measure carefully.
  3. Skipping proper footwear — Walking in socks, sandals, or bare feet increases fatigue and reduces stability. Wear supportive shoes.
  4. Trying to walk all day — The goal is movement variety, not maximum walking time. Use the sit-stand-walk rotation.
  5. Ignoring noise in shared spaces — Some treadmills produce 50+ dB at working speed. If you’re in a shared office or take frequent calls, test noise levels before committing.
  6. Not adjusting your gait — Take slightly longer, smoother strides. Short, choppy steps tire you out faster and create more vibration.

Who Should Use a Treadmill Desk — and Who Should Skip It

Best for:

  • Remote and hybrid workers with a dedicated home office
  • Knowledge workers (writers, developers, project managers, analysts)
  • People managing weight or metabolic health goals
  • Anyone spending 8+ hours/day seated with limited exercise time

Not for:

  • Professionals doing precision-heavy tasks all day (graphic design, CAD, video editing) — the slight instability while walking makes fine mouse control harder
  • People with balance or mobility restrictions — consult a physician first
  • Very small workspaces — even compact walking pads need a clear 3×6 ft area
  • Shared open offices where noise is a dealbreaker

Final Verdict

A treadmill desk is one of the most practical ways to reduce sitting time without overhauling your schedule. The health benefits are real and well-supported — better cardiovascular health, improved metabolism, lower back pain relief, and a genuine boost in creativity and focus.

But it’s not a miracle device. It works when you pair it with the right ergonomic setup, use it in rotation with sitting and standing, and match your task to the right position. Most users who quit within 3 months do so because they tried to walk all day from day one.

Start with two 60-minute walking sessions daily. Build from there. If your work is primarily email, calls, and reading — a treadmill desk can transform your workday without sacrificing productivity.

Frequently Asked Questions

Q: How fast should you walk on a treadmill desk?

A: Most users find 1–1.5 mph comfortable for typing and reading. Speeds above 2 mph tend to reduce typing accuracy and make mousing difficult. Start slow and increase gradually as you adapt.

Q: Can you lose weight using a treadmill desk?

A: Yes, but it’s gradual. Walking at 1.5 mph usually burns around 100–130 extra calories per hour compared to sitting, so the effect on weight is gradual and depends on your overall routine., so the impact on weight is gradual and depends on your overall routine. Over weeks and months, this contributes meaningfully to weight management — especially when combined with a balanced diet.

Q: Are treadmill desks noisy?

A: Many under‑desk treadmills produce around 45–54 dB at walking speeds — roughly equivalent to a quiet conversation — but actual noise levels can vary significantly by model, speed, and flooring. If you take frequent calls or share office space, test before buying.

Q: How long should you use a treadmill desk each day?

A: Many users end up walking about 1–3 hours per day, broken into 60–90 minute sessions, once they’ve fully adapted. The key is alternating between walking, standing, and sitting — not walking continuously all day.

Q: Is it hard to type while walking on a treadmill desk?

A: There’s a short adaptation period (1–2 weeks). Research shows a modest 9% dip in typing speed at walking pace. Most users adapt quickly, especially at speeds below 1.5 mph.

Q: Treadmill desk vs. standing desk — which is better?

A: Both reduce sitting risks. Treadmill desks burn significantly more calories and provide active movement, but require adaptation and space. Standing desks are quieter, cheaper, and simpler. The ideal setup combines both in a sit-stand-walk rotation.

4 Advantages The Best Blood Flow Supplements Offer Users

Are you seeking the perfect blood flow supplement to improve cardiovascular health? If so, then you came to the right place. In this blog post, we’ll detail the advantages of top-of-the-line supplements and why they’re essential.

From enhancing nutrient delivery to increasing circulation, these four benefits will show you why taking a proactive approach to improving your veins and arteries is worth it. Everyone wants healthier blood vessels and improved overall health, so read on as we explore what makes supplements attractive.

1- Better Blood Pressure

Blood pressure is a significant health issue for many people worldwide, and investing in the best blood flow supplements can be managed it more effectively. Scientifically developed with natural ingredients, these supplements help increase circulation health while improving blood pressure numbers.

Blood flow supplements give you better results in your overall checkups, and lower blood pressure also helps reduce strain on your cardiovascular system. This means fewer episodes of shortness of breath, headaches, and other related issues over time, all thanks to the positive impact that blood flow supplements can provide.

2- Better sex

The best blood flow supplements have many advantages; one is better sex. Healthy blood circulation is essential for normal sexual arousal, as it helps to deliver oxygen and other vital chemicals to the erogenous zones. Increasing one’s overall blood flow enables more intense nerve stimulation, leading to enhanced pleasure during sex.

Hence, enhancing your circulation can be a great way to regain your passion in the bedroom. Blood flow supplements are packed with specific vitamins and minerals that promote nitric oxide production in the body, which significantly impacts one’s ability to get and maintain erections during sex.

3- Increased Energy Levels

Increasing energy is one of the fantastic advantages of taking the necessary steps to boost blood flow using supplements. Our bodies require healthy amounts of oxygen and nutrients to power our cells, so taking a blood flow supplement helps them move effectively throughout our body.

Stress can cause your body to struggle with tiredness or run down. Taking care of your blood vessels with these supplements will help prevent fatigue due to poor circulation. Good circulation ensures that your cells receive the necessary levels of nutrition and oxygen needed to stay energized.

4- Increased Mental Clarity

Blood flow supplements can have many benefits for our overall health. One of the most remarkable advantages is their ability to improve our mental clarity. Increasing blood flow allows the body’s cells to receive more oxygen, which helps enhance cognitive function and can provide the desired alertness and deep focus we require to tackle daily tasks.

4 Key Benefits of Top Blood Flow Supplements

Now that we’ve reviewed some advantages of the best blood flow supplements, it’s time to look at what these products can do for you. If you seek to improve your circulation and overall cardiovascular health, consider trying one supplement option.

Blood flow supplements can offer users better blood pressure, better sex, increased energy levels, and mental clarity. With so many benefits, it’s no wonder people are searching for these products.

Beat Muscle Loss During Perimenopause: Diet & Exercise

0

Introduction

Are you in your 40s or 50s and noticing that everyday tasks feel harder? You’re not alone.

Many women going through perimenopause face an invisible challenge: muscle loss. It happens slowly, so you might not notice it at first. But over time, you may find that:

  • Carrying groceries feels heavier
  • Your jeans fit differently despite the same weight
  • You feel less steady on your feet
  • Simple tasks leave you more tired

The good news? You can fight back. With the right foods and exercises, you can keep your muscles strong and even build new ones.

This guide will show you exactly how to do it. No complicated medical terms or impossible workout plans. Just simple, proven strategies that fit into your real life.

What Is Muscle Loss?

As women get older, they lose muscle. This happens faster during perimenopause.

Muscle loss has a medical name: sarcopenia. It means your muscles get smaller and weaker over time.

This isn’t just about looks. Weak muscles can cause:

  • Falls and injuries
  • Trouble doing daily tasks
  • Lower energy levels
  • Weaker bones
  • Loss of independence

Why Does This Happen During Perimenopause?

Your body makes less estrogen during perimenopause. Estrogen helps keep muscles strong.

When estrogen drops, your muscles break down faster than they rebuild. This makes the natural aging process worse.

Signs you might be losing muscle:

  • Heavy things feel harder to lift
  • Climbing stairs is more difficult
  • Getting up from chairs takes more effort
  • You feel tired more often
  • Your body shape changes even if weight stays the same

The psychological impact can be just as hard. You might feel less confident or worry about becoming frail.

The Power of Protein

Protein is like food for your muscles. It helps repair and build muscle tissue.

During perimenopause, your body needs more protein than before. Aim for 20 grams of protein at each meal.

Your body becomes less efficient at using protein as you age. That’s why you need to eat more of it to get the same muscle-building benefits.

Easy Ways to Add Protein:

Breakfast Options:

  • 2 eggs = 12 grams protein
  • Greek yogurt (1 cup) = 15-20 grams
  • Protein smoothie with milk = 15-25 grams
  • Tofu scramble = 10-15 grams
  • Quinoa bowl with nuts = 12-15 grams

Lunch and Dinner Ideas:

  • Chicken breast (3 oz) = 25 grams
  • Fish fillet = 20-25 grams
  • Black beans (1 cup) = 15 grams
  • Lentils (1 cup) = 18 grams
  • Chickpeas (1 cup) = 12 grams

Protein-Rich Snacks:

  • Almonds (1/4 cup) = 6 grams
  • String cheese = 8 grams
  • Hard-boiled egg = 6 grams
  • Hummus with veggies = 4-6 grams
  • Pumpkin seeds (1/4 cup) = 8 grams

Plant vs. Animal Protein

Both work well for building muscle. Animal proteins contain all the building blocks your muscles need. Plant proteins work too, but eat different types throughout the day.

Good plant protein combinations:

  • Rice and beans
  • Quinoa with nuts
  • Hummus with whole grain pita
  • Peanut butter on whole grain bread

Special considerations:

  • Lactose intolerant? Try lactose-free dairy or plant milks
  • Vegetarian? Mix different plant proteins each day
  • Budget-conscious? Eggs and beans are affordable options

Strength Training: Your Secret Weapon

Lifting weights is the best way to fight muscle loss. It tells your body to keep and build muscle.

Don’t worry – you won’t get “bulky.” Women don’t have enough testosterone to build large muscles. You’ll get strong and toned instead.

Why Strength Training Works:

  • Forces muscles to grow stronger
  • Makes bones thicker and stronger
  • Speeds up metabolism (burns more calories all day)
  • Improves balance and prevents falls
  • Boosts confidence and mood

Getting Started Safely:

Week 1-2: Learn the Movements

  • Use light weights or no weights
  • Focus on doing exercises correctly
  • Do 2 sessions per week
  • Rest 2-3 days between workouts

Week 3-4: Add More Weight

  • Increase weight when exercises feel easy
  • Aim for 8-12 repetitions
  • Rest 1-2 minutes between exercises
  • Continue 2 sessions per week

Week 5+: Keep Growing

  • Add weight every 1-2 weeks
  • Try new exercises
  • Consider working with a trainer
  • Increase to 3 sessions per week if desired

Simple Home Exercises:

No Equipment Needed:

  • Squats (for legs and glutes)
  • Push-ups (for arms and chest)
  • Planks (for core strength)
  • Lunges (for legs and balance)

With Basic Equipment:

  • Dumbbells for arm exercises
  • Resistance bands for full body
  • Kettlebell for strength and cardio

Making Time for Exercise:

  • Start with 20-30 minutes, twice a week
  • Exercise in the morning before life gets busy
  • Do exercises while watching TV
  • Use lunch breaks for quick workouts
  • Find a workout buddy for motivation

Combining Diet and Exercise

Protein and strength training work best together. Think of it this way:

  • Protein gives your muscles the materials to grow
  • Exercise tells them to use those materials

Eat protein within 2 hours after exercising. This helps muscles recover and grow stronger.

The combination creates a powerful effect. Maintaining muscle strength becomes much easier when you do both consistently.

Other Important Factors

Sleep: When Muscles Repair

Your muscles repair themselves while you sleep. Aim for 7-8 hours each night.

Poor sleep hurts muscle growth by:

  • Reducing muscle repair
  • Increasing stress hormones
  • Making you hungrier for junk food
  • Lowering energy for exercise

Better sleep tips:

  • Keep a regular bedtime schedule
  • Avoid screens 1 hour before bed
  • Keep your room cool and dark
  • Limit caffeine after 2 PM

Stress Management

Too much stress releases hormones that break down muscle. Chronic stress can undo all your hard work.

Simple stress-busters:

  • Take 5-minute breathing breaks
  • Go for short walks outside
  • Try gentle yoga or stretching
  • Talk with friends regularly
  • Listen to calming music

Stay Hydrated

Water helps nutrients get to your muscles. It also helps remove waste products from exercise.

Hydration goals:

  • Drink water throughout the day
  • Check your urine – it should be light yellow
  • Drink extra water during and after exercise
  • Eat water-rich foods like fruits and vegetables

Avoid These Muscle Killers:

Smoking

  • Reduces blood flow to muscles
  • Slows healing and growth
  • Increases inflammation

Too Much Alcohol

  • Interferes with protein use
  • Disrupts sleep quality
  • Adds empty calories

Crash Diets

  • Cause muscle loss along with fat loss
  • Slow down metabolism
  • Make you weak and tired

Making It Work for Your Life

Busy Schedule Solutions:

Meal Prep Shortcuts:

  • Cook proteins in batches on weekends
  • Keep hard-boiled eggs ready
  • Stock up on Greek yogurt and nuts
  • Use protein powder for quick smoothies

Quick Exercise Options:

  • 15-minute bodyweight workouts
  • Resistance band exercises at your desk
  • Take stairs instead of elevators
  • Do squats while brushing teeth

Time-Saving Tips:

  • Use phone apps for quick workouts
  • Exercise while watching TV
  • Walk during phone calls
  • Park farther away for extra steps

Limited Budget Solutions:

Affordable Protein:

  • Eggs (cheapest complete protein)
  • Dried beans and lentils
  • Peanut butter
  • Canned fish
  • Chicken thighs (cheaper than breasts)

Free Exercise Options:

  • Bodyweight exercises at home
  • YouTube workout videos
  • Walking or jogging outside
  • Use water jugs as weights
  • Community center classes

Health Concerns:

If you have health issues:

  • Talk to your doctor before starting
  • Consider working with a physical therapist
  • Start very slowly and listen to your body
  • Focus on what you CAN do, not what you can’t
  • Modify exercises as needed

Understanding menopause and its effects on your body is crucial for making informed decisions about your health. A holistic perspective on menopause can help you navigate this transition with confidence and take control of your muscle health.

Your 4-Week Action Plan

Week 1: Start Simple

  • Add protein to each meal (aim for 20 grams)
  • Do bodyweight exercises 2 times
  • Track how you feel in a journal
  • Get 7-8 hours of sleep each night

Week 2: Build Habits

  • Try new protein sources
  • Add light weights or resistance bands
  • Continue 2 exercise sessions
  • Practice stress management techniques

Week 3: Increase Challenge

  • Add more weight to exercises
  • Try cooking one new protein recipe
  • Consider increasing to 3 exercise sessions
  • Focus on consistent sleep schedule

Week 4: Make It Sustainable

  • Evaluate what’s working
  • Plan for long-term success
  • Set goals for next month
  • Celebrate your progress!

Personalizing Your Approach

Everyone’s body is different. What works for your friend might not work exactly the same for you.

Consider your:

  • Current fitness level
  • Health conditions
  • Time availability
  • Food preferences
  • Budget constraints

Adjust as needed:

  • Start slower if you’re a beginner
  • Modify exercises for injuries
  • Choose proteins you enjoy eating
  • Find activities that feel fun, not like work

Listen to your body:

  • Some soreness is normal, sharp pain is not
  • Rest when you feel exhausted
  • Eat when you’re hungry
  • Celebrate small victories

The Bottom Line

Muscle loss during perimenopause is common but not inevitable. You can fight back with:

  1. Protein at every meal (aim for 20 grams)
  2. Strength training (2-3 times per week)
  3. Good sleep (7-8 hours nightly)
  4. Stress management (daily practice)
  5. Consistency (small efforts add up)

Start small and be patient with yourself. Building muscle takes time, but every day you take action is a day you’re getting stronger.

Remember: It’s never too late to start building muscle. Even small changes can make a big difference in how you feel and function.

Your future self will thank you for the strong muscles and healthy lifestyle you build today. Take the first step – your muscles are waiting!

How to Exercise Safely: 8 Essential Tips (2026)

0

Exercise is one of the most powerful things you can do for your health. It strengthens your heart, sharpens your mind, and adds years to your life. But here’s the catch — doing it wrong can sideline you with pulled muscles, stress fractures, or joint injuries that take weeks to heal.

The good news? Many common exercise injuries are highly preventable with the right habits.. Learning how to exercise safely isn’t complicated. It comes down to preparation, proper form, gradual progression, and knowing when your body is telling you to stop.

This guide covers everything you need to work out safely — whether you’re a complete beginner, getting back into fitness after a break, or managing a chronic condition. You’ll find structured tips, a pre-workout checklist, age-specific adjustments, and clear red flags that mean you should stop immediately.

Quick Safety Summary

exercise safety tips infographic
Key habits that help reduce injury risk during workouts.
  • Do I need a doctor first? Yes, if you have heart disease, diabetes, joint problems, are pregnant, or haven’t exercised in over a year.
  • How much should I do? Around 150 minutes of moderate exercise per week plus 2 days of strength training.
  • How much should I do? Around 150 minutes of moderate-intensity exercise per week plus 2 days of strength training (as recommended by the CDC’s Physical Activity Guidelines for Americans).
  • How do I keep it safe? Warm up, use proper form, follow the 10% rule, stay hydrated, and take 1–2 rest days weekly.
  • What should I stop for immediately? Sharp pain, chest discomfort, severe shortness of breath, dizziness, or feeling like you might faint.
  • Does safety change by age/condition? Yes — older adults focus more on balance and joint protection; chronic conditions and pregnancy need modified, lower-impact options.

What Does It Mean to Exercise Safely?

Safe exercise is physical activity performed in a way that maximizes health benefits while minimizing the risk of injury, illness, or overtraining. It involves proper preparation, correct technique, appropriate intensity progression, adequate recovery, and awareness of your body’s signals.

Why Exercise Safety Matters

Every year, millions of people sustain exercise-related injuries that could have been avoided. Sprains, strains, and overuse injuries account for the majority of gym-related emergency visits.

The irony is hard to miss. People start exercising to get healthier — and end up injured because they skipped the basics.

Safe exercise habits protect more than your muscles and joints. They also protect your motivation. An injury in your first month of training can derail your fitness journey for months.

How to Warm Up and Cool Down Properly

person doing dynamic warm up before workout
Dynamic warm-ups increase blood flow and prepare muscles for activity.

Skipping your warm-up is like starting a car in freezing weather and immediately flooring it. Your muscles, tendons, and joints need time to prepare for movement.

Dynamic Warm-Up Routine (5–10 Minutes)

A proper warm-up gradually increases your **heart rate and blood flow** to working muscles. This makes muscle fibers more elastic and responsive, reducing tear risk.

Follow this sequence before every workout:

  1. Light cardio — 2–3 minutes of brisk walking, jogging in place, or cycling
  2. Leg swings — 10 per leg, front-to-back and side-to-side
  3. Arm circles — 10 forward, 10 backward
  4. Bodyweight squats — 10 reps at a controlled pace
  5. orso rotations — 10 per side

[!TIP] Why this works: Warm muscles absorb force more effectively than cold muscles. Research suggests that a structured warm-up can significantly reduce injury risk, especially in higher‑demand sports and activities.

Cool-Down and Static Stretching (5–10 Minutes)

After your workout, spend 5–10 minutes bringing your heart rate back to resting levels. This prevents blood from pooling in your extremities (which can cause dizziness).

  • Walk slowly for 2–3 minutes
  • Hold static stretches for 20–30 seconds each — hamstrings, quads, calves, chest, shoulders
  • Focus on muscles you just worked
  • Never bounce during static stretches — hold steady

8 Essential Tips for Exercising Safely

1. Use Proper Form and Technique

person performing squat with proper form
Correct technique reduces injury risk during strength training.

Bad form is the fastest route to injury. When you lift with a rounded back, run with overstriding feet, or squat with caving knees, you’re loading joints and tissues in ways they weren’t designed for. Poor technique is also one of the leading causes of chronic back injury, which can sideline you for weeks or longer.

How to get it right:

  • Learn movements with bodyweight first before adding load
  • Use mirrors or record yourself to check alignment
  • If you’re unsure, book even one session with a certified personal trainer
  • Slow down — controlled reps are safer and more effective than fast, sloppy ones

2. Follow the 10% Rule for Progression

This is the single most underrated safety principle in fitness. The 10% rule states that you should increase your weekly training volume — distance, weight, or duration — by no more than 10% per week.

Why it matters: Your muscles adapt faster than your tendons, ligaments, and bones. Jumping from 20 minutes of running to 45 minutes in one week puts connective tissue at risk — even if your lungs can handle it.

Example:

  • Week 1: Running 10 km total
  • Week 2: Running 11 km total (10% increase)
  • Week 3: Running 12 km total

This applies to weight training too. If you squatted 60 kg this week, don’t jump to 75 kg next week.

3. Stay Hydrated Before, During, and After

person drinking water during workout
Staying hydrated supports performance and exercise safety.

Dehydration impairs your body’s ability to regulate temperature and deliver nutrients to working muscles. Even a 2% drop in hydration can reduce exercise performance and increase injury risk.

Practical hydration guide:

  • Before: Drink 400–600 ml of water 2 hours before exercise
  • During: Sip 150–200 ml every 15–20 minutes
  • After: Drink 500–700 ml within 30 minutes post-workout
  • In heat: Add an electrolyte solution for sessions over 60 minutes

4. Wear the Right Gear and Footwear

Your shoes matter more than your outfit. Worn-out shoes lose cushioning and support, increasing stress on your ankles, knees, and hips. If you lift weights regularly, using dedicated squat shoes can improve stability, form, and safety during heavy lower-body lifts.

  • Replace running shoes every 500–800 km (or every 6–8 months of regular use)
  • Choose shoes designed for your activity — running shoes for running, court shoes for tennis
  • Wear moisture-wicking fabrics to prevent chafing and overheating

5. Mix Cardio, Strength, and Flexibility

Doing only one type of exercise creates muscle imbalances and increases overuse injury risk. As recommended by NHS guidelines on starting exercise safely, a balanced routine includes:

  • Aerobic activity:150 minutes of moderate-intensity or 75 minutes of vigorous-intensity per week
  • Strength training:2+ sessions per week targeting all major muscle groups
  • Flexibility:Stretching 2–3 days per week

Cross-training challenges your body in different ways and prevents repetitive stress on the same tissues.

6. Listen to Your Body — Soreness vs. Pain

Not all discomfort is the same. Learning to distinguish normal soreness from injury signals is critical.

Signal What It Means What to Do
Mild muscle ache 24–48 hours after exercise (DOMS) Normal adaptation Continue exercising at reduced intensity
Sharp, sudden pain during movement Potential strain, tear, or sprain Stop immediately, apply RICE
Pain that persists more than 72 hours Possible overuse injury Rest and consult a professional
Joint pain (not muscle-related) Possible joint or ligament issue Stop the aggravating movement immediately

7. Schedule Rest and Recovery Days

Rest isn’t laziness — it’s where adaptation happens. Your muscles repair and grow stronger during rest, not during the workout itself.

  • Take at least 1–2 full rest days per week
  • Allow 48 hours between strength training the same muscle group
  • Prioritize 7–9 hours of sleep per night — this is when human growth hormone peaks
  • Active recovery (walking, gentle yoga, swimming) is fine on rest days

8. Be Mindful of Your Environment

Your surroundings affect your safety more than you might think.

  • Hot weather: Exercise in early morning or evening, wear light clothing, watch for heat exhaustion symptoms (nausea, dizziness, confusion)
  • Cold weather: Layer up, warm up longer, protect extremities
  • Outdoor running: Wear reflective gear at night, run against traffic, stay aware of surfaces
  • Home workouts: Ensure adequate space and stable flooring

Exercise Safety by Age and Condition

Safe exercise isn’t one-size-fits-all. What works for a 25-year-old marathon runner won’t work for a 70-year-old with arthritis. Here’s how to adjust.

Group Key Safety Priorities Recommended Focus
Beginners (any age) Form over intensity, gradual progression Bodyweight exercises, walking, light yoga
Adults 25–44 Progressive overload, injury prevention Compound lifts, HIIT with proper form, mobility
Adults 45–64 Joint protection, longer warm-ups Low-impact cardio, resistance training, flexibility
Seniors 65+ Balance training, fall prevention Chair exercises, tai chi, walking, supervised training
Pregnancy Modified positions, core safety Prenatal yoga, swimming, walking (avoid supine after 1st trimester)
Chronic conditions Medical clearance, adjusted intensity Work with a physiotherapist or exercise specialist

Safe Exercise for Beginners

If you haven’t exercised in months (or years), start with just 10–15 minutes of low-intensity activity, 3 days per week. Walking is a perfectly valid starting point — you don’t need a doctor’s clearance to go for a daily walk.

Build up gradually using the 10% rule. Most beginners who get injured do so in the first 4–6 weeks because enthusiasm outpaces conditioning.

Adjustments for Seniors and Older Adults

For adults over 65, the American Academy of Orthopaedic Surgeons recommends focusing on balance and fall prevention exercises alongside standard aerobic and strength work. Tai chi, water aerobics, and supervised resistance training are excellent choices.

Warm up for at least 10 minutes — older joints and muscles need more time to reach working temperature.

Exercising with Chronic Conditions or During Pregnancy

If you have heart disease, diabetes, high blood pressure, asthma, or joint conditions, get medical clearance before starting a new program. This isn’t about gatekeeping — it’s about getting the right intensity and exercise type for your situation.

During pregnancy, avoid exercises that involve lying flat on your back after the first trimester, high-impact jumping, or heavy overhead lifting. Prenatal yoga, swimming, and walking are safe and effective for most pregnant individuals.

Red Flags — When to Stop Exercising Immediately

Some signals mean you should **stop your workout right now** and seek medical help if symptoms persist.

Warning Signs During a Workout

  • Chest pain or pressure — could indicate a cardiac event
  • Severe shortness of breath disproportionate to effort
  • Dizziness, lightheadedness, or feeling faint
  • Sudden sharp pain in a muscle or joint
  • Nausea or vomiting during moderate activity
  • Heart palpitations** or irregular heartbeat
  • Numbness or tingling** in your extremities

When to See a Doctor

Consult a healthcare professional if:

  • Pain lasts more than 72 hours after exercise
  • You experience swelling that doesn’t subside with rest and ice
  • A joint feels unstable or gives way
  • You have recurring pain during the same movement pattern
  • You’re over 45 and starting vigorous exercise for the first time

Common Exercise Safety Mistakes to Avoid

These are the errors that send people to the physio’s office:

  • Skipping the warm-up — “I’ll save time” costs you weeks of recovery if you get injured
  • Doing too much too soon — violating the 10% rule is the #1 cause of beginner injuries
  • Ignoring pain — pushing through sharp pain turns minor strains into serious tears
  • Never taking rest days — overtraining syndrome causes fatigue, mood changes, and declining performance
  • Copying advanced exercises from social media — filmed highlights don’t show the years of training behind the movement
  • Neglecting flexibility and mobility work** — tight muscles restrict range of motion and increase strain risk
  • Exercising through illness** — a fever means your body is already fighting; adding exercise stress makes recovery harder

Who Should Prioritize Exercise Safety (And Who Can Relax)

This guide is especially important for:

  • Complete beginners starting their first exercise program
  • People returning to fitness after a long break or injury
  • Adults over 50 or those with joint concerns
  • Anyone managing a chronic health condition
  • Pregnant individuals

Less urgent for (but still relevant):

  • Experienced athletes with established routines and body awareness
  • People with regular access to coaching or personal training

Even seasoned exercisers get injured when they get complacent. The basics never stop mattering.

Final Verdict

Exercising safely doesn’t mean exercising timidly. It means being **strategic** — warming up properly, progressing at the right pace, listening to your body, and knowing when to push and when to rest.

The 10% rule, proper form, and scheduled recovery are your three non-negotiable foundations. Build every workout on them, and you’ll stay active, injury-free, and progressing for years to come.

Start where you are. Progress deliberately. And never skip the warm-up.

Frequently Asked Questions

Q: How long should I warm up before exercising?

A: Aim for 5–10 minutes of light cardio followed by dynamic stretches. Older adults and those exercising in cold weather should extend this to 10–15 minutes for adequate muscle and joint preparation.

Q: What is the 10% rule in exercise?

A: The 10% rule means increasing your weekly training volume — whether that’s distance, weight, or duration — by no more than 10% per week. This allows your tendons, ligaments, and bones to adapt alongside your muscles.

Q: Can I exercise every day safely?

A: You can be active daily, but avoid intense exercise targeting the same muscle groups on consecutive days. Schedule at least 1–2 full rest days per week and allow 48 hours between strength sessions for the same muscles.

Q: Should I exercise when I’m sick?

A: Use the “neck check.” If symptoms are above the neck (runny nose, mild congestion), light exercise is usually fine. If symptoms are below the neck (fever, body aches, chest congestion), rest until you recover.

Q: What are the signs I’m exercising too hard?

A: Watch for persistent fatigue, declining performance, mood changes, trouble sleeping, recurring injuries, and elevated resting heart rate. These are signs of overtraining and mean you need more recovery time.

Q: Do I need a doctor’s clearance before starting exercise?

A: For basic activities like walking, no. But consult a healthcare professional before starting vigorous exercise if you have heart disease, diabetes, high blood pressure, joint problems, or haven’t exercised in over a year.

error: Content is protected !!